7.4 Project 4: The Call of the Mermaid
The fourth project is a bit more complicated than the third. It uses
many of the techniques of the first three projects and adds several
more. The objective is to actually combine image elements from two
disparate sources, a young woman and a fish, to create a realistic and
alluring mythological creature--the mermaid.
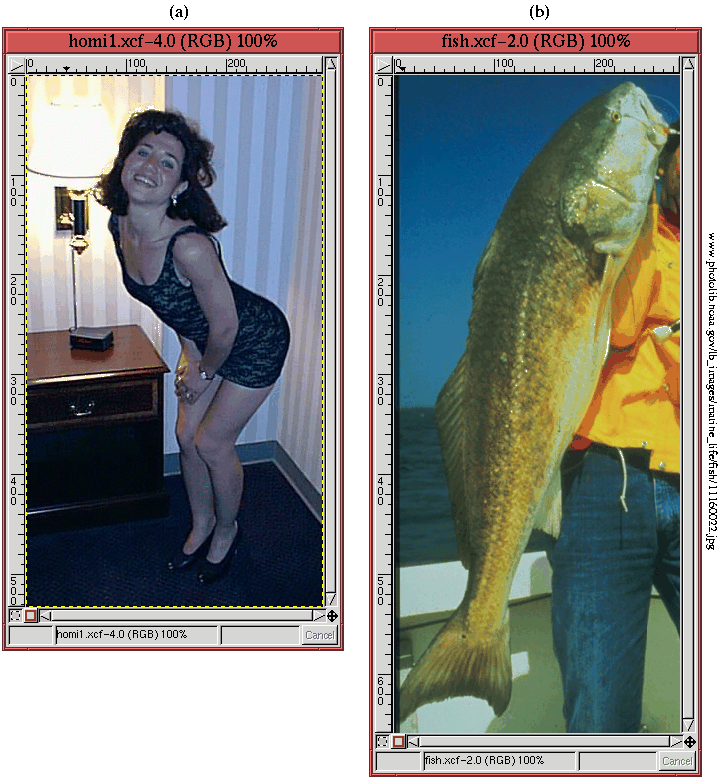
The raw image materials used to create the mermaid are shown in
Figure
7.24.
Figure 7.24:
Original Images of the Young Woman and the Fish
 |
The first step of this project is to fuse together parts of the young
woman and fish in a realistic way to create the mermaid. The second
step is to place the mermaid composite into an appropriate underwater
background scene.
To create the mermaid, the woman and the fish must be
selected and united into
a single image but on separate layers. The woman is selected using
the Decompose and Threshold technique described in
Section
4.5.3. The HSV option of the Decompose function is chosen, and Threshold is applied to the
resulting value component. The result is shown in
Figure
7.25(a).
Figure 7.25:
Using Threshold and the Lasso to Create a Mask
for the Woman
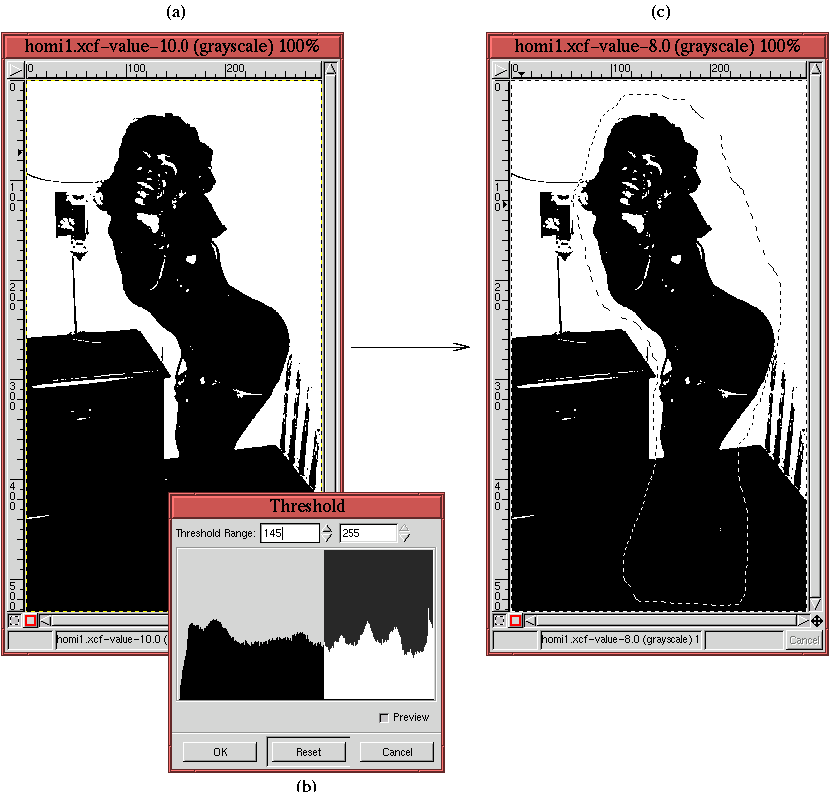 |
The range of values used with the
Threshold dialog is shown
in Figure
7.25(b).
The image shown in Figure
7.25(a) has
separated a large part of the subject from the background but requires
a little more work to achieve the desired result. First, there are
elements of the background that must be removed, and second, there are
holes in the subject that must be filled. Both tasks are relatively
easy to accomplish. The background is removed by following these
steps:
- 1.
- Draw a rough selection around the woman's silhouette using the Lasso tool. Make sure the path of the Lasso separates the
background from the woman.
- 2.
- Invert the resulting selection by typing C-i in the image
window. This phase is shown in
Figure
7.25(c).
- 3.
- Choose white as the Active Background Color by typing d
and then x in the image window.
- 4.
- Cut the selection by typing C-x in the image window.
Figure
7.26(a)
Figure 7.26:
Using the Paintbrush to Finish the Mask of the Woman
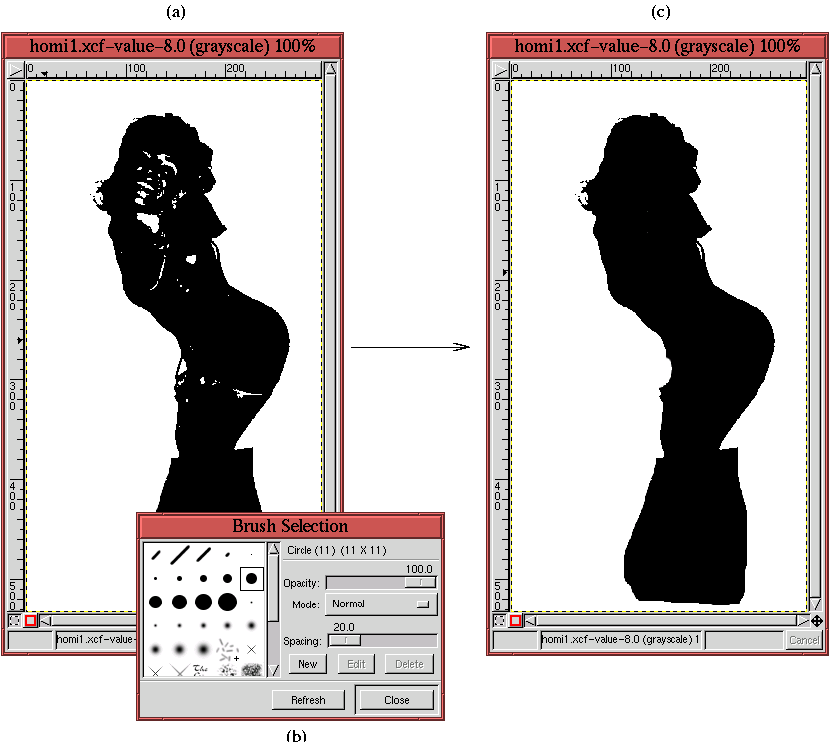 |
shows the result of having cut away the unwanted background. The
remaining work is to fill in the holes seen in
Figure
7.26(a) using the
Paintbrush
tool. As shown in Figure
7.26(b), a medium
hard brush is chosen for this.
Figure
7.26(c) shows the final mask.
Although the lower portion of the woman's legs are not cleanly
separated from the background, this is remedied shortly.
The next task is to create a layer mask for the image in Figure
7.24(a)
and to paste into it the grayscale image shown in
Figure
7.26(b). This is done in the
following steps:
- 1.
- Invert the black and white regions of the image in
Figure
7.26(b) using Invert from the
Image:Image/Colors menu.
- 2.
- Copy the resulting grayscale image to the default buffer by typing
C-c in the image window.
- 3.
- Create a layer mask for the image in
Figure
7.24(a) by opening the Layers dialog and
choosing Add Layer Mask from the
Layers menu.
- 4.
- Paste the default buffer's contents into
Figure
7.24(a) by typing C-v in the image
window.
- 5.
- Drop the resulting float into the layer mask by clicking on the
Anchor button in the Layers dialog.
The effect of the layer mask on the image is shown in
Figure
7.27(a),
Figure 7.27:
Applying a Layer Mask to the Woman
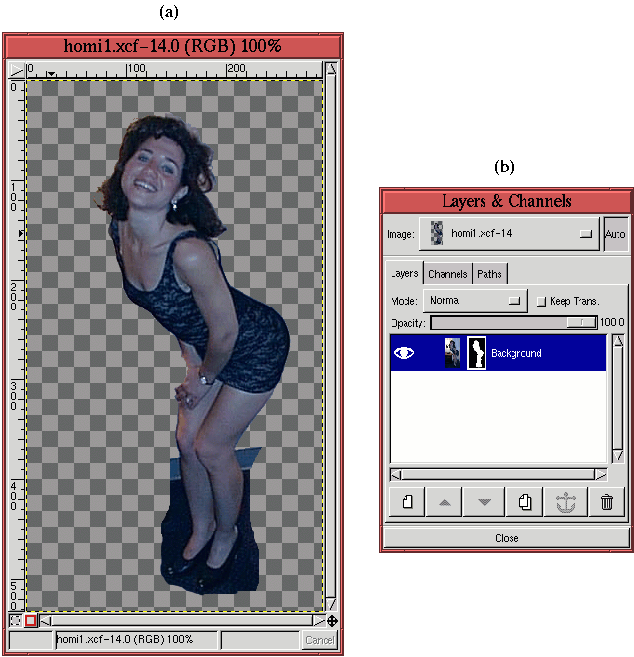 |
and the thumbnail of the mask can be seen in the Layers dialog shown
in Figure
7.27(b).
Now that the layer mask is in place, the remaining parts of the
background around the woman's lower legs are removed by painting away
the offending parts of the layer mask with black paint using the Paintbrush tool.
The Decompose and Threshold technique is the easiest
method for selecting the woman. She presents a relatively difficult
selection using any other tool. In particular, the outline of her
hair would have been an especially thorny problem. In comparison, the
parts of the fish that are needed for the project present a simple
outline that can easily be selected using the Bezier Path tool.
This step is not illustrated here, but the Bezier Path tool is
described in detail in Section
3.1.1.
The selection of the woman and the fish are now united into a single
image, as shown in
Figure
7.28(a).
Figure 7.28:
Uniting the Pieces
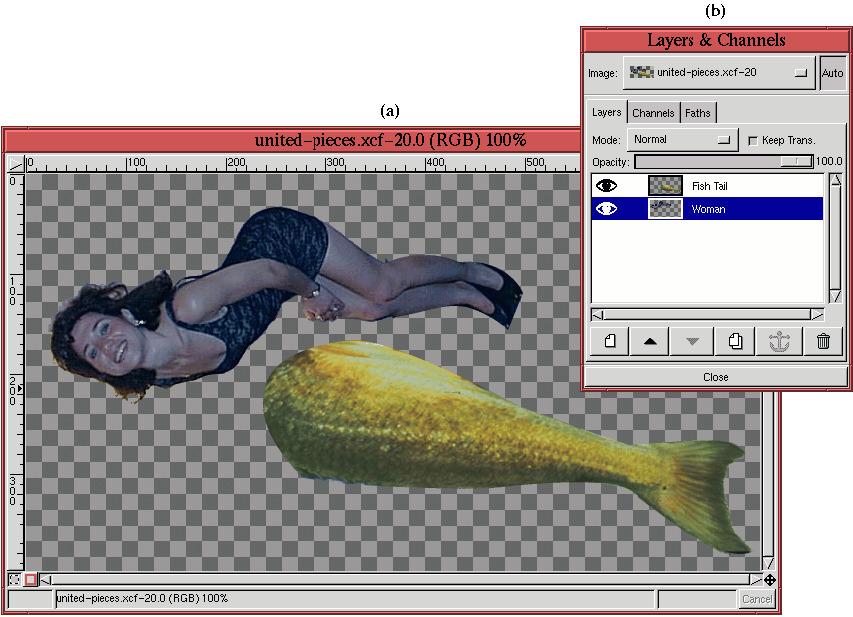 |
Figure
7.28(b), which shows the Layers dialog,
indicates that the woman and the fish each reside in separate layers.
Note that both images have been rotated 90
o with respect to their
original orientations. This properly orients our mermaid in
preparation for inserting her into her final underwater setting.
At this stage, we are ready to begin melding the two image components
together. The strategy is to take pieces of the fish's tail and
appropriately fuse them onto the woman's body. The fish's tail is too
large to superimpose in one piece; thus, it is cut into two parts
using the Lasso tool. Using the Move
tool, the bottom part, the tail fin, is repositioned over the lower
part of the woman's legs. This is shown in
Figure
7.29.
Figure 7.29:
Flipping and Positioning the Tail Fin
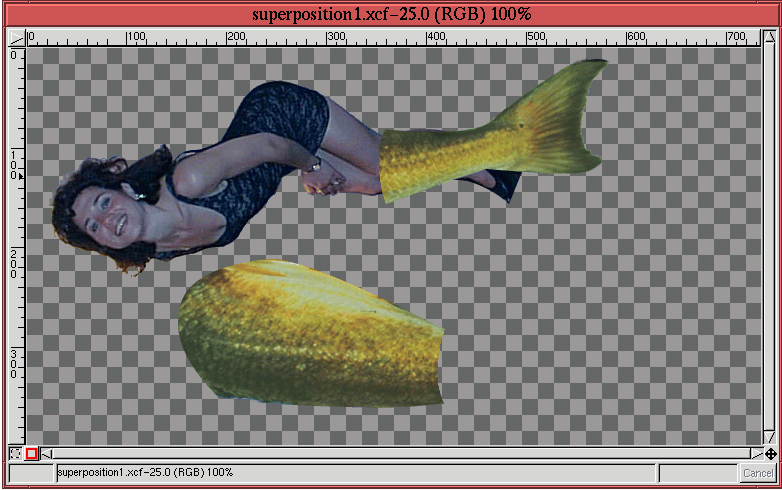 |
Notice that I vertically flipped the tail fin (using the Flip tool) because that orientation looked better to
me. The positioning of the tail fin over the woman's legs was
facilitated by using the Opacity slider in the Layers dialog.
To convincingly fuse the tail fin to the woman's lower legs, a layer
mask is needed. The layer mask, which is applied to the Tail Fin
layer, is used to mask off the parts that extend beyond the boundaries
of the woman's legs. Figure
7.30(a)
Figure 7.30:
Fusing the Tail Fin to the Woman's Lower Legs
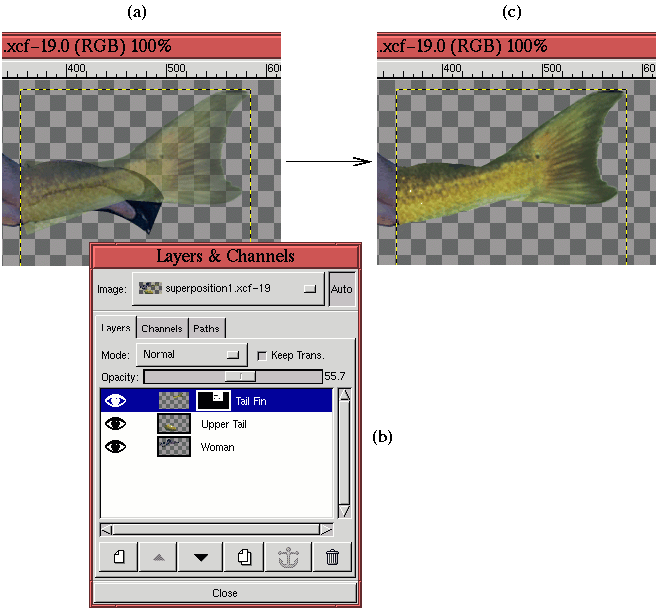 |
shows that the Tail Fin layer has been made partially transparent to
allow the woman's legs to be seen through it.
Figure
7.30(b) shows the corresponding Layers
dialog. The Tail Fin layer mask is highlighted in the Layers dialog
and the Opacity slider set to 56%.
The Paintbrush and Airbrush tools
were used to mask off parts of the tail fin in
Figure
7.30(a). The Eraser tool was used to remove the parts of the woman's feet that
extend out beyond the tail fin. The result, after returning the
Opacity slider to 100% in the Layers dialog, is shown in
Figure
7.30(c). The tail fin now seems to be
fused onto the woman's legs.
Figure
7.31
Figure 7.31:
Fusing the Remainder of the Tail and Correcting for Image
Inconsistencies
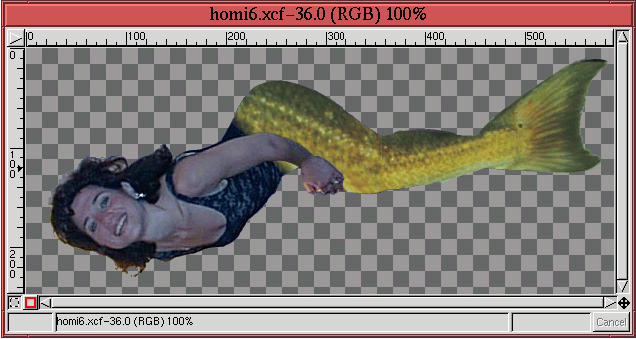 |
shows the image after performing a similar sequence of fusing the
upper part of the fish's tail to the woman's body between her waist
and her knees. As before, a layer mask is used to perform the fusion.
Also, in order to better align the highlight in the scales of the tail
with the axis of the woman's upper legs the
Rotation option from
the
Transform tool is used.
In addition to fusing the tail to the woman's body,
Figure
7.31 also shows that her wrist watch has
been removed with the Clone tool. Let's hope
she wasn't too attached to it. The Clone tool was also used to
remove some overly bright highlights in her face (for more on how to
use the Clone tool see Section
6.3). Finally,
the image was cropped to the dimensions seen in
Figure
7.31.
It is now time to insert our siren of the sea into a scene reflecting
her natural habitat, swimming with her faithful fishy companions along
a reef, undoubtably somewhere in the south Pacific. The insertion of
the mermaid into the scene was accomplished by first merging all the
layers used to create Figure
7.31, applying the
layer mask, and then copying and pasting the result into the
underwater image. As usual, the paste gives rise to a floating
selection, which is then dropped into a new layer using the New
Layer button in the Layers dialog. The Move tool is used to
position the Mermaid layer and the result is shown in
Figure
7.32.
Figure 7.32:
The Mermaid Placed into an Underwater Scene
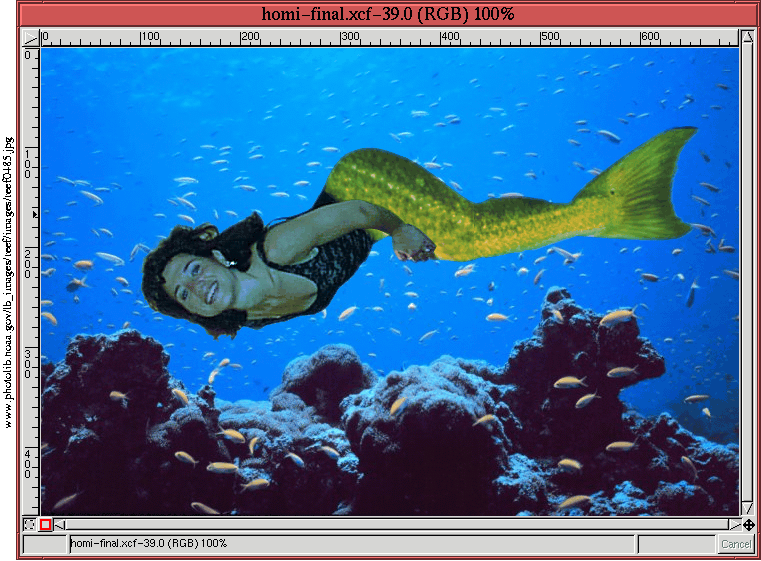 |
Actually, the result in Figure
7.32 also displays
an additional finesse. The obvious sunburn of our underwater beauty,
as seen in Figure
7.31, has been color corrected
to a tint more in keeping with her new environment. This is
accomplished using the perturbation technique for the Curves tool, as
described in Section
6.2.5. The result is
that her skin color has been changed to a mild bluish-green tint.
Looking at Figure
7.32, the edge between the
mermaid's upper body and the blue of the background waters seems fine.
However, the edge of her yellow tail seems a little too abrupt, too
sharp. It looks as if this part of her body were cut out of another
image and pasted into this one. Indeed, it was. So, as a final
attention to detail, it would be nice to diminish the abruptness of
this edge. You can do this using a clever technique based on the Border function found in the Image:Select menu (see Section
3.3.9).
The idea is to blur
together the background and the mermaid in a narrow region around the
mermaid's edge. To do this, follow these
Figure 7.33:
Using Border and Gaussian Blur (IIR) to Soften the
Cut-Out Look of the Mermaid's Edge
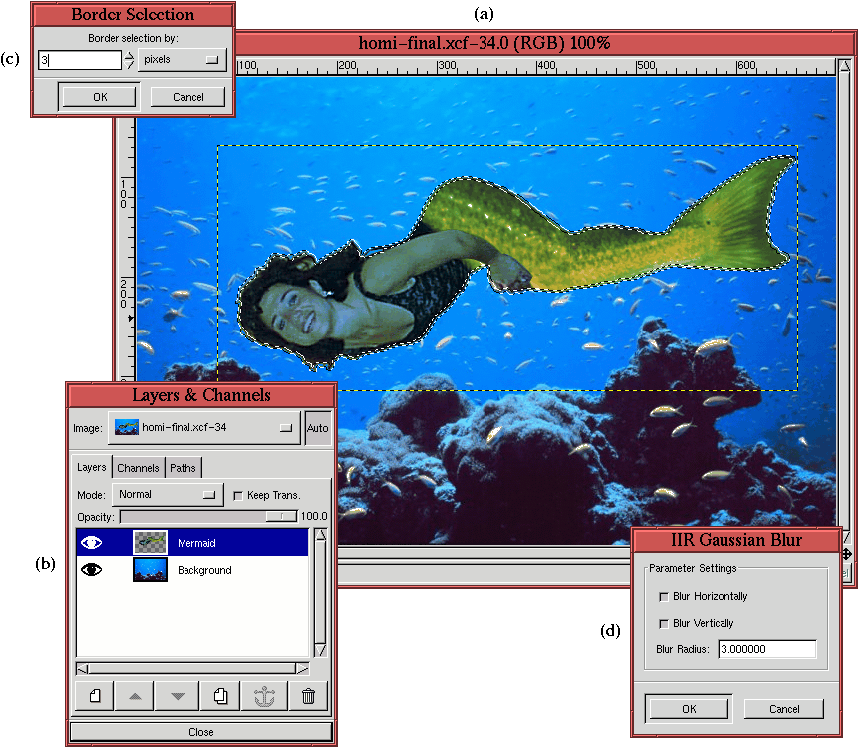 |
steps while referring to Figure
7.33:
- 1.
- Activate the Mermaid layer by clicking on her thumbnail in the
Layers dialog (shown in Figure
7.33(b)).
- 2.
- Create a selection of the mermaid using Alpha to
Selection from the Layers menu.
- 3.
- Use the selection to make a border 3 pixels wide using Border
(Figure
7.33(c) shows the Border tool's
dialog, and Figure
7.33(a) illustrates the
selection result).
- 4.
- Merge the Mermaid layer into the background by typing C-m in the Layers dialog or the image window.
- 5.
- Apply Gaussian Blur (IIR)
with a radius of 3 pixels (Figure
7.33(d) shows
the dialog for this filter).
- 6.
- Remove the selection by typing C-S-a in the image window.
The final result gives a much softer edge between the mermaid and the
background. This is shown in Figure
7.34.
Figure 7.34:
The Final Mermaid Composition
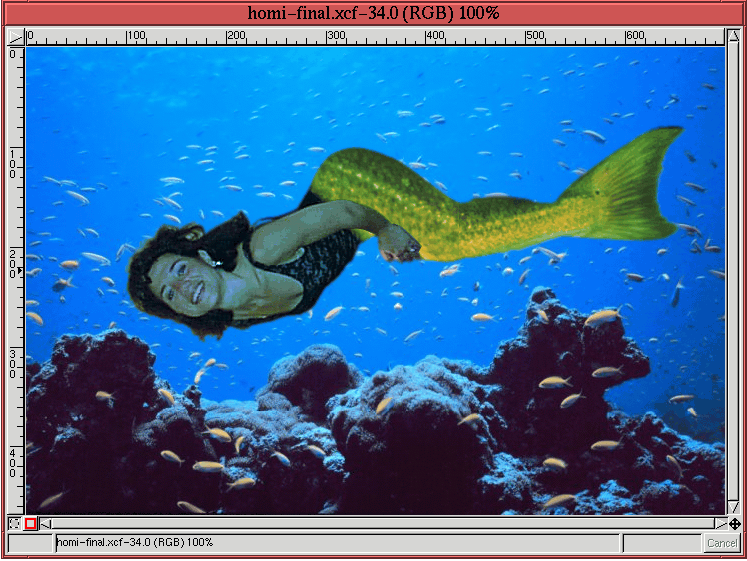 |
To summarize, this project illustrates how layer masks, in conjunction
with many other tools, can be used to literally fuse together image
elements. This project also shows how the Border tool can be
used to finesse the edges of composited images.
©2000 Gimp-Savvy.com
