Subsections
6.4 Sharpening
Due to a whole range of issues, the acquisition and digitization of an
image can often produce a slightly blurred or out-of-focus result.
Furthermore, the ensuing processing to improve tonal range and
contrast can also deteriorate the crispness of the image. To remedy
this, it is desirable to sharpen things up. Sharpening is usually
applied at the end of the processing sequence after all other
modifications have been made.
In the GIMP, there are two tools for sharpening an image; they are
both located in the menu Image:Filters/Enhance. These tools are
called Sharpen and Unsharp Mask. Although the underlying
principles of the two are the same, I prefer Unsharp Mask
because it has several parameters that have intuitive meanings and
that provide more control over the sharpening process. The remainder
of this section describes in detail how to use Unsharp Mask.
6.4.1 The Unsharp Mask Concept
Before knowing the sharp, little grasshopper, you must first become
one with the unsharp. Wheeew...that sounds like a bad episode of
Kung Fu. I'm expecting David Carradine to peak out from behind my
monitor any moment now! The truth is, though, that Unsharp
Mask, as arcane and counter-intuitive as its name may sound, is an
excellent tool for sharpening. The principle of the Unsharp
Mask and the ins and outs of this special filter are covered in this
section.
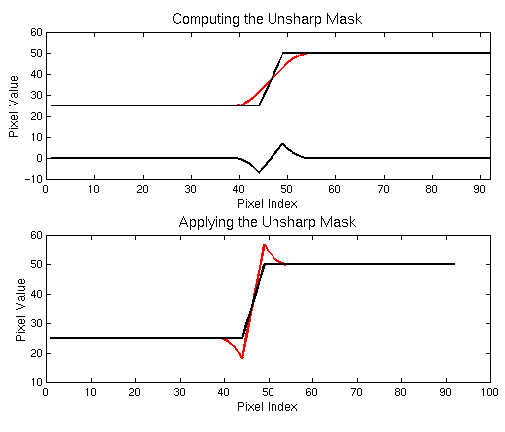
Figure
6.32
Figure 6.32:
Understanding the Unsharp Mask
 |
illustrates the principle of the
Unsharp Mask. The upper black
line graphed in the top part of the figure represents pixel values as
a function of pixel index. For example, this line could represent the
color values along the row of an image. The graph shows a transition
from a lower to a higher pixel value at the middle of the graph.
Visually, if you were looking at this row of pixels in an image, it
would appear as an edge between regions of constant value.
The red line in the upper graph of Figure
6.32
illustrates how the pixel values change if the row of pixels is
blurred. The resulting red curve is a smoothed version of the
original. If you viewed the row of pixels corresponding to this
smooth curve, it would appear much less sharp than the pixels for the
black curve. So, in essence, the red curve is an unsharp version of
the black. Now, subtract the unsharp version from the original and
the result is the lower black line in the top graph of
Figure
6.32. You could say that this result
is just the original curve with its unsharp component masked out.
This is the interpretation of what the unsharp mask does, but how does
this sharpen the image? The answer is given by the lower graph of
Figure
6.32, which shows the original black
line representing the row of pixel values. The graph also shows a red
curve, which is the original curve and the associated unsharp masked
version added to it. As you can see, just before the edge, there is
now a dip in pixel value at the low side of the transition and a peak
on the high side. Thus, the result is that the edge has been made
sharper.
