So much for the theory of the Unsharp Mask. A simple example
brings out the practical effects of this filter. Unsharp
Mask can be found in the Image:Filters/Enhance menu.
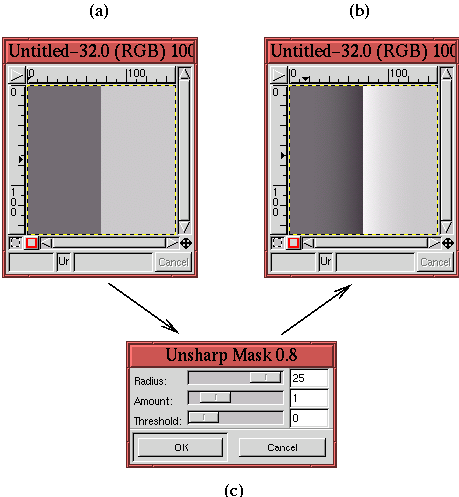
Figure
6.33(a)
Figure 6.33:
Illustrating the Effect of Applying the Unsharp Mask
 |
shows a simple image with just two grayscale regions. Thus, the
values along a row of the image resemble the graph of
Figure
6.32.
Figure
6.33(b) shows the result of applying the
Unsharp Mask using the parameters in the filter's dialog shown
in Figure
6.33(c). Here a maximum value for the
Radius has been chosen to accentuate the effect.
Note that in the sharpened result (see
Figure
6.33(b)), there is a light halo on the
right side of the edge and a deep shadow on the dark side of the edge.
This corresponds to the discussion of the red curve in the lower graph
of Figure
6.32. The effect of the Unsharp Mask is very pronounced but was chosen to clearly illustrate
the effect. In general, the dialog parameters are chosen to produce
more subtle results.
The Unsharp Mask dialog has three parameters. Looking at the
dialog in Figure
6.33(c), there is Radius, which
specifies the relative width of the halo/shadow created by the mask.
The parameter named Amount controls the relative magnitude of the dip
and the peak created on each side of the edge. Finally, Threshold
specifies the difference in pixel values that must exist across the
edge for the Unsharp Mask to be applied. Thus, if Threshold is
set to 25, adjacent pixels whose difference in pixel value is less
than 25 are not sharpened. An important fact is that the Unsharp
Mask is applied individually to each color channel, R, G, and B; the
results are then combined.
