4.5.3.1 Working with the Threshold Tool
The Threshold tool allows you to specify a range of values in an
image. All the pixels that are in the range of the selected values
are mapped to white, and the rest are mapped to black. Threshold is a powerful tool for automatically creating masks. This
is illustrated in the following example.
Figure
4.43
Figure 4.43:
Pasting the Image into Its Own Channel Mask
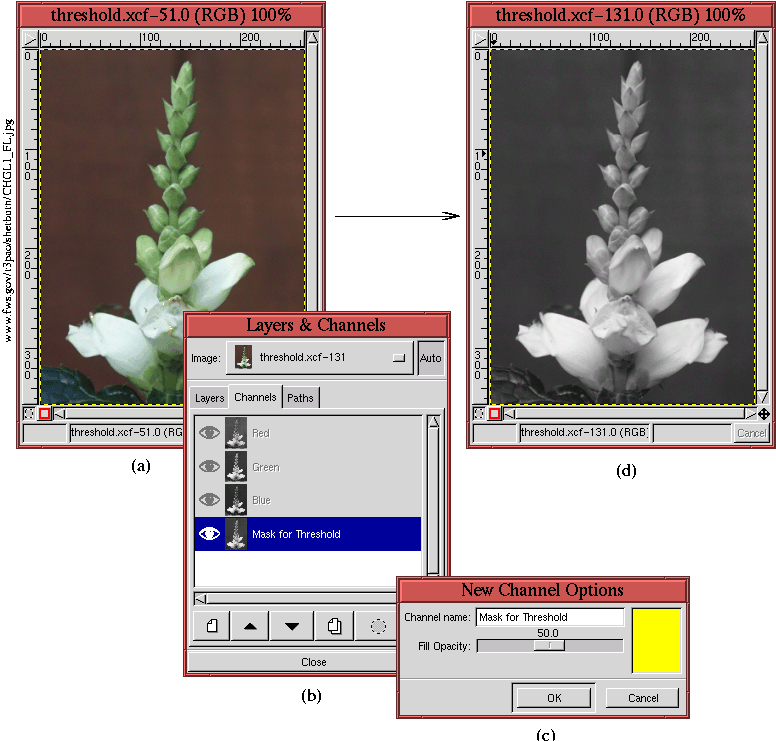 |
illustrates the first step of using
Threshold to create a
natural mask. In the example, we want to make a selection of the
partially blooming flower in Figure
4.43(a). We
begin by copying the image in Figure
4.43(a) into
a channel mask. This is done by creating a new channel mask in the
Channels dialog, and then copying and pasting the image layer to the
mask using
C-c and
C-v (see
Section
2.4).
Figure
4.43(b) shows the resulting Channels
dialog, and Figure
4.43(c) shows that yellow is
chosen as the mask color. This color was chosen to contrast against
the dark background of Figure
4.43(a). Since a
channel mask is only 8 bits deep, pasting the color image into the
channel mask immediately converts it to a grayscale. This can be seen
in Figure
4.43(d), which was obtained by toggling
on the channel mask's Eye icon and toggling off the image layer's Eye
icon.
The Threshold dialog works by clicking and dragging out a part
of the range of values in the histogram. The range of values in the
histogram is in [0,255], and, as can be seen in
Figure
4.44(b),
Figure 4.44:
Applying Threshold to the Channel Mask
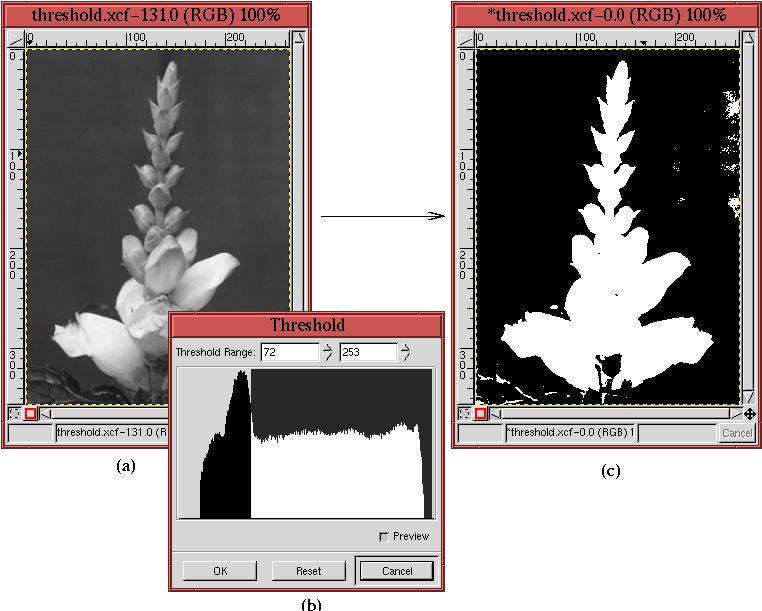 |
the range that has been selected is from 72 to 253. Sweeping out
values in the
Threshold dialog's histogram immediately maps to
white the pixels in the active layer (here the channel mask) having
these values. The pixels having values outside the swept range are
mapped to black. Thus, the channel mask that was a continuously
varying grayscale image is converted to a binary black-and-white one.
Figure
4.44(a) shows the channel mask before the
application of
Threshold, and
Figure
4.44(c) shows the channel mask after the
application of
Threshold.
Toggling the image layer's Eye icon back on allows the channel mask to
be seen over the image, as illustrated in
Figure
4.45.
Figure 4.45:
The Resulting Mask Defects as Seen in the Image Window
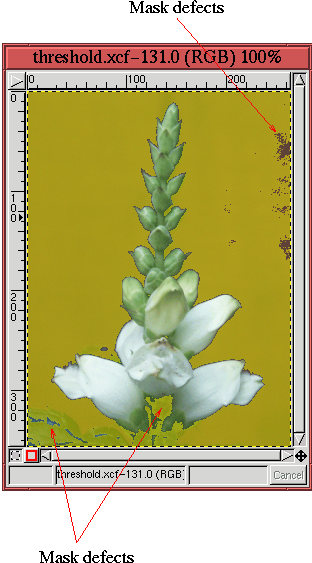 |
The parts of the image layer corresponding to the white parts of the
channel mask can be seen clearly in the image window. The parts of
the image corresponding to black parts of the channel mask are masked
by a partially transparent yellow film.
As shown in Figure
4.45, the result of using Threshold produces an almost perfect mask for the flower. However,
several defect regions remain. There are certain parts of the image
that should be masked but aren't, and there are parts that are masked
but that shouldn't be. These regions are easily removed using the
Lasso and the Paintbrush tool.
Figure
4.46(a)
Figure 4.46:
Using the Lasso Tool to Remove Defect Regions
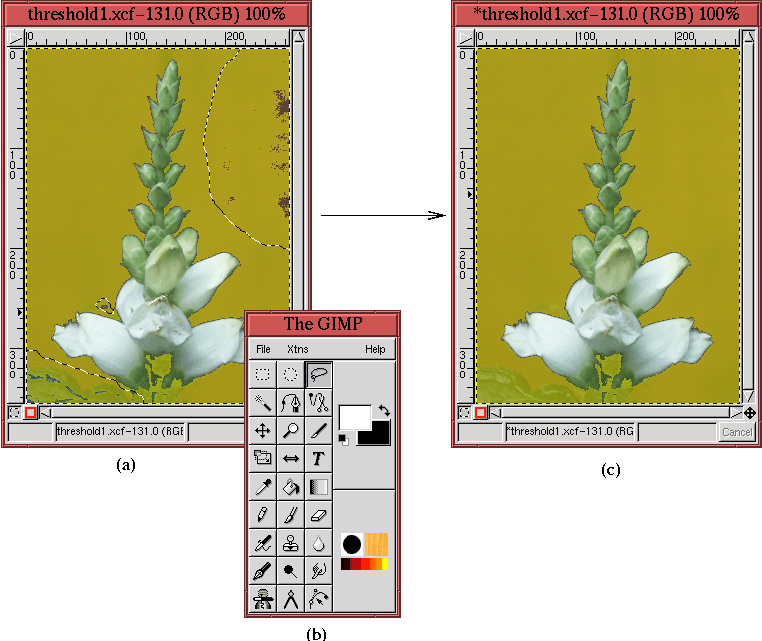 |
shows how the
Lasso has been used to select parts of the image that should be
masked but aren't. Because there are several offending regions, their
selections have been combined using the methods described in
Section
3.2. The parts of the channel
mask that are in the selected regions are repaired (that is, converted
to black) in three steps. The channel mask is made active by clicking
on its thumbnail in the Channels dialog, the
Active Background
Color is set to black, as shown in
Figure
4.46(b), and the selections are cut by
typing
C-x in the image window. The result is shown in
Figure
4.46(c).
Figure
4.47 shows how the stalk of the flower,
which was not included in the mask, is restored using the Paintbrush tool.
Figure
4.47(a)
Figure 4.47:
Using the Paintbrush Tool to Fill in Missing Regions
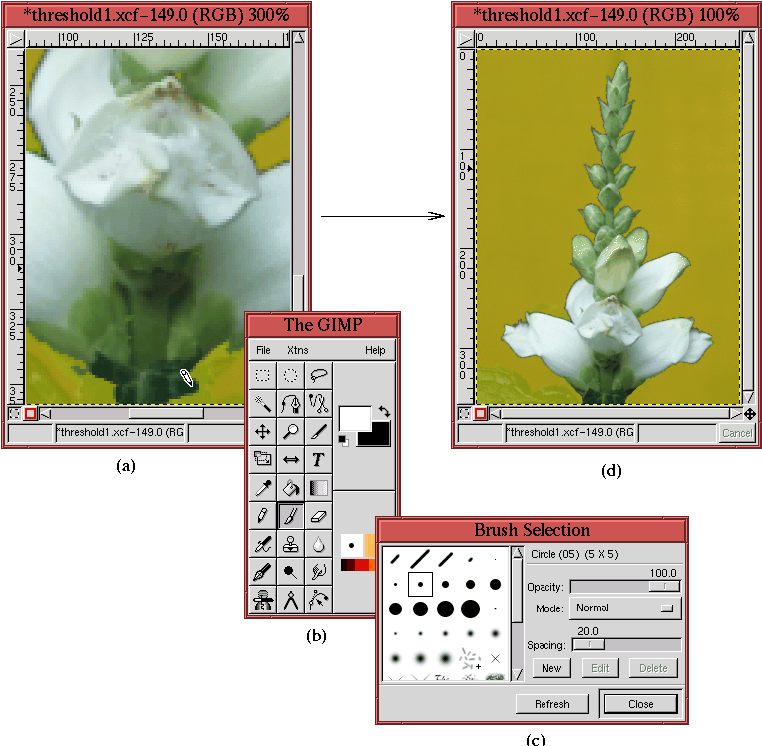 |
shows the stalk of the flower zoomed by 300%, and
Figure
4.47(b) and (c) show that white is chosen
as the
Active Foreground Color and that a small hard brush has been
chosen from the
Brush Selection dialog. The
Paintbrush
cursor can be seen applying white paint to the mask over the region of
the flower stalk in Figure
4.47(a). The
semi-transparency of the mask facilitates the painting process.
Figure
4.47(d) shows the result of having fully
restored the flower stalk.
For the final step in this example, Figure
4.48(a)
Figure 4.48:
Converting the Mask to a Selection
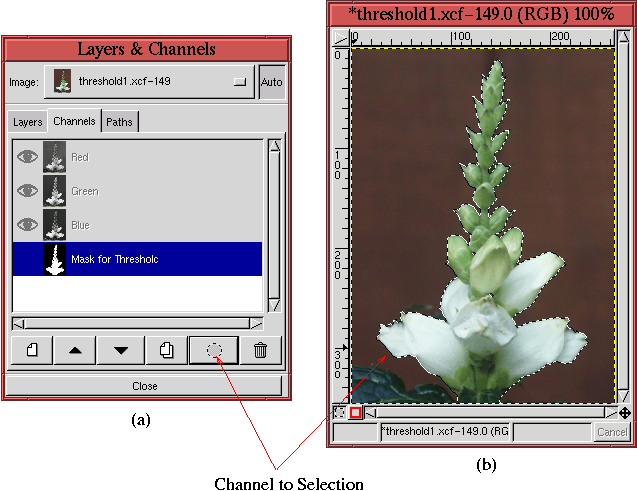 |
shows how the
Channel to Selection function is applied by
clicking on its icon in the Channel dialog's button bar. Turning off
the visibility of the channel mask, the resulting selection is seen in
Figure
4.48(b).
This example shows how using Threshold can produce a selection
much more quickly than would have been possible with the Bezier
Path tool. Making a Bezier path would have required placing and
refining a large number of control points. In contrast, the procedure
employed with the Threshold tool required some experimentation
with values in the tool's dialog, followed by some rough selections
with the Lasso and some painting with the Paintbrush.
A key element to making the Threshold tool work efficiently is
finding a reasonable range of values in the tool dialog's histogram.
The example used in this section shows that it is not necessary to
find a perfect mask. Rather, the goal is to find a mask that
separates the subject from the background enough so that tools such as
the Lasso and the Paintbrush can be used to easily clean
up the defects.
The range of values used to create the mask in this example is shown
in Figure
4.44(b). It is important to understand
that this result was obtained by using a trial-and-error, experimental
approach. Several contiguous regions of the histogram were swept out
by the mouse, and, each time, the parts of the image that mapped to
white and black were observed. A tip for finding useful regions is to
examine the ranges of values supporting the main bumps in the
histogram. These are usually associated with major image features,
and it is often the case that one of these bumps is the solution to
our search. When a reasonable range has been discovered, the data
entry boxes can be used to refine the end points of the range.
Although the Threshold tool is not a panacea and isn't
guaranteed to work, it is often successful. It is worth trying to
apply the Threshold tool before launching into a long selection
process with the Bezier Path tool. Some good examples of using
Threshold to make selection masks are illustrated in
Sections
7.3 and
7.4.
