2.4 Layer Export and Import
Collecting separate, raw image elements into a single image window is
one of the most-used layer operations in this book. This is a
fundamental component of compositing, a subject discussed in great
depth in Chapter
7. However, it is also useful for
a wide range of core and advanced techniques in the GIMP.
The importation of layers into an image is accomplished using the Copy , Cut, and Paste editing functions (see
Section
1.7). The technique for importing a layer is
so important that this section develops an example in detail to
illustrate the methodology. Study it well, because this technique is
used often in this book.
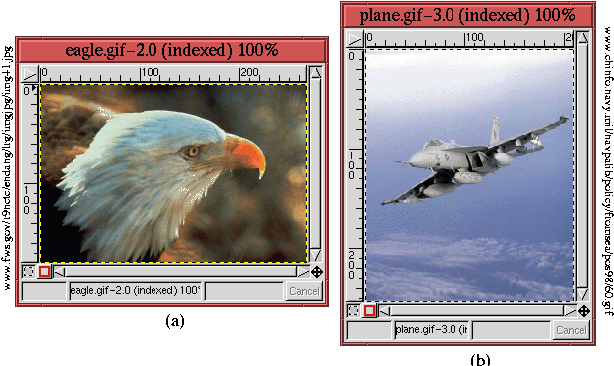
To illustrate the process, we begin with the two images shown in
Figure
2.8. Each image consists of a
Figure 2.8:
Two Images to Illustrate the Use of Copy and Paste
 |
single layer, and each will be imported into a third image that, on
completion of the procedure, will contain three layers.
To begin, a new image is created that has width and height sufficient
to accommodate the two single-layer images. Once open, the eagle
image in Figure
2.8(a) is
copied and pasted into it. This is accomplished
by moving the mouse cursor into the eagle image window and selecting
the Copy function from the Image:Edit
menu. This can also be accomplished by simply typing C-c in the
image window. This copies the active layer of the eagle image into
the default buffer. Note
that for multiple-layer images, it is the active layer that is copied
into the buffer. Thus, it would be prudent to verify which layer is
active by inspecting the Layers dialog before copying. The whole
procedure could also be performed by cutting the image instead of
copying. Cutting puts a copy of the layer in the buffer and then
deletes it from the image window. To cut the image, use the Cut function from the Image:Edit menu.
This function can be more easily employed by typing C-x in the
image window.
Now that the eagle image is in the buffer, it can be pasted into the
new image. This is done by moving the mouse cursor into the new image
window and using the Paste function found in the Image:Edit menu, which can be more expeditiously accomplished by
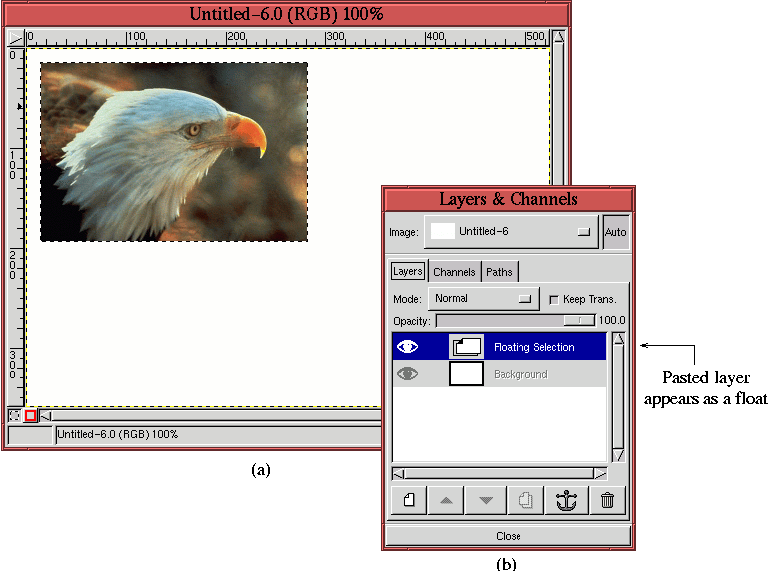
typing C-v in the image window. The result of the paste is
shown in Figure
2.9(a).
Figure 2.9:
Importing the First Pasted Image
 |
The Layers dialog for this image is shown in
Figure
2.9(b), and it shows that the pasted
layer appears as a floating selection. The Background layer, the only
other layer in the dialog, is grayed out, meaning that it cannot be
selected as the active layer.
The pasted layer appears in Figure
2.9(a) as a
selection with a moving dashed line around it. These moving dashes
are referred to as the Marching Ants. This floating
selection can be positioned in the new image with the Move tool from the Toolbox.
Once the layer is positioned, it can be anchored to the underlying
layer by bringing up the Layers menu and selecting the Anchor
Layer function from the
Layers menu or by typing C-h in either
the Layers & Channels or image windows. It is also possible to
simply click on the Anchor button in the Layers dialog. For this
example, however, the layer is not anchored to the layer below it.
Rather, it is converted into a new layer. This is done by using the
New Layer function
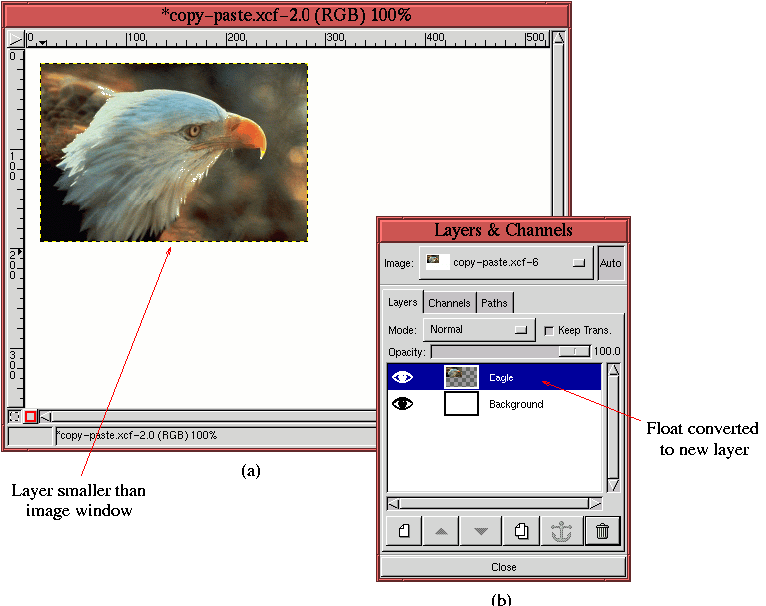
found in the Layers menu. Figure
2.10
Figure 2.10:
Creation of New Layer
 |
illustrates the result of the conversion.
Figure
2.10(a) shows how the converted layer is
smaller than the image window. Figure
2.10(b)
illustrates the corresponding Layers dialog showing that the float was
converted to a layer. A floating selection can also be converted to a
new layer by typing
C-n in the
Layers
& Channels window or by clicking on the New Layer icon in the button
bar.
The sequence just described for importing the eagle image is used so
often that it deserves to be memorized. Let's concisely recap the
steps required...then bookmark this page! The following list of
steps slightly generalizes the procedure by assuming that there is
a multilayer source image window containing a layer to be exported
and another multilayered destination image that will import
it:
- 1.
- In the source image window, type C-l to bring up the Layers
dialog.
- 2.
- In the Layers dialog, make the source layer active by
clicking on its thumbnail in the Layers Palette.
- 3.
- Back in the source image window, type C-c to copy the
active layer to the default buffer.
- 4.
- In the destination image window, type C-v to paste the
buffer contents into a floating selection. (Note that the context of
the Layers dialog automatically changes to the destination image
window when C-v is typed there.)
- 5.
- Position the floating selection as desired with the Move
tool.
- 6.
- Type C-n in the Layers dialog (or click on the New Layer
button) to anchor the float to a new layer. Otherwise, type C-h
or click the Anchor button to anchor it to the last active layer of
the destination image.
By the way, when the floating selection is converted to a new layer,
the resulting dimensions of the layer are just large enough to contain
the contents of the pasted layer. As shown in
Figure
2.10(a) the resulting pasted eagle image
layer is smaller than the image window. It is easy to put the pasted
image into a separate layer having the same dimensions as the
destination image window. Just create a new layer in the destination
image before pasting from the buffer. After pasting, anchor the
floating selection to this new layer by clicking the anchor icon in
the button bar.
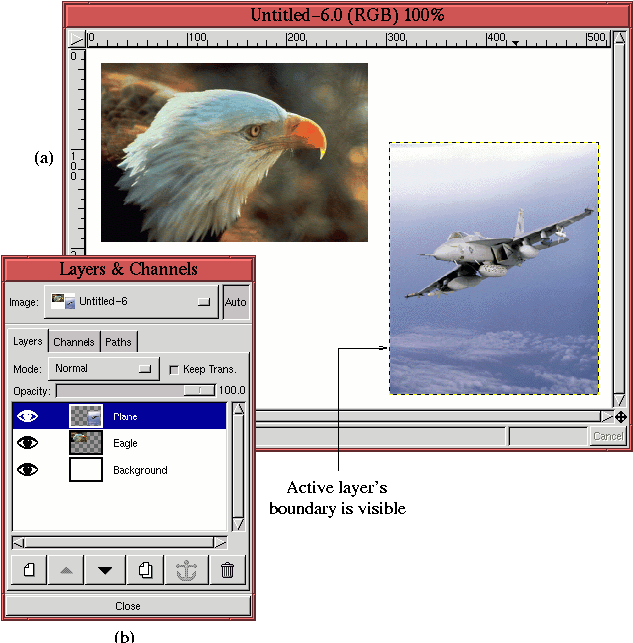
Repeating the import procedure for the airplane in
Figure
2.8(b) produces the result shown in
Figure
2.11.
Figure 2.11:
Importing the Second Pasted Image
 |
Note that the boundary of the active layer in
Figure
2.11(a) is visible as a black-and-yellow
dashed line. Typically we are not aware of layer boundaries because
often all the layers have the same dimensions. When this is the case,
the layer boundary is coincident with the window edge. However, for
the case illustrated in Figure
2.11(a), the
layer boundary is apparent because the pasted layer is smaller than
the image window.
The visible boundary of a layer can be a problem, especially when
you're trying to adjust the relative position of two layers or when
you're trying to carefully match colors at layer edges (for a
particularly good example of this problem, see
Section
7.5). When it is desirable to suppress the
layer boundary, its visibility can be turned off with the function
Toggle Selection,
found in the Image:View menu or by typing C-t in the image window.
©2000 Gimp-Savvy.com
