Subsections
4.1 Channel Masks
A channel mask is a special grayscale layer only 8 bits deep and is
used to store and edit selections. This section describes the
Channels dialog, how to save selections to channel masks, how to
convert channel masks to selections, and the other GIMP functions used
for organizing masks and operating on them.
4.1.1 The Channels Dialog
As an image can have any number of layers, it can also have any number
of channel masks. Thus, analogous to the Layers dialog, the Channels
dialog is the the tool for organizing and working with channels. The
Channels dialog is obtained by typing C-l in the image window
and clicking on the Channels tab in the resulting Layers &
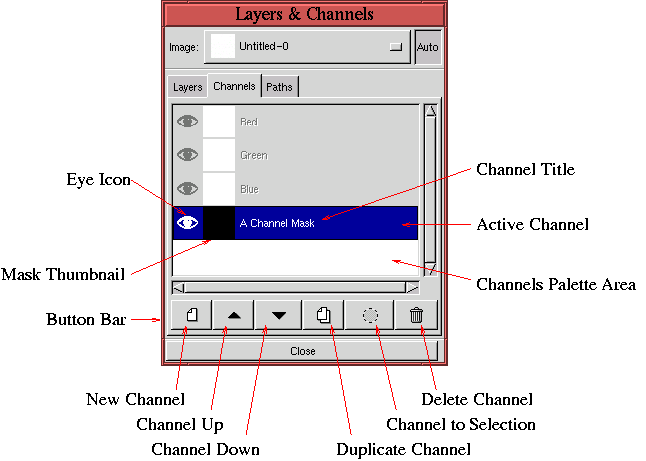
Channels window. Figure
4.1
Figure 4.1:
The Channels Dialog
 |
illustrates the various elements of the Channels dialog.
The most important feature of the Channels dialog is the Channels
Palette.
This region of the dialog consists of horizontal strips where the top
three entries are always the Red, Green, and Blue channels of the
image, already described in Section
2.2.1.
The rest of the strips are channel masks.
Figure
4.1 shows a single channel mask.
The channel mask strip displays a thumbnail image of the mask's
contents, and the area to the left of the thumbnail contains an Eye
icon. Analogous to layer strips in the Layers dialog, the
visibility of the Eye icon for channel strips can be toggled on and off,
making the channel mask either visible or invisible in the image
window.
To the right of the thumbnail is the Channel Title
Area. In
Figure
4.1 the channel is named A Channel
Mask. The title can be changed by double-clicking in the Channel
Title Area. This brings up a dialog where the new title can be
entered.
The channel strip in Figure
4.1 is
highlighted in blue, indicating that it is the active
channel. A channel mask is made active by
clicking on its thumbnail or Title Area. Only a single channel mask
can be active at a time, and, when a channel mask is active, none of
the image layers can be active. Because GIMP tools applied to the
image window are applied to the active layer or
the active channel, this can sometimes be a
source of confusion. After working on a channel mask, to work on a
layer it is necessary to explicitly switch to the Layers dialog and to
make the layer active.
The remaining elements of the Channels dialog are the Channels menu
and the button bar. These are described in more detail shortly.
