6.2.6 Getting More Detail into the Subject
Sometimes one part of an image is more important than the rest. We
often refer to this part of the image as the image subject. It is
typical to want the subject to have as much contrast as possible.
This makes the subject stand out and look much more interesting. As
was discussed in Section
6.2.1, the Curves tool can be
used to improve the contrast of certain parts of the tonal range in an
image. This can be applied to the subject of the image by determining
its lightest highlight and deepest shadow and then steepening the part
of the control curves covering this range.
However, if a lot of work has already gone into maximizing tonal range
and correcting color, you might be reticent to play with the curves to
get additional contrast into the subject. Clearly, manipulating a
part of the curves in an attempt to improve contrast can damage the
color balance obtained with much hard work.
Fortunately, there is a way to have your cake and eat it too. Up to
this point, the red, green, and blue control curves have monopolized
our attention. As you have already seen, modifying any of these
changes the overall balance of color in the image. However, the Curves tool can also be used to modify the image's Value
channel. As discussed in
Section
5.3, the Value channel has no effect
on color; it only affects brightness. This, then, is the perfect
channel for improving contrast while preserving the image's color
balance.
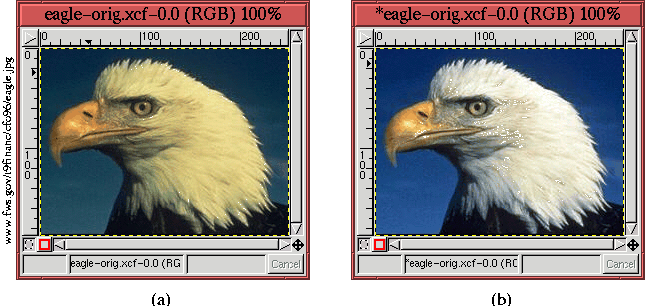
To illustrate the use of the Value channel to improve
contrast,
Figure
6.22(a)
Figure 6.22:
Original and Color Corrected Images
 |
shows an original image that lacks tonal range and has a terrible
yellow color cast. Figure
6.22(b) shows the
corrected image, which was obtained simply by applying the Auto Levels
button of the
Levels tool (see Section
6.1.2).
Although the image is much improved, it lacks detail in the eagle's
white head feathers. It would be nice to improve this part of the
eagle to give it more visual depth. This can be done by modifying the
Value channel of the
Curves tool.
To improve the contrast of the head feathers, it is necessary to
determine the value range that this part of the image is contained
in. The Threshold tool is perfect for this (see
Section
6.2.3).
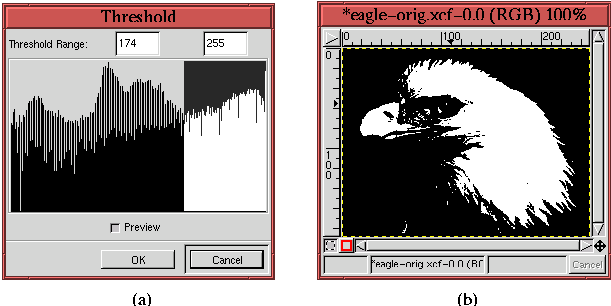
Figure
6.23
Figure 6.23:
Using Threshold to Find the Correct Value Range
 |
illustrates the use of
Threshold for determining an appropriate
range of values. Figure
6.23(a) shows the
Threshold dialog applied to the color corrected image in
Figure
6.22(b), and
Figure
6.23(b) shows the result of having swept
out the range [174,255] in the
Threshold dialog. This range,
which was determined by experimentation, pretty much covers the part
of the eagle image where we want to improve the contrast.
The value range determined with the Threshold tool is noted, and
the tool is then canceled. The next step is to invoke the Curves tool and to improve the contrast of the Value channel curve
using the range determined using Threshold.
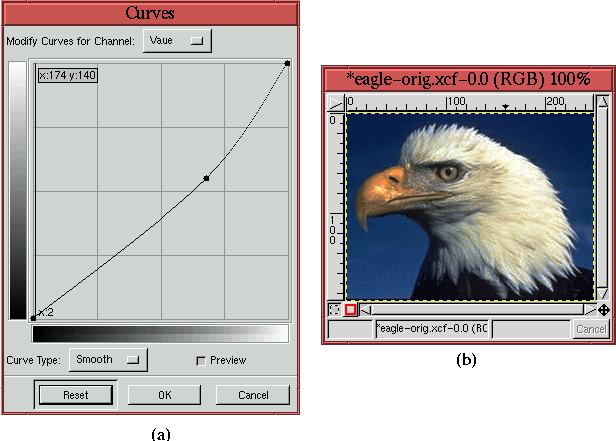
Figure
6.24
Figure 6.24:
Using Curves to Improve Contrast in the Subject Value Range
 |
illustrates the procedure. Figure
6.24(a) shows
the
Curves dialog for the Value channel. A control point has
been added to the curve at the input value of 174, and this point has
been moved to the output value of 140. This has the effect of
steepening the Value curve in the range [174,255], which is the range
of values where we want to improve contrast. From previous
discussion, we know that steepening the Value curve in a range has the
effect of improving this range's contrast.
The result of applying the curve shown in
Figure
6.24(a) is shown in
Figure
6.24(b). Comparing this result to the
image in Figure
6.22(b) shows that the contrast
of the eagle's head feathers has been significantly improved. As a
final, practical note, the amount that the Value curve is steepened is
determined experimentally by moving the control points on the curve
and evaluating the effect on the image.
