Subsections
9.5 Web-Safe Color
A problem with the exchange of images on the Internet is that not all
computers have the capability of displaying a large number of colors
simultaneously. For example, a computer using a display resolution of
 and using 1 byte (8 bits) of color
per pixel requires at least 0.786 Mb of RAM on the video adapter card.
Such a system is capable of displaying only 28=256 colors
simultaneously.
Alternatively, a system that is using 2 bytes (16 bits) per pixel can display
216=65,536 colors, and 3 bytes (24
bits) per pixel can display
224=16,777,216colors. Thus, the available color palette grows significantly on a 16
bits-per-pixel (bpp) system. A 24 bpp system is known as a true or
high color system. However, the demands on the video adapter for
these systems also grows. A 16 bpp system on a
 pixel
display requires about 1.6 Mb of video RAM and a 24 bpp system
requires 2.4 Mb.
Many video adapter cards have only 1 Mb or less of RAM. Although this
is less and less common with current computers being delivered with up
to 32 Mb of video RAM, there are still many legacy machines that have
smaller quantities. The consequence is that an image containing more
than 256 colors cannot be faithfully displayed on machines with only
an 8 bpp color depth. Some of the original colors in the image will
have to be replaced because of the lack of a sufficient number of
available colors on the displaying system. This replacement creates
color distortion in the displayed image.
The GIMP uses 24 bits per pixel to represent color, 8 bits for each of
the R, G, and B channels. Thus, the GIMP can easily generate images
that have color distortion when displayed on low color systems. This
is a concern for the Web designer who wants to ensure an accurate
representation of color for his or her graphics. This section
discusses the issues of preparing web-safe color graphics and how to
achieve this in the GIMP.
9.5.1 Types of Color Distortion
Color distortion occurs when the monitor is already displaying all the
colors it can, and a request for a new color is made. The least
sophisticated way of handling this request is by color
clipping.
This approach displays new colors using the closest color from the
palette already being displayed. For images with subtle color
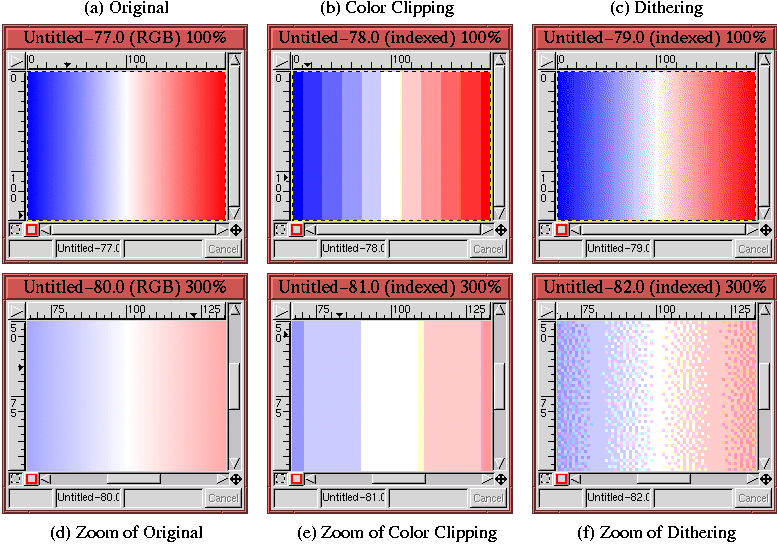
shading, this can give rise to banding , which is also called posterization . An example of this type of color distortion is
shown in Figure
9.23.
Figure 9.23:
Clipping and Dithering Color Distortions
 |
Figure
9.23(a) shows the original
image and Figure
9.23(b) the same
image on a system with insufficient colors.
You can plainly see the banding of colors in this image.
The other type of color distortion is called dithering . Although dithering is a color distortion, this
is not a bug, it's a feature! Dithering is a technique used to
simulate unavailable colors by spatially mixing the available ones as
a mesh of small dots. The idea is that color dithering is more
visually acceptable than color banding.
Figure
9.23(c) illustrates the effect
of dithering. Figure
9.23(f) shows a
zoomed version of Figure
9.23(c) so
that you can see the mix of small dots used to simulate unavailable
colors. Compare this zoomed image with the zooms of the original and
color clipped images shown in
Figure
9.23(d) and (e), respectively.
Figure
9.23 shows that dithering is a
much more sophisticated approach to the problem of color distortion
than is banding. For continuous gradients of color, the rule seems to
be that the dithering approach is superior. However, there are
caveats to this rule. To see why, you need to understand how
dithering works. A simple illustration is shown in
Figure
9.24, where
Figure 9.24:
Illustration of Using Dithering to Simulate a Color
 |
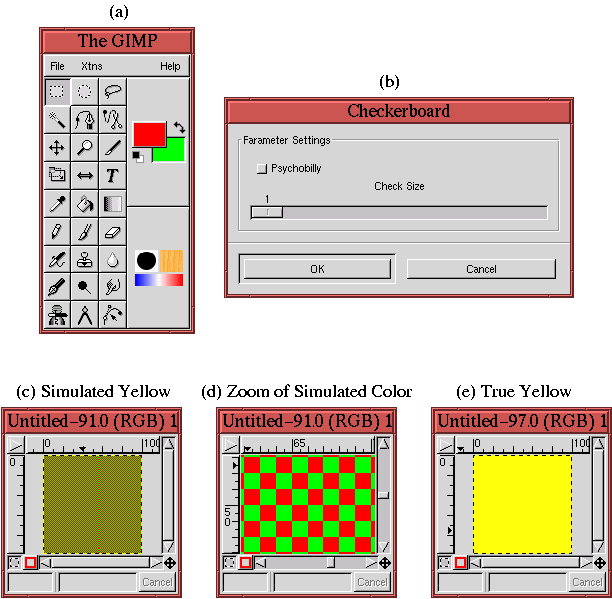
a crude dithering scheme is employed using the
Checkerboard
plug-in (found in
Image:Filters/Render/Pattern menu). The
Checkerboard dialog is shown in
Figure
9.24(b). This plug-in creates a
checkerboard pattern in the active layer using the colors specified by
the
Active Foreground Color and the
Active Background
Color. Figure
9.24(a) shows that these
colors have been set to red and green.
Figure
9.24(b) shows that a 1-pixel check
size is being used by the Checkerboard plug-in. The result is a
simulated dither of the color yellow, as you can see in
Figure
9.24(c). That the resulting dithered
color is yellow follows from the discussions of the RGB colorspace in
Section
5.1. The vector sum of red and green
in the RGB cube yields yellow.
A zoomed version of Figure
9.24(c) is shown
in Figure
9.24(d). This plainly shows the
red and green checks. For comparison purposes, a pure yellow is shown
in Figure
9.24(e). The example shown in
Figure
9.24 is exaggerated because it is
never necessary to dither two colors as distant from each other in the
color cube as are red and green. However, it nicely illustrates how
dithering works.
The dithering algorithms used in the GIMP are far more sophisticated
than that illustrated in our checkerboard example. In the GIMP,
several dithering algorithms are available including the
Floyd-Steinberg algorithm.
The main feature of Floyd-Steinberg dithering is that it uses a
pseudo-random spatial distribution of up to three colors to simulate
an unavailable color. Figure
9.23(f)
clearly shows the pseudo-random nature of Floyd-Steinberg dithering.
In many cases, it is this pseudo-random aspect of Floyd-Steinberg
dithering that improves the overall perception of a dithered color
image...but not always. See Section
9.5.4 for more
on this subject.
