5.5 Conversion to Grayscale
From the previous discussions, it is clear that every color image has
a grayscale component that can be separated out from the hue and
saturation components. There are actually three different functions
in the GIMP for converting an image to grayscale. These are the Grayscale function, the Desaturate function, and the value
component of the HSV option of the Decompose function. To
illustrate these functions, each one is applied to the color image
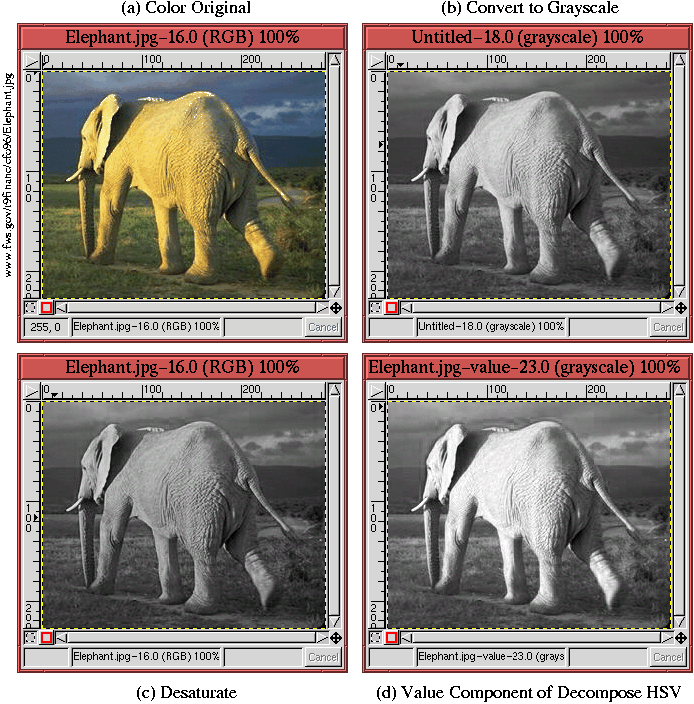
shown in Figure
5.10(a).
Figure 5.10:
The Three Methods for Converting to Grayscale
 |
To begin, the most obvious choice for converting a color image to
grayscale is to use the Grayscale
function found in the Image:Image/Mode menu. This function
transforms a 24-bit, three-channel, color image to an 8-bit,
single-channel grayscale image by forming a weighted sum of the red,
green, and blue components. The formula used in the GIMP is
Y = 0.3R
+ 0.59G + 0.11B; this result is known as luminance (see
[4] or
[5]). The weights used to compute luminance are related to
the monitor's phosphors. The explanation for these weights is due to
the fact that for equal amounts of color the eye is most sensitive to
green, then red, and then blue. This means that for equal amounts of
green and blue light the green will, nevertheless, seem much brighter.
Thus, the image obtained by the normal averaging of an image's three
color components produces a grayscale brightness that is not
perceptually equivalent to the brightness of the original color image.
The weighted sum that defines Y, however, does.
The result of converting the color image of
Figure
5.10(a) using the Grayscale
function is shown in Figure
5.10(b). When
you compare it to the two other grayscale images, the Grayscale
function does seem the most representative of the color image's
brightness.
From previous discussion, the removal of the saturation from an image
should also produces a grayscale. One way to desaturate an image is
to replace the RGB value for each pixel with that of the closest point
on the neutral axis. This point on the neutral axis is illustrated in
Figure
5.6. In the GIMP, the Desaturate function, found in the Image:Image/Colors menu, does something like this. Actually, it uses
an approximation to this idea; it chooses the point on the neutral
axis determined by computing
 ,
which corresponds to the definition of
lightness. After
applying Desaturate, the image remains in RGB space and
continues to have three color channels, but now the channels have
identical values, which is why the image appears as a grayscale.
The result of applying Desaturate to the color image in
Figure
5.10(a) is shown in
Figure
5.10(c). Of the three methods for
converting an image to grayscale, this one produces the flattest (that
is, with the least contrast) and the darkest conversion.
Finally, it is possible to get a slightly different grayscale
conversion by using the HSV option of the Decompose function. This decomposes the
original image into three new images, each an 8-bit grayscale image
representing the hue, saturation, and value components of the image.
The value component is a conversion to grayscale that is based on
moving to the neutral axis by selecting the maximum RGB component.
Thus,
 .
.
Figure
5.10(d) shows the value component of
the HSV decomposition for Figure
5.10(a).
This grayscale is clearly the brightest of the three, which makes
sense because the value is defined as the maximum of the R, G, and B
components (see Figure
5.6).
So, which conversion to grayscale is best? I'm tempted to say that
Grayscale is best because it produces the result whose
brightness is the most perceptually similar to the brightness of the
original color image. However, the answer must depend on what you want to do with the image. Furthermore, the two other methods
for converting to grayscale are useful, and, in particular, the value
component of the Decompose HSV function is used for many
operations in the GIMP (for examples, see Sections
6.2.6 and
6.4.4).
©2000 Gimp-Savvy.com
