Subsections
3.4 The Paths Dialog
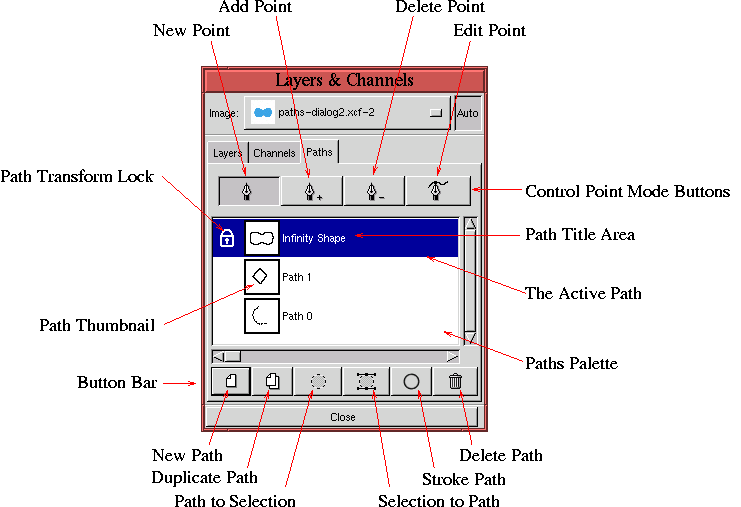
Because Bezier paths are so useful, there is a special Paths dialog
that allows multiple Bezier paths to be edited, managed, and saved.
The Paths dialog, shown in Figure
3.21,
Figure 3.21:
The Bezier Paths Dialog
 |
is displayed by typing
C-l in the image window to produce the
Layers & Channels window and, then, clicking on the Paths tab.
The elements of the Paths dialog are described in this section.
3.4.1 The Paths Palette
The most important part of the Paths dialog is the Paths Palette. The
palette contains horizontal strips, where each strip represents a
single path for the image. Each strip contains a Path Thumbnail, a
Path Title, and a Path Transform Lock.
Figure
3.21 illustrates a Paths Palette
containing three strips. The top strip is highlighted in blue,
indicating that it represents the active path. Only the active path
can be seen and manipulated in the image window. Clicking on a path
strip in the Paths Palette makes that path active and also makes it
visible in the image window.
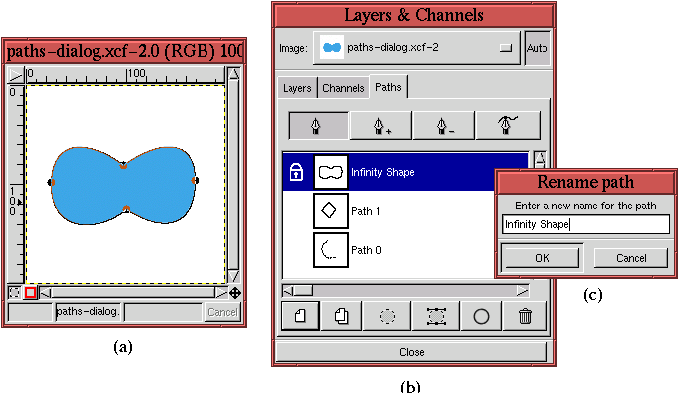
Figure
3.22(a)
Figure 3.22:
Making a Path Visible in the Image Window and Changing a Path
Title
 |
illustrates an image window where the path visibility has been toggled
on by clicking on its strip in the Paths Palette.
Figure
3.22(b) shows the associated Paths
dialog. To toggle off the path's visibility, it is necessary to click
on a tool icon (other than the one for the
Bezier Path) in the
Toolbox window.
A path's title can be changed by double-clicking in
the title area. This brings up a dialog where the text of the new
title can be entered. Figure
3.22(c)
illustrates the dialog for changing the Path Title.
Finally, the Path Transform Lock can be
toggled on and off by clicking to the left of the Path Thumbnail.
When the icon is toggled on, the path's shape is locked to the active
layer with respect to the Transform tool. This means that any
transform applied to the active layer is also applied to the path.
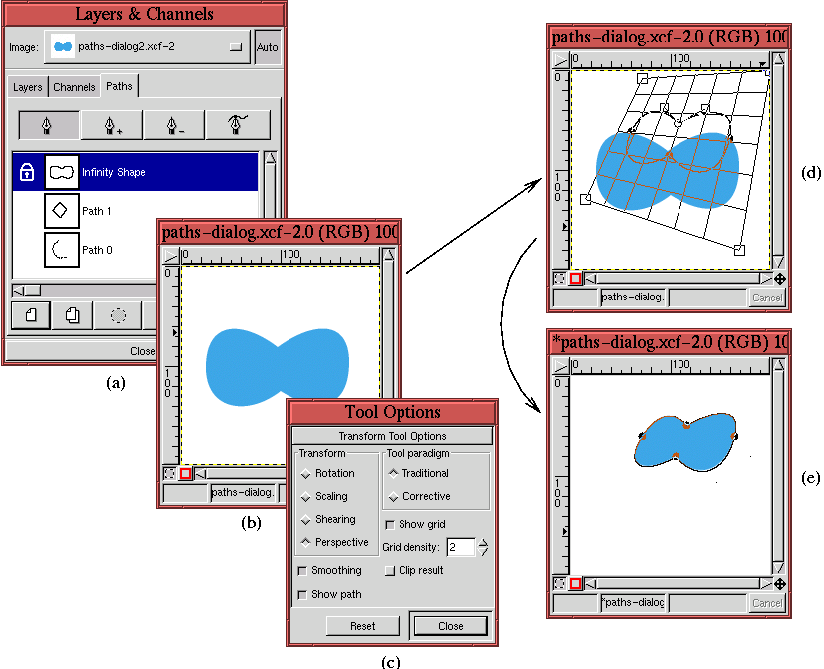
Figure
3.23
Figure 3.23:
Applying the Transform Lock to a Path
 |
illustrates an example of using the Path Transform Lock.
Figure
3.23(a) shows the Path Transform
Lock has been toggled on for the path in the top path strip. This
path corresponds to the outline of the blue shape in the image window
shown in Figure
3.23(b). The image window
consists of two layers: a white background and the blue shape, the
latter which is the active layer. Because of the Path Transform Lock,
applying the
Transform tool will affect the blue shape and the
path defining the shape's boundary.
Figure
3.23(c) shows the dialog for the
Transform tool. The Perspective radio button has been selected,
and the Show path checkbox has been toggled on. This last button
makes the active path visible in the image window while it is being
transformed. Figure
3.23(d) shows the
perspective transform of the grid and the active path. When the
transform is actually performed by clicking on the Transform button in
the Perspective Transform dialog, the result is as shown in
Figure
3.23(e). The active layer
containing the shape is transformed and the path associated with this
shape is transformed along with it.
The ability to see a path superimposed on the transform grid while
performing a transformation of a layer is a particularly useful
capability. There is no more precise way of warping one image to
another than with this feature. A concrete example of using the Path
Transform Lock is illustrated in Section
7.2.
