1.2 Loading and Saving Images
The two most fundamental operations that can be performed in the GIMP
are that of loading and saving images. There are a few subtleties
about these operations worth noting. Figure
1.9
Figure 1.9:
Loading Images into the GIMP
 |
illustrates the
Load Image dialog.
This function can be called in several ways. It lives in the
Image:File/Open menu and the
Toolbox:Image/Open menu, and it can be obtained by simply typing
C-o in either the image or Toolbox windows.
You can navigate your file structure's directory tree using the Load Image dialog. The directories are shown to the left, and files
to the right. Clicking on a file highlights it, and if a preview
image for this file exists, it is displayed in the preview box near
the bottom of the dialog. If no preview exists one can be created by
clicking on the Generate Preview button (the button displaying the
thumbnail in Figure
1.9(a)). Clicking the OK button at the bottom of the dialog loads the highlighted image.
Figure
1.9(a) shows a highlighted file, and the
preview box shows the associated thumbnail for this image.
Clicking the OK button loads the image. A file can also be loaded by
double-clicking on its name. Double-clicking on directory names
navigates the Load Image dialog to that directory. It is
possible to load multiple images into the GIMP by highlighting
multiple files before clicking the OK button. Multiple files are
highlighted by pressing the Shift key while clicking on the desired
filenames. Dragging the mouse with the Shift key pressed highlights
all the files that come under the mouse cursor.
Another very useful feature of the Load Image dialog is that
file (and directory) name completion is enabled in the selection box. Typing a few
letters of a filename followed by pressing the Tab key will
automatically complete as much of the name as is uniquely defined by
what has already been typed. The right side of the dialog then
displays all the files that match the letters in the selection box.
Adding a letter followed by pressing the Tab key will further
complete as much as possible, and so on. For a good typist, this is
an agreeable and rapid way to find the file to be loaded.
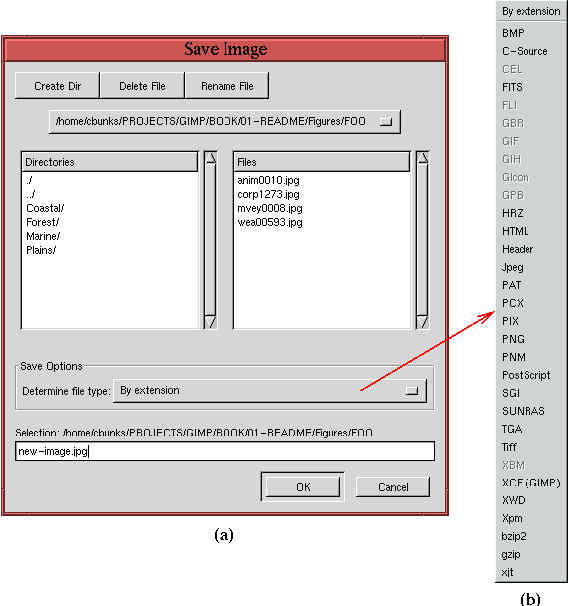
An image can be saved with the Save As
function found in the Image:File menu. This brings up the Save Image dialog, shown in
Figure
1.10(a).
Figure 1.10:
Saving Images
 |
This dialog is similar to the
Load Image dialog. The image can
be saved to a new or existing file. Navigation of the file structure
directory tree is the same as for the
Load Image dialog.
Entering a name in the selection box at the bottom of the dialog
followed by clicking the OK button saves the image to the specified
filename.
A convenient feature of the Save Image dialog is that the file
is automatically saved in the format specified by the extension of the
typed filename. As an example, if foo.jpg is typed, the file
will be saved in JPEG format.
The GIMP can load and save in many file formats.
The set of all formats can be seen by looking in the Save Options
menu, shown in
Figure
1.10(b). There are three file formats
which are unique to the GIMP. The first is XCF , which is the native GIMP format . This is the only
format that can save all the GIMP features and states when working on
a project. If your image contains multiple layers, channels,
selections, or paths, you must save using the XCF format to avoid
losing parts of your work. Because the GIMP is the only program that
can load XCF format files, you will also want to eventually save to
other formats. See Sections
2.7.1 and
2.7.2 for
precautions that should be used before saving to a different file
format.
The two other file formats native to the GIMP are PAT and GBR.
PAT is for saving image patterns such as those
available in the Pattern Selection dialog. Placing a file saved
with the PAT extension in your ~/.gimp/patterns directory will
make it available in the Pattern Selection dialog the next time
you run the GIMP. The GBR file format is used
for creating GIMP brushes. This works like for pattern files, except
GBR files must be placed in the
~/.gimp/brushes directory to be made available in the Brush Selection dialog.
©2000 Gimp-Savvy.com
