Customizing the user interface
Customizing
the menu font
If you want to
change the menu font from that supplied by OOo to the system font
for your operating system, do this:
Choose
Tools > Options >
OpenOffice.org > View.
Check
Use system font for user
interface and click
OK.
Customizing
menu content
You
can customize menus in OpenOffice.org.
Choose
Tools > Customize.
On
the Customize dialog, pick the
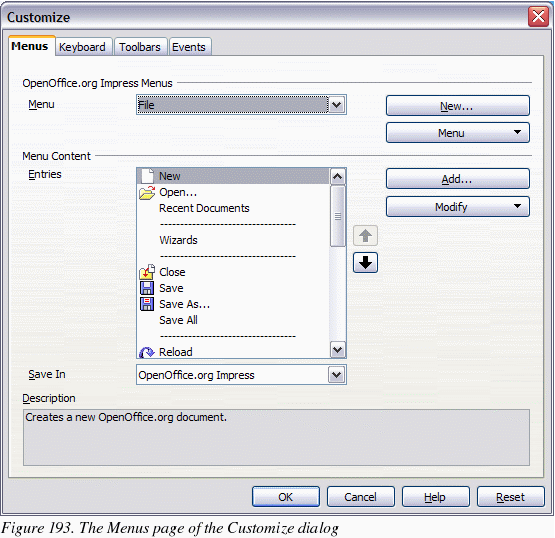
Menus page (Figure 193).

In
the Save In
drop-down list, choose whether to save this changed menu for
Impress or for a selected document.
In
OpenOffice.org Impress
Menus,
select the menu you want to customize in the Menu
drop-down list.
You
can customize each menu by clicking on the Menu or Modify
buttons.
You
can add commands in a menu by clicking on the
Add button.
You
can create a new menu by clicking on the New
button.
When
you are done customizing menus, click OK
to save your changes.
Customizing
toolbars

Open the Toolbars
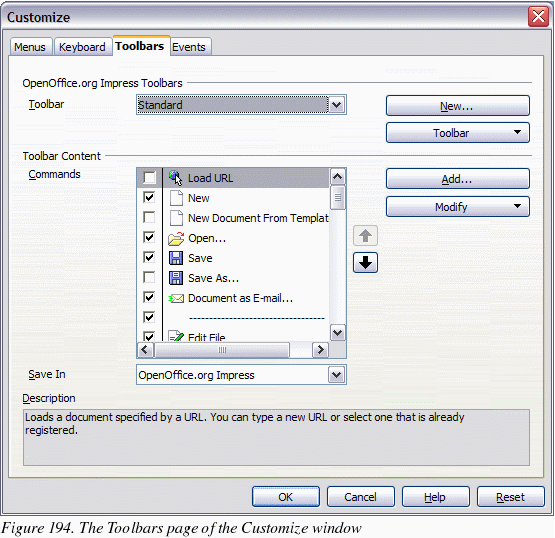
page of the Customize dialog (Figure 194) in one of these ways:
In
the Save In
drop-down list, choose whether to save this changed toolbar for
Impress or for a selected document.
In
the OpenOffice.org
Impress Toolbars section, choose
the toolbar you want to modify, or click on the New
button to create a new
toolbar.
Click
the Toolbar
button on the right to display a drop-down list of choices.
To
display or hide commands, select or deselect the checkboxes in the
Toolbar
Content – Commands section.
To
change the position of commands on a toolbar, select a command and
click the big up and down arrows to the right of the lists.
To
add commands to a toolbar, click the Add
button on the right. The Add Commands dialog opens. Follow the
instructions on this dialog and then click Add
to return to the Customize dialog.
When
you are done customizing menus, click OK
to save your changes.
Customizing
keyboard shortcuts
The
Appendix to this book lists the default keyboard shortcuts supplied
with Impress. You can change these defaults or add new shortcuts.
You can assign shortcuts to standard Impress functions or your own
macros and save them for use with Impress only, or with the entire
OpenOffice.org suite.
|
Caution

|
Be
careful when reassigning your operating system’s or OOo’s
predefined shortcut keys. Many key assignments are universally
understood shortcuts, such as F1
for Help, and are always expected to provide certain results.
Although you can easily reset the
shortcut key assignments to the OOo defaults, changing some
common shortcut keys can cause confusion, frustration and
possible data loss or corruption, especially if other users share
your computer.
|
As
an example, suppose you wish to assign a shortcut key to easily
insert a duplicate slide in your presentation. You could assign the
Insert key
as a
logical shortcut for this purpose, as described below:
Choose
Tools > Customize.
On
the Customize dialog, pick the
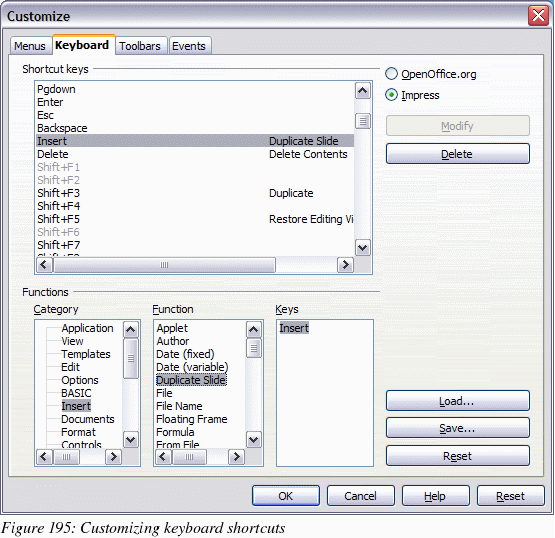
Keyboard page (Figure 195).
As
the shortcut key assignment is only relevant with Impress, and not
OpenOffice.org in general, select the Impress button (at the
upper right corner of the Keyboard
tab).
Next
select Insert in
the Category
list and Duplicate
Slide in the
Function
list.
Now
select the shortcut key Insert
in the Shortcut
keys list and
click the Modify
button at the upper right.
Click
OK
to accept the change. Now the Insert shortcut
key will insert a duplicate slide immediately after the currently
selected slide.
|
Notes
|
All
existing shortcut keys for the currently selected Function
are listed in the Keys
selection box. Since there
was no currently assigned shortcut for the
Insert > Duplicate Slide
function the Keys
list was empty. If it had not been, and you wished to reassign a
shortcut key combination that was already in use, you would
first have had to Delete
the existing Key.
Shortcut
keys that are greyed-out in the listing on the Customize dialog,
such as F1
and F10,
are not available for
reassignment.
|

Saving
changes to a file
Changes to the
shortcut key assignments (and other configurations) can be saved in
a keyboard configuration file for use at a later time, thus
permitting you to create and apply different configurations as the
need arises. To save keyboard shortcuts to a file:
After
making your keyboard shortcut assignments, click the Save
button near the bottom right of the Customize dialog.
In
the Save Keyboard Configuration dialog, select All files
from the Save as Type list.
Next
enter a name for the keyboard configuration file in the File name
box, or select an existing file from the list. If you need to,
browse to find a file from another location.
Click
Save. A confirmation dialog will
appear if you are about to overwrite an existing file, otherwise
there will be no feedback and the file will be saved.
Loading
a saved keyboard configuration
To
load a saved keyboard configuration file and replace your existing
configuration, click the Load button near the bottom right of
the Customize dialog, and then select the configuration file from
the Load Keyboard Configuration dialog.
Resetting
the shortcut keys
To
reset all of the keyboard shortcuts to their default values, click
the Reset button near the bottom right of the Customize
dialog. Use this feature with care as no confirmation dialog will be
displayed; the defaults will be set without any further notice or
user input.
Running
macros from key combinations
You
can also define shortcut key combinations that will run macros.
These shortcut keys are strictly user-defined; none are built in.
For information on macros, see Chapter 17 (Getting started with
macros) in the Getting
Started guide.
