7.1 Project 1: Fish on Holiday!
A primary component of compositing is the assembling of different
image elements and the subsequent positioning and scaling required to
achieve the final desired composition. Assembling the image
components consists of selecting them from their respective images.
The selections are made using combinations of techniques from
Chapters
3 and
4.
Because I'm often not sure exactly how I'll use selected image
components in a project, I first like to assemble all of them into a
kind of clip book. A
clip book is just a single image consisting of a layer for each image
component. This makes an image palette from which the various
components can be copied and then pasted into the target composition.
Figure
7.1(a)
Figure 7.1:
Collection of Selected Sea Creatures
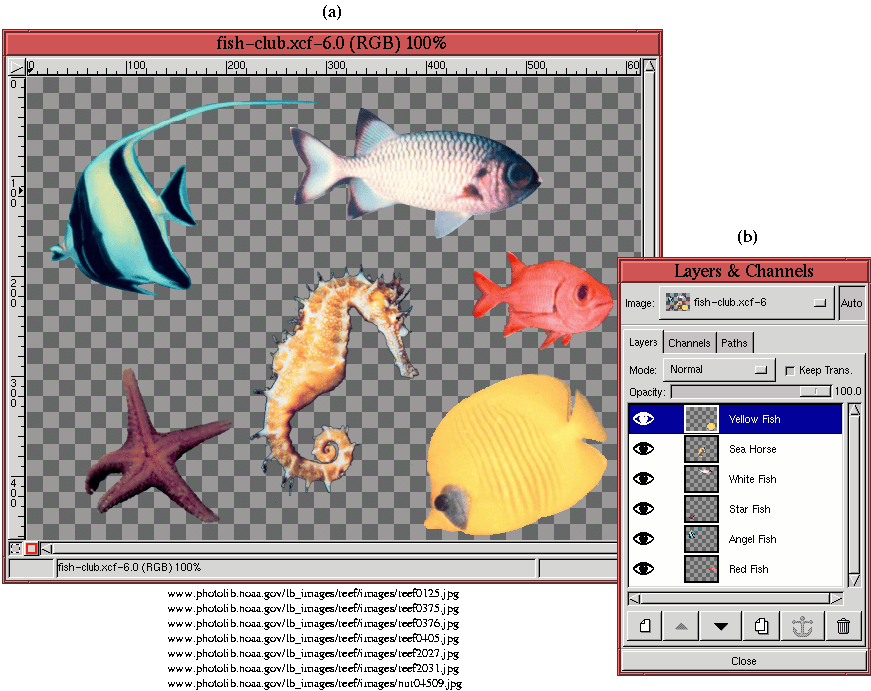 |
shows the image clip book used in this project. Each sea creature was
obtained from a separate image source using a combination of selection
and masking techniques. The Layers dialog in
Figure
7.1(b) shows that each of the six
separate images is contained in a separate layer. The project goal is
to use these reef inhabitants to populate an eco-system not normally
their own. The composition places our denizens of the deep among the
palms of a tropical island beach scene. Sometimes even fish need a
holiday...
The background image is shown in
Figure
7.2(a).
Figure 7.2:
Pasting an Image Component into the Holiday Scene Background
 |
This scene will receive all the other image elements. The first
element is the angel fish, which has been copied from
Figure
7.1 and pasted into this one. The
following procedure is used to accomplish this:
- 1.
- Make the Angel Fish layer active by clicking on its thumbnail in the
Layers dialog shown in Figure
7.1 (see
Section
2.1.1 for more on active layers).
- 2.
- Copy the Angel Fish layer to the default buffer by typing C-c in the image window shown in
Figure
7.1.
- 3.
- Paste the Angel Fish layer into the target image by typing C-v
in the image window shown in Figure
7.2.
This loads the Angel Fish layer into a floating selection.
- 4.
- Make the float into a new layer by clicking on the New Layer
button in the Layers dialog.
There are two features worth noting in
Figure
7.2. First, the Layers dialog shows
that the new layer has been named Angel Fish to more easily identify
it later. Second, the Angel Fish layer's boundaries (the yellow and
black dashed line) are visible in the image window because it is the
active layer in the image. The layer's boundaries can be toggled off
by typing C-t in the image window.
With respect to our composition, the first thing you might notice is
that the angel fish seems too large for the background. This can be
fixed by shrinking the angel fish or by enlarging the background. As
already noted in Section
2.6.2, it is almost
always preferable to shrink an image element that is too large rather
than to enlarge the element that is too small. This is because
enlarging an image requires interpolating pixel values, which
introduces unpleasant image artifacts. Always avoid this--unless, of
course, the artifacts are desirable as an artistic device.
Thus, our first task is to scale the Angel Fish layer to a more
fitting size for our scene. This can be done in two ways, either with
the Transform tool from the Toolbox or the Scale
Layer command found in the Layers menu.
Section
2.6.2 describes both. The Transform tool is used here because it is interactive and gives some
visual feedback to the scaling process. The Scaling option of the
Transform tool is invoked by double-clicking on the Transform tool icon in the Toolbox, which brings up the Tool
Options dialog. The Scaling option can then be selected from the
dialog, as shown in Figure
7.3(b).
Figure
7.3(a)
Figure 7.3:
Scaling the Angel Fish
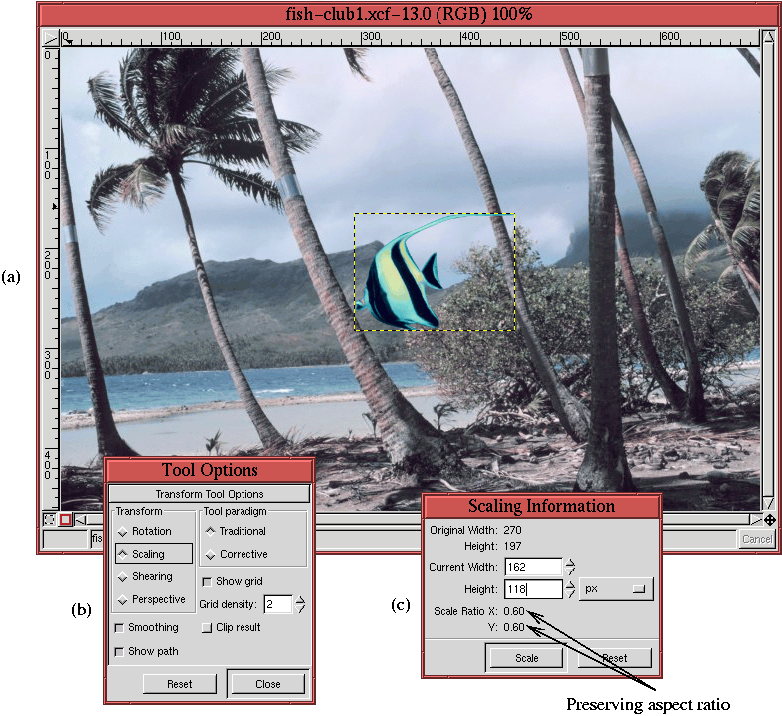 |
shows the result of using the
Transform tool to scale the Angel
Fish layer.
In scaling the Angel Fish layer, the aspect ratio has been preserved.
This prevents the scaled layer from looking distorted. The aspect
ratio can be maintained manually by watching the Scaling
Information dialog and keeping it
manually adjusted during the scaling process. The Scaling
Information dialog provides interactive feedback about the X and Y
Scale Ratios while the transform is being performed. The aspect ratio
is preserved by keeping the X Scale Ratio equal to the Y Scale Ratio.
Alternatively, the Scaling option of the Transform tool can be
constrained to preserve aspect ratio by pressing the Control and Alt
keys while scaling. In this example, the angel fish has been scaled
to 60% of her original dimensions. In the compositing process,
however, this might be undone an redone several times to achieve the
desired effect in the final result.
When the scaling of the angel fish is complete, she can be
positioned using the Move tool. Her final location for this project is seen in
Figure
7.4.
Figure 7.4:
The Beginnings of a Composition
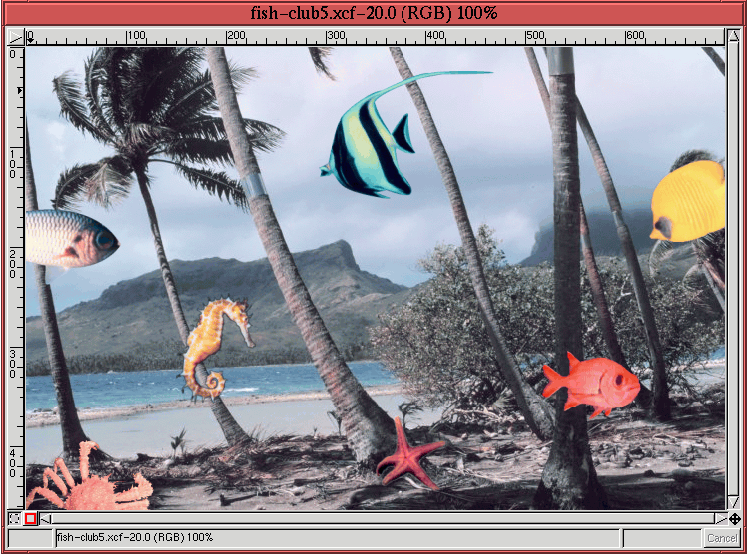 |
Also seen in this figure is the result of repeating the preceding
operations for each of the angel fish's friends. Notice that it is
not necessary for the repositioned image elements to be inside the
boundaries of the background image window. In fact, having layers
that extend partially outside the boundaries can create more interest
in their subject elements.
The final procedure performed in this project adds an element of depth
to our composition. The idea is to make the sea horse's tail look as
if it is wrapped around a tree and to make the little red fish appear
as if it is peaking out from behind another. This is done with layer
masks (see Section
4.2). The
elements of the procedure are shown in
Figure
7.5.
Figure 7.5:
Using a Layer Mask to Create the Illusion of Depth
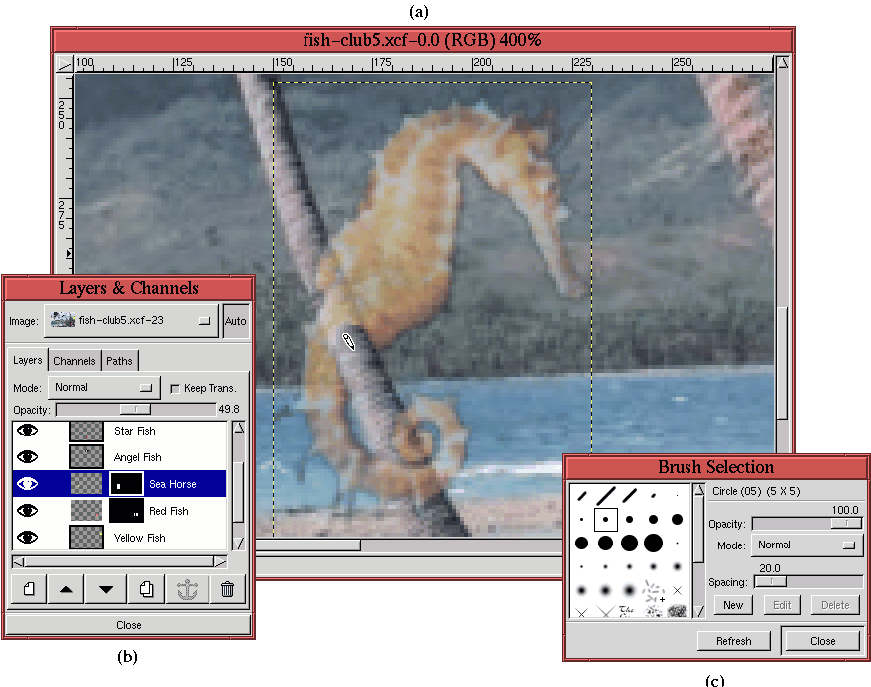 |
Figure
7.5(a) shows a zoom of the image
centered around the sea horse. As you can see from
Figure
7.5(b), a layer mask
has been added to the Sea Horse layer
in the Layers dialog, and the Opacity slider has been set to 50%.
This allows the tree in the background image to be seen through the
Sea Horse layer. In setting the Opacity slider, the goal is to be
able to see the tree's boundaries through the sea horse.
Because the tree's boundaries can be seen, the Paintbrush tool
can be used to paint away parts of the Sea Horse mask making the tree
fully visible from behind. Figure
7.5(a)
shows that this process has been started using a brush from the Brush Selection dialog and shown in
Figure
7.5(c). The whole procedure is
summarized in the following steps:
- 1.
- A layer mask is added to the Sea Horse layer.
- 2.
- The layer mask is made active by clicking on its thumbnail in the
Layers dialog.
- 3.
- The Opacity slider is set so that the tree can be seen through
the Sea Horse layer.
- 4.
- The Active Foreground Color is set to black by typing d in
the image window.
- 5.
- An appropriate brush type and size is selected. Here a small hard
brush is chosen.
- 6.
- Painting tools, such as the Paintbrush and the Airbrush,
are used to reveal the tree from behind the sea horse by painting away
the appropriate parts of the layer mask.
If too much of the layer mask is removed while painting, you can
recover it by changing the Active Foreground Color to white by
typing x in the image window and by painting over the
erroneously removed parts of the mask. Close to the edge of the tree,
it is probably worthwhile working with a smaller brush size in
conjunction with the Airbrush tool, which is more effective at
applying graded amounts of paint. See Section
4.5.1 for
more details.
The result of applying layer masks to both the Sea Horse and the Red
Fish layers is shown in Figure
7.6.
Figure 7.6:
The Final Composition
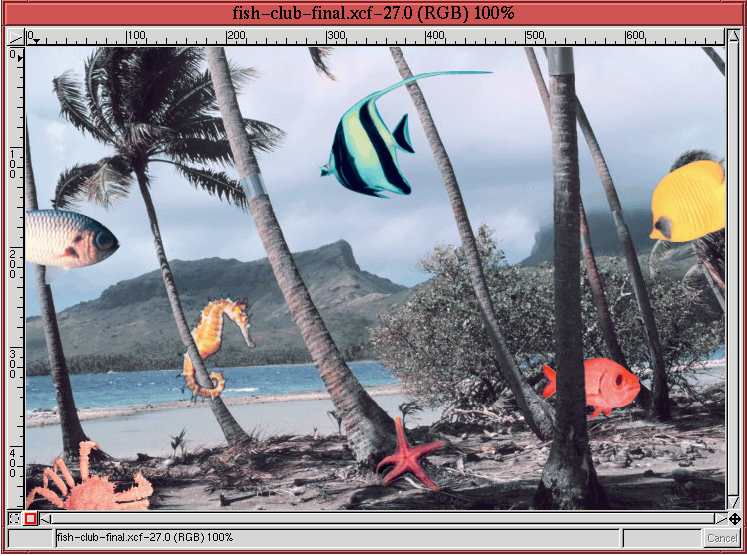 |
The sea horse now seems to be well anchored, with its tail securely
wrapped around the tree, against unforeseen, rapid air currents. The
little red fish, surprisingly coy given its bright coloring, is
peaking out from behind another.
The effects obtained with layer masks could have also been
accomplished with selections applied in the image window. However,
this would have required permanently cutting away parts of the Sea Horse
and Red Fish layers. Alternatively, the layer masks used in
conjunction with the painting tools simplified the work and produced a
more robust solution. Because of the layer masks, nothing has been
irrevocably lost in either the Sea Horse or Red Fish layers. Thus,
these layers can be repositioned if need be--only the layer masks
need be re-edited. This flexibility with positioning adjustments is
not possible when using selections because the cut-away components are
gone.
To summarize, this project reviewed cutting, pasting, scaling, and the
positioning of layers for compositing. In addition, a simple
application of layer masks was used to give our composition some
illusion of depth. The next compositing project is more complicated
because it makes use of the blending modes and the Curves tool.
©2000 Gimp-Savvy.com
