5.8.2 Realistic Shadows and Highlights
A strong specular reflector illuminated by a point source creates a
strong highlight and well defined shadows. However, more diffuse
lighting produces less well-defined effects. Under these
circumstances, the Multiply and Screen blending modes can
be used to create realistic shadows and highlights in an image. These
modes can be used to darken and lighten parts of an image without the
risk of blowing out the tonal range, as is the case for specular
reflectors and point source illumination. The following example
illustrates this application of these blending modes.
Figures
5.30(a) and (b)
Figure 5.30:
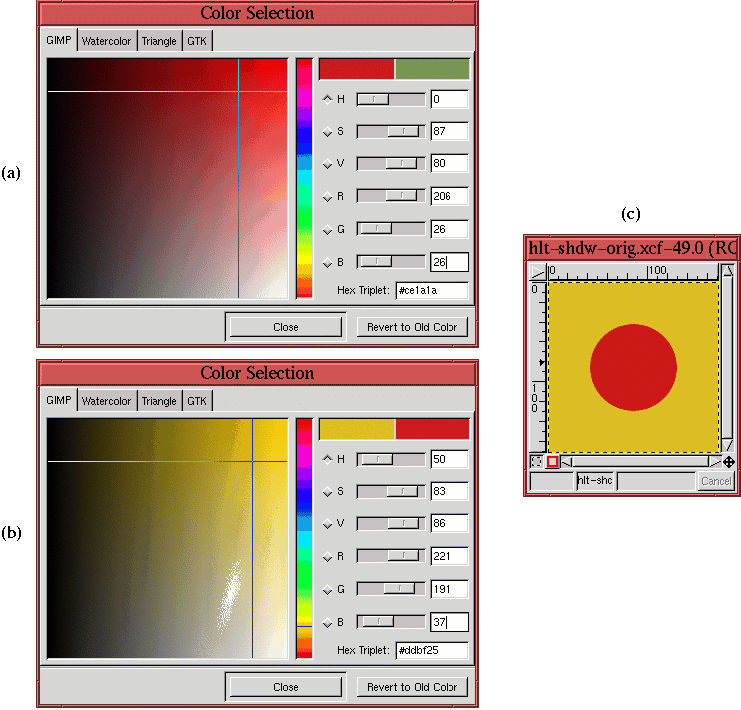
Original Circle with Measured Colors Shown in Color Selection
Dialogs
 |
illustrate two selected colors that are used to make the red circle
on the yellow background shown in
Figure
5.30(c). The goal is to give the
circle a 3D look, to produce the effect of depth and light by creating
a natural, diffuse looking highlight and shadow. The idea is to use
each color itself to create the shadow and highlight. Applying a
color to itself in
Multiply mode tends to slightly darken the
spot where the paint is applied. In
Screen mode, it tends to
slightly lighten it. This darkening and lightening, then, appears
visually as a diffuse shadow and highlight. Repeated applications
increase the shadow/highlight intensity until the desired effect is
achieved.
Using the Color Picker tool, the
measured colors of the image are
221R 191G 37B for the yellow
background and
206R 26G 26B for the red circle. Because the
colors are not fully saturated, they can be used. However, if either
color were fully saturated (that is, a pure red, green, blue, cyan,
magenta, yellow, or white), it would be necessary to select a color
that is slightly off pure for this technique to work. This is easily
done, however, using the Color Selection tool.
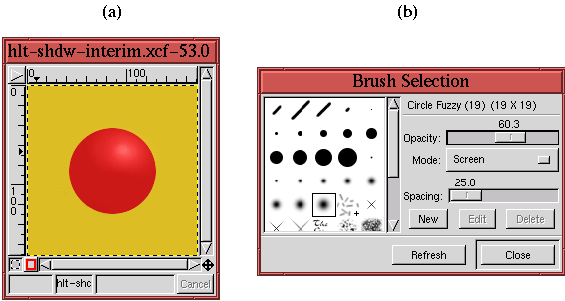
To make the highlight shown in Figure
5.31(a), a
large fuzzy brush is chosen from the Brush Selection tool, as
shown in Figure
5.31(b).
Figure 5.31:
Screening a Diffuse Highlight
 |
Note that, in the
Brush Selection dialog, the blending mode has
been set to
Screen and the opacity to 60%. These numbers were
chosen with some experimentation to achieve results I liked. A light
application of the
Paintbrush tool to the side of the red circle
where I imagine the light to be coming from produces the highlight
shown in Figure
5.31(a). Note that the
Airbrush tool is also an excellent device for
this type of work.
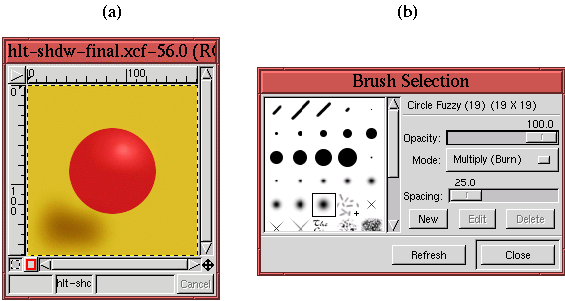
The shadow
shown in Figure
5.32(a) is made with the same
brush; however, now the Multiply blending mode is used, as shown in
Figure
5.32(b).
Figure 5.32:
Multiplying in a Diffuse Shadow
 |
Here, the opacity slider in the
Brush Selection dialog is set to
100%. Again, the numbers depend on the aesthetic sensibilities of
the individual. Light application of the
Paintbrush tool to the
opposite side of the highlight and below the circle produces a
believable, diffuse shadow.
©2000 Gimp-Savvy.com
