4.2.2 Manipulating the Layer Mask
As was first described in Section
2.1.1, the active
layer in the Layers dialog is highlighted in blue. When the active
layer consists of an image layer and a layer mask, only one of these
two components can be active at a time. Operations performed in the
image window affect the active component of the layer, either the
image or the layer mask. The layer mask is made active by clicking on the
layer mask thumbnail. The active focus is returned to the image by
clicking on the image thumbnail.
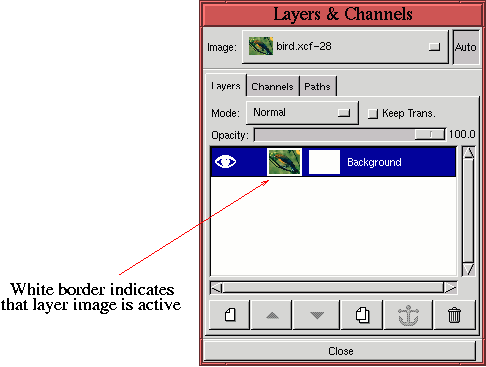
You can determine whether the image or the layer mask is active by a
white border drawn around the appropriate thumbnail in the layer
strip. However, if the layer mask is white, it may be difficult to
tell that there is an additional white border around it. Carefully
examine Figure
4.12(b). Here it can be seen that
the image thumbnail does not have a white border and that the layer
mask thumbnail looks a little taller than the image thumbnail. This
is a clue that the layer mask is active. Changing the active focus
from the layer mask to the image by clicking on the image thumbnail is
shown in Figure
4.13.
Figure 4.13:
Toggling from an Active Layer Mask to an Active Layer Image
 |
It can be seen that the image thumbnail now has the white border.
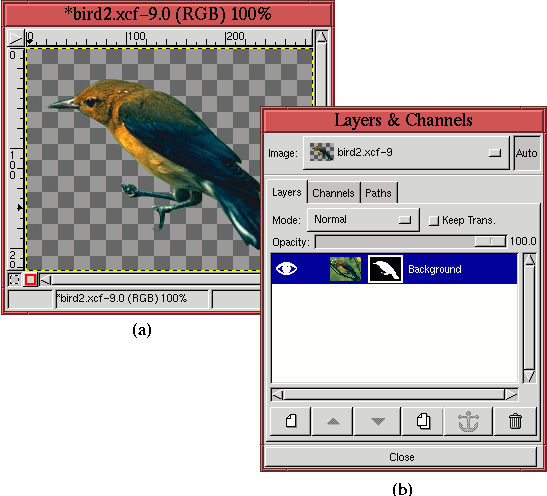
A layer mask is a direct way of editing an image layer's alpha
channel. Thus, performing
edits on the layer mask changes the opacity of the corresponding image
layer. This is illustrated in Figure
4.14.
Figure 4.14:
Editing a Layer Mask Edits the Image Layer's Alpha Channel
 |
Figure
4.14(b) shows that the image consists of a
single layer with a layer mask. The layer mask has been constructed
so that the white part of the mask corresponds to the bird shown in
Figure
4.12(a) and the black part corresponds to
the rest of the image.
Figure
4.14(a) shows the effect of the layer
mask; it makes the region around the bird's body completely
transparent. It is important to note that the background part of the
image has not been destroyed; it just can't be seen due to the
modified values in the alpha channel. Section
4.3
describes in detail how a layer mask can be edited to produce a result
like the one shown in Figure
4.14. However,
before doing that, several additional features of layer masks must be
described.
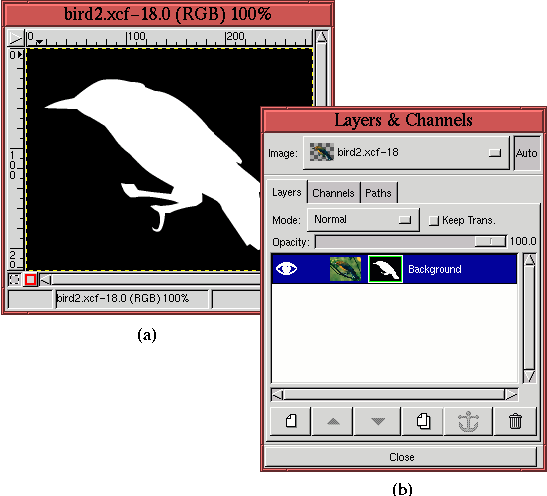
It is often useful to be able to examine the layer mask without the
visual interference of the image layer. This can be accomplished by
Alt-clicking on the
thumbnail of the layer mask. Doing this toggles off the visibility of
the image layer in the image window, leaving just the layer mask. In
addition, the outline of the layer mask thumbnail in the Layers dialog
becomes green. This is illustrated in
Figure
4.15.
Figure 4.15:
Viewing Only the Mask in the Image Window
 |
The mask seen in the image window is shown in
Figure
4.15(a), and the green border around the
layer mask thumbnail is shown in Figure
4.15(b).
The effect can be toggled off by Alt-clicking on the thumbnail a
second time.
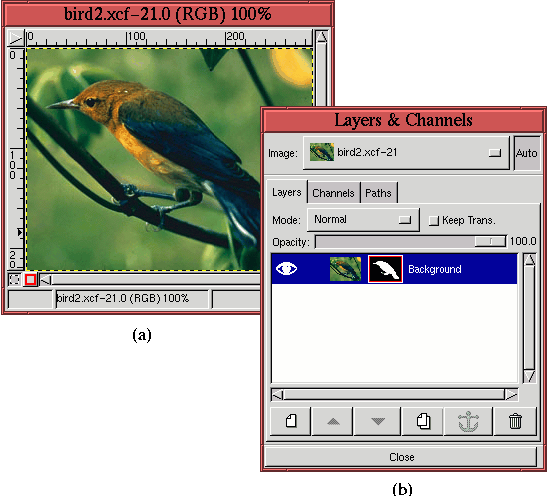
Similarly, it can be useful to toggle off the visual effect the layer
mask has
on the image. This is done by Control-clicking on the layer mask
thumbnail. When this is done, the effect of the layer mask on the
image is toggled off, and the border of the layer mask thumbnail
becomes red. Figure
4.16
Figure 4.16:
Suppressing the Effect of the Layer Mask in the Image Window
 |
illustrates this. The full image can now be seen in
Figure
4.16(a) and a red border can be seen
around the layer mask thumbnail in
Figure
4.16(b).
A layer mask can be converted to the image layer's alpha channel by
choosing the Apply Layer Mask function
from the Layers menu. This is not normally necessary, though, because
the action of the mask is the same whether it remains a mask or is
converted to the alpha channel. However, the Apply Layer Mask
dialog also permits the layer mask to be discarded. This is the only
way to remove a layer mask. Applying a layer mask by converting it to
an alpha channel destroys the mask and removes it from the Layers
dialog. It can be recovered, though, by choosing Add Layer Mask
from the Layers menu and choosing Layer's Alpha Channel as the mask option.
Finally, a layer mask can be converted directly to a selection. This
is done by choosing Mask To Selection from the Layers
menu. This operation creates a selection by mapping the white pixels
in the layer mask to selected pixels in the image window, black pixels
in the layer mask to unselected pixels, and gray pixels in the layer
mask to partially selected pixels. Note that applying the mask as a
selection does not destroy the mask.
©2000 Gimp-Savvy.com
