Chapter 10. Software RAID Configuration
Software RAID can be configured during the graphical installation process,
the text-based installation process, or during a kickstart
installation. This chapter discusses how to configure software RAID during
installation, using the Disk Druid interface.
Read Chapter 9 Redundant Array of Independent Disks (RAID) first to learn about RAID, the
differences between hardware and software RAID, and the differences
between RAID 0, 1, and 5. An overview of the steps required to configure
RAID include:
Applying software RAID partitions to the
physical hard drives.
If you wish to have the boot partition (/boot/)
reside on a RAID parition, it must be on a RAID 1
partition.
Creating RAID devices from the software
RAID partitions.
Optional: Configuring LVM
from the RAID devices. Refer to Chapter 8 LVM Configuration for
more information on configuring LVM after first configuring RAID.
Creating file systems from the RAID devices.
 | Note |
|---|
| | Although the following steps are illustrated during a GUI installation, the
same can be done during a text-based installation.
Configuration of software RAID must be done manually in
Disk Druid during the installation process.
|
Two 9.1 GB SCSI drives (/dev/sda and
/dev/sdb) are used in the following examples. They
detail how to create a simple RAID 1 configuration by implementing
multiple RAID devices.
On the Disk Partitioning Setup screen, select
Manually partition with Disk Druid.
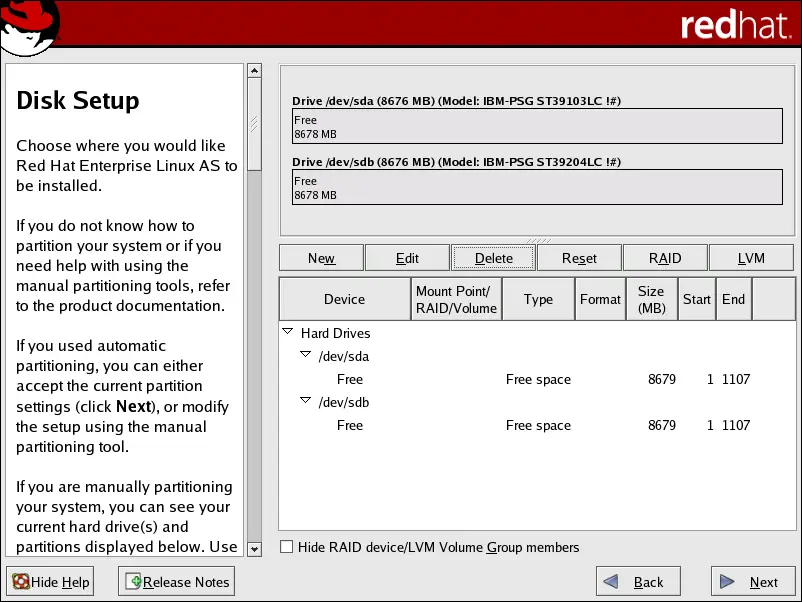
In a typical situation, the disk drives are new or are formatted. Both
drives are shown as raw devices with no partition configuration in
Figure 10-1.
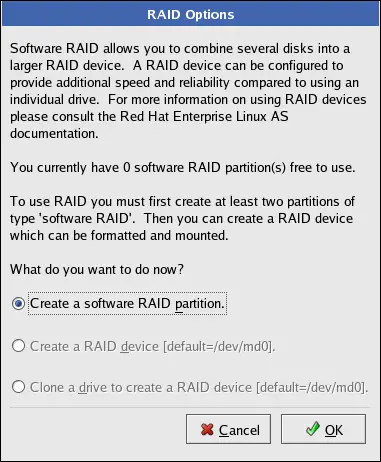
In Disk Druid, choose
RAID to enter the software RAID creation
screen.
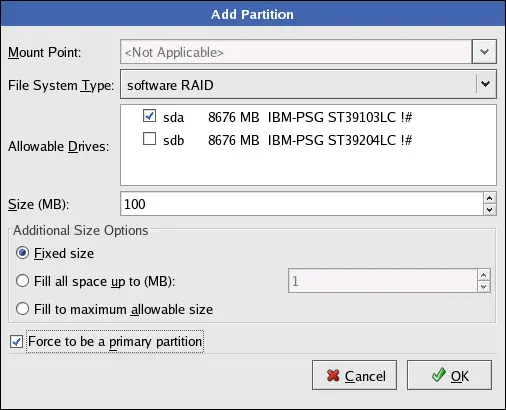
Choose
to create a RAID partition as shown in Figure 10-2. Note that no other RAID options (such as
entering a mount point) are available until RAID partitions, as well as
RAID devices, are created.
A software RAID partition must be constrained to one drive. For
, select the drive on
which RAID is to be created. If you have multiple drives, all
drives are selected, and you must deselect all but one drive.
Enter the size that you want the partition to be.
Select Fixed size to make the partition the
specified size, select Fill all space up to (MB)
and enter a size in MBs to give range for the partition size, or
select Fill to maximum allowable size to make it
grow to fill all available space on the hard disk. If you make more
than one partition growable, they share the available free space
on the disk.
Select Force to be a primary partition if you
want the partition to be a primary partition. A primary partition is
one of the first four partitions on the hard drive. If unselected,
the partition is created as a logical partition. If other operating
systems are already on the system, unselecting this option should be
considered. For more information on primary versus logical/extended
partitions, refer to the appendix section of the
Red Hat Enterprise Linux Installation Guide.
Click OK to return to the main screen.
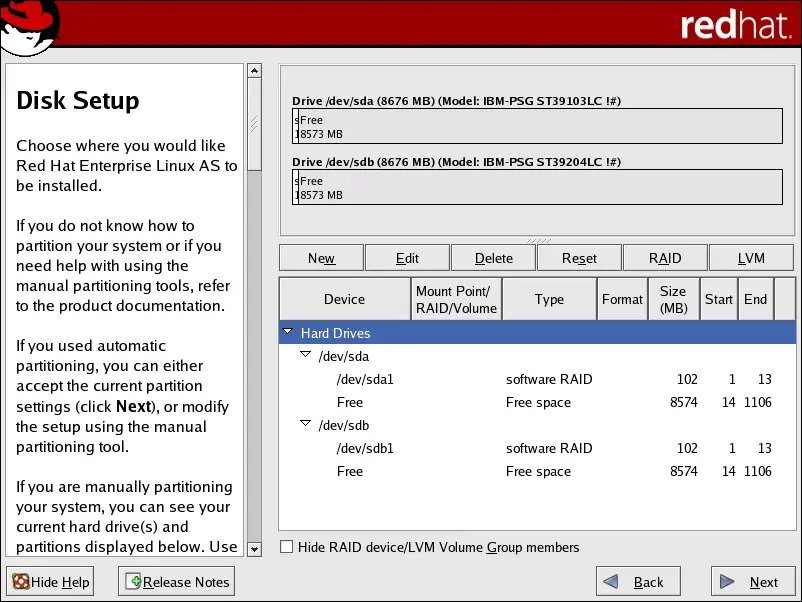
Repeat these steps to create as many partitions as needed for your RAID
setup. Notice that all the partitions do not have to be RAID
partitions. For example, you can configure only the
/boot/ partition as a software RAID device, leaving
the root partition (/), /home/,
and swap as regular file systems. Figure 10-4 shows successfully
allocated space for the RAID 1 configuration (for
/boot/), which is now ready for RAID device and mount
point creation: