9.1.2 GIMP Layers Can Behave Like Animation Frames
Animations are sequences of images that can be played according to
timing information attached to each frame. The GIMP has built-in
support for animations because each layer in an image can be treated
as an animation frame by the GIMP. The GIMP supports this equivalence
by allowing timing information to be attached to layers, by providing
a tool for playing layered images as animations, and by supporting the
conversion of layered
images to Indexed format and output as GIF files.
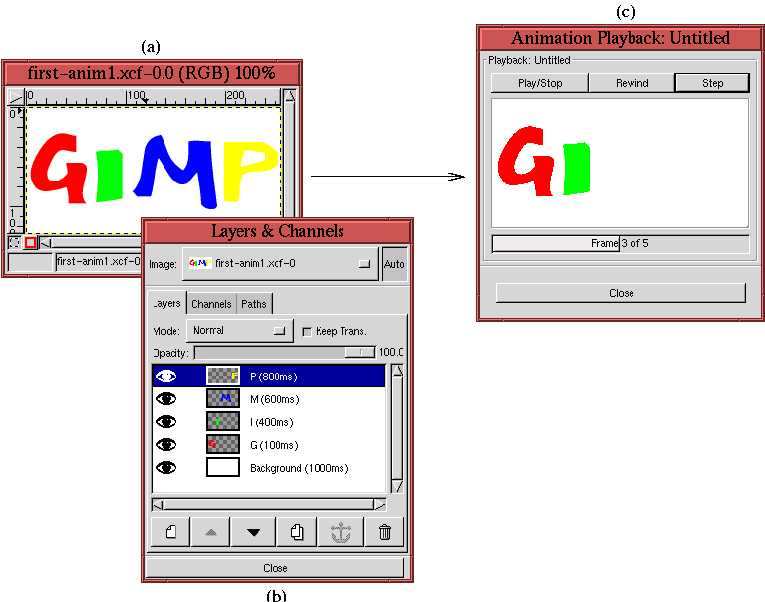
Figure
9.1
Figure 9.1:
Example of Some GIMP Animation Features
 |
illustrates some of the GIMP's built in animation features.
Figure
9.1(a) shows an image that consists
of five layers. The organization of the layers is seen in the Layers
dialog shown in Figure
9.1(b). This image
is constructed by creating an image with a white background, and then
adding four new layers, each one containing, in sequence, one of the
four letters G, I, M, and P. The letters were colored using the
Bucket Fill tool.
The animation sequence is illustrated here:
(Note: The animation can be turned off by clicking on the Stop
button of your browser.)
Notice that each layer is named and that the names contain timing
information used for the
frame animation. The timing information is indicated by the text in
the format (XXXXms), where XXXX is a 1 to 4 digit number, and ms
indicates that the units of the number are in milliseconds. The
parentheses are a required part of the format. Thus, for this
example, the Background layer appears empty for 1 second (1000ms)
followed by the four letters appearing at intervals of 100ms, 400ms,
600ms, and 800ms. Name and timing information is added to each layer
by double-clicking the layer title area to the right of the thumbnail
as described in Section
2.1.1.
The animation in Figure
9.1(a) can be
viewed in the GIMP using the Animation Playback tool found in
the Image:Filters/Animation menu. As you can see in
Figure
9.1(c), the tool consists of a
Play/Stop button, a Step button, which allows the animation to be
stepped along a frame at a time, and a Rewind button, which can be
used to set the animation back to the first frame. This last button
is particularly useful if the animation consists of a very large
number of frames. The Animation Playback tool plays the animation associated to the image using
the timing information as specified in the name of each layer. Note
that there is also a progress bar that shows the animation's current
frame number.
By default, GIMP animations sequentially present frames using the
Combine mode. This means that as
each new frame is displayed, it is stacked on the previous one. Thus,
if a new frame is partially transparent the previous frame can be seen
through its transparent parts. This is not the traditional movie
paradigm for animation, which, instead of combining frames, replaces
each frame with a new one. Consequently, although the frames in
Figure
9.1 all consist of single letters
on a transparent field, the animation spells out the word GIMP a
letter at a time on the white background of the first layer.
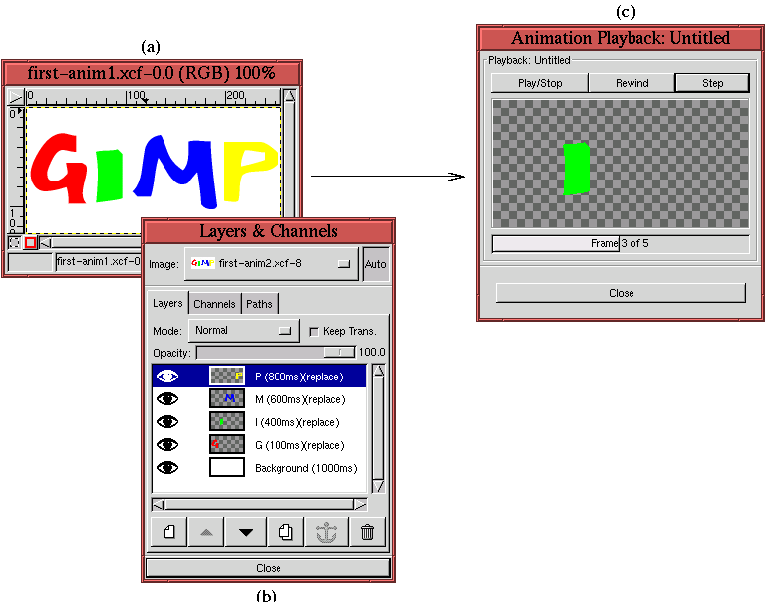
Figure
9.2
Figure 9.2:
Example of Replace Mode
 |
illustrates the same example as in
Figure
9.1 except now each layer uses
Replace
instead of Combine mode
in the animation sequence. The Layers dialog in
Figure
9.2(b) shows that the Replace mode
is specified by typing the text
(replace) in the title field of
each layer. The
Animation Playback tool shown in
Figure
9.2(c) shows the animation at the
same point in the sequence as before. However, now, due to Replace
mode being used, the white background and the red letter G are not
visible. There is only the green letter I on a transparent
background. This is the traditional movie paradigm for animation.
The new animation sequence is shown here:
(Note: The animation can be turned off by clicking on the Stop
button of your browser.)
The explicit use of Combine mode can be made by typing the text (combine) instead of (replace) in a layer title. The two modes
can be used together in an animation with some frames replacing and
others combining.
