Subsections
Blending modes are fascinating toys that are lots of fun and can
stimulate creative play with color. Results of experimenting with the
blending modes often produce surprising and very aesthetic results.
Blending modes, however, are a lot more than toys for playing with
color; some very useful operations would be impossible without them.
Examples of practical uses for blending modes can be found in
Sections
7.2,
7.3, and
7.4.
This section describes two great applications of blending modes that
do not appear elsewhere in this book.
5.8.1 Colorization
It is often desirable to completely change the color of a
subject--the color of a car, a lip gloss, eyes, a dress. The
problem with changing the color of any real world image is that there
are always lots of variations in the shading of a color. This is due
to natural color gradations, lighting conditions, and textures.
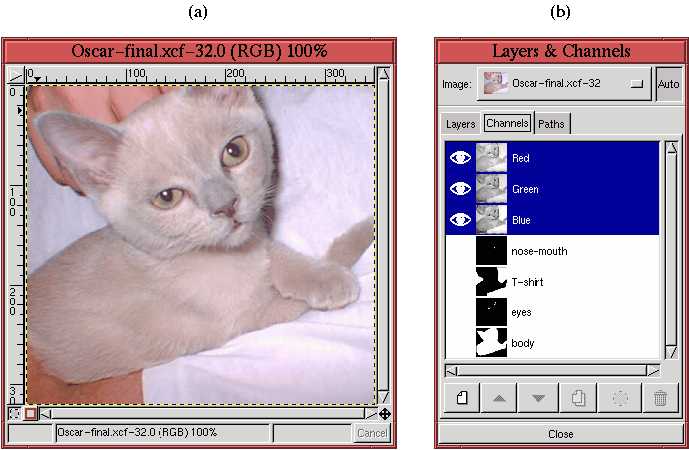
Figure
5.26(a)
Figure 5.26:
Image Whose Color Is to Be Changed
 |
illustrates such an image. Notice the subtle variations in the
kitten's fur. The gray color of her coat has highlights and shadows
as well as natural variations due to the texture of her fur. Changing
the color of her coat requires choosing the new color and applying it
in such a way that these natural looking variations are preserved.
The Color blending mode is purr-fect
for this type of operation. This mode combines the hue and saturation
of the foreground with the lightness of the background. Thus, the
natural dark and light areas of the kitten's coat are preserved and
only the color changes. The following illustrates how the
technique is applied.
The objective is to change the kitten into a tabby colored cat with
blue-ish eyes and to make the T-shirt of the person holding her a
khaki green. To do this, a separate selection is made of the kitten's
body, her eyes, her nose and mouth, and of the T-shirt. Each of these
image components are selected using any of the techniques from
Chapters
3 or
4 (I used the Bezier
Path tool). Each selection is stored as a channel mask, as shown in
the Channels dialog displayed in
Figure
5.26(b). The four channel masks
are labeled Body, Eyes, T-shirt, and Nose+Mouth.
The next step is to create a transparent layer above the kitten image
where the new colors can be applied. The new layer is created by
clicking on the New Layer button in the Layers dialog. When the
New Layer Options dialog appears, the Transparent option is
used, and the resulting layer is labeled Colorization Layer. Changing
the blending mode of this new layer to Color, the color surgery
can begin.
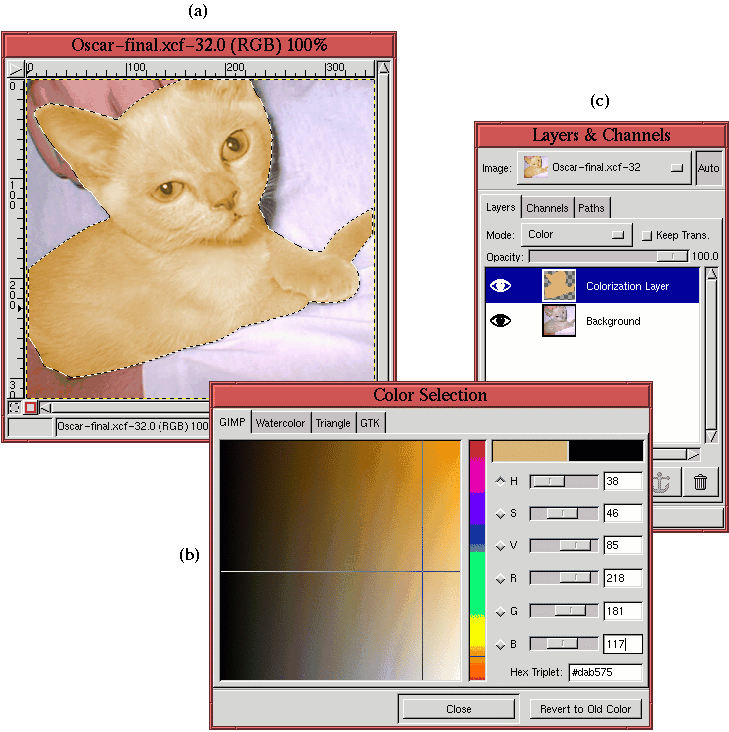
The Body channel mask is used to recover the selection of the kitten's
body by applying the function Channel to Selection from the
Channels menu (see Section
4.1.5). The Marching Ants
for this selection can be seen in
Figure
5.27(a). Now, making sure that
the Colorization layer is active by clicking on its thumbnail in the
Layers dialog, the Color Selection tool, as shown in
Figure
5.27(b), is used to pick the
desired color, and the Bucket Fill tool
is used to apply the color to the selected region.
Figure
5.27(a)
Figure 5.27:
Making the Kitten's Coat Tabby-Colored
 |
shows the result of this process. Note that the lightness variations
of the kitten's coat from the lower layer are applied to the color and
saturation choices in the upper one. Also note that, in the Layers
dialog, shown in Figure
5.27(c), the
Colorization Layer shows the thumbnail of the
Bucket Fill
operation.
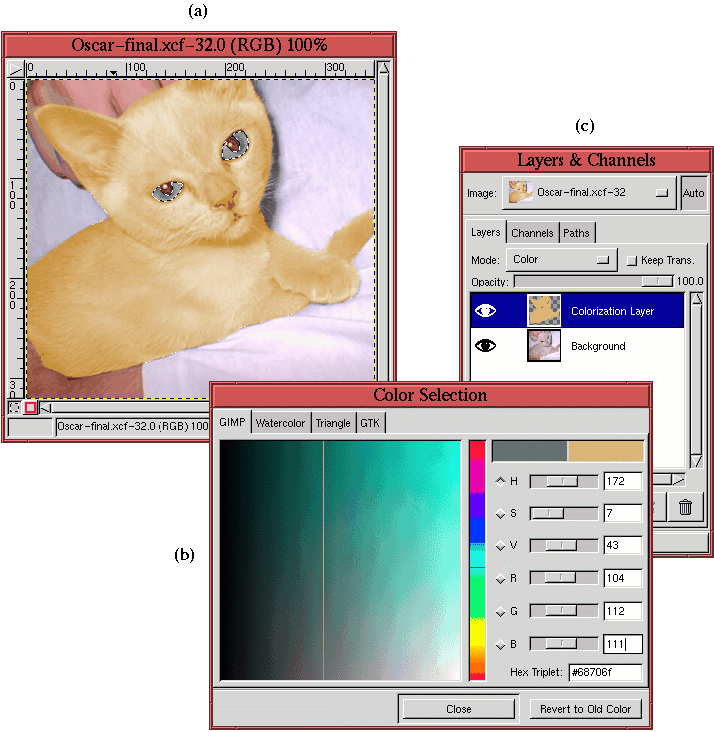
The color of the kitten's eyes are changed using a similar operation.
After applying the selection from the Eyes channel mask and making the
Colorization layer active, you can apply the desired color to the
eyes. Figure
5.28(b)
Figure 5.28:
Making the Kitten's Eyes Blue
 |
shows the color selection, Figure
5.28(a)
shows the result of the eye-coloring procedure, and
Figure
5.28(c) shows the corresponding
Layers dialog.
Before proceeding to the final operation, that of changing the T-shirt
color, an important touch is needed to make the kitten's nose, mouth,
and inner ear look natural. These parts are not the same color as her
fur and require a little pink to make them look correct. The nose and
mouth are colored by converting the Nose+Mouth mask to a selection and
by using the Bucket Fill tool to apply an appropriately chosen
pink color. As for the kitten's inner ear, the color is applied a
little differently. The inside of her ear consists of both fur and
skin, and, consequently, the Airbrush tool
is more suitable than the Bucket Fill tool for locally applying
the pink paint.
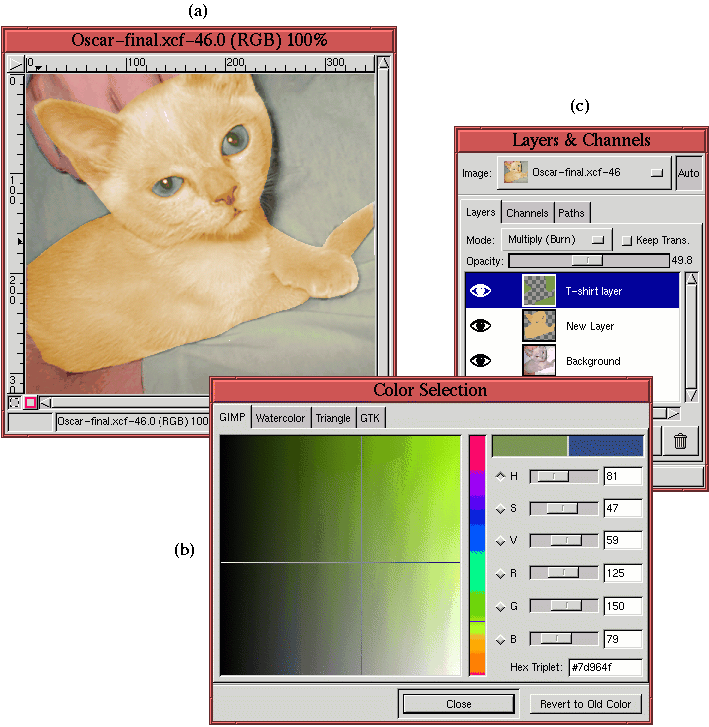
Making the T-shirt a khaki green is a little different from the
previous colorization efforts. Because the T-shirt's color in the
original image is so light, it is impossible to make it any darker
using the Color blending mode, which uses the lightness of the
lower layer. This problem can be solved by changing blending modes.
Creating a new transparent layer and setting the mode to Multiply allows darker color to
be applied to the T-shirt. The result of this is shown in
Figure
5.29(a).
Figure 5.29:
Making the T-shirt a Khaki Green Using Multiply Mode
 |
Figure
5.29(b) shows the color chosen for
the T-shirt, and Figure
5.29(c) shows the
thumbnail of the new layer and the choice of the
Multiply
blending mode. Note that I set the Opacity slider to 50% for this
layer, which adjusted the color to a value I liked.
