Managing Users and Rights With the Solaris Management Console (Task Map)
In Trusted Extensions, you must use the Solaris Management Console to administer
users, authorizations, rights, and roles. To manage users and their security attributes, assume
the Security Administrator role.
How to Modify a User's Label Range in the Solaris Management Console
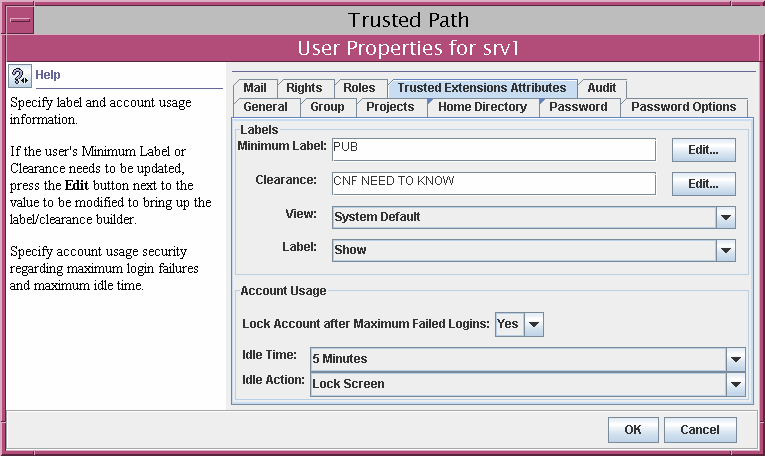
You might want to extend a user's label range to give the
user read access to an administrative application. For example, a user who can
log in to the global zone could then run the Solaris Management Console.
The user could view, but not not change the contents.
Alternatively, you might want to restrict the user's label range. For example, a
guest user might be limited to one label.
Before You Begin
You must be in the Security Administrator role in the global zone.
- Open a Trusted Extensions toolbox in the Solaris Management Console.
Use a toolbox of the appropriate scope. For details, see Initialize the Solaris Management Console Server in Trusted Extensions.
- Under System Configuration, navigate to User Accounts.
A password prompt might be displayed.
- Type the role password.
- Select the individual user from User Accounts.
- Click the Trusted Extensions Attributes tab.

- To save the changes, click OK.
How to Create a Rights Profile for Convenient Authorizations
Where site security policy permits, you might want to create a rights profile
that contains authorizations for users who can perform tasks that require authorization. To
enable every user of a particular system to be authorized, see How to Modify policy.conf Defaults.
Before You Begin
You must be in the Security Administrator role in the global zone.
- Open a Trusted Extensions toolbox in the Solaris Management Console.
Use a toolbox of the appropriate scope. For details, see Initialize the Solaris Management Console Server in Trusted Extensions.
- Under System Configuration, navigate to Rights.
A password prompt might be displayed.
- Type the role password.
- To add a rights profile, click Action –> Add Right.
- Create a rights profile that contains one or more of the following authorizations.
For the step-by-step procedure, see How to Create or Change a Rights Profile in System Administration Guide: Security Services.
In the following figure, the Authorizations Included window shows the authorizations that might
be convenient for users.

Allocate Device – Authorizes a user to allocate a peripheral device, such as a microphone.
By default, Solaris users can read and write to a CD-ROM. However, in Trusted Extensions, only users who can allocate a device can access the CD-ROM drive. To allocate the drive for use requires authorization. Therefore, to read and write to a CD-ROM in Trusted Extensions, a user needs the Allocate Device authorization.
Downgrade DragNDrop or CutPaste Info – Authorizes a user to select information from a higher-level file and place that information in a lower-level file.
Downgrade File Label – Authorizes a user to lower the security level of a file
DragNDrop or CutPaste without viewing contents – Authorizes a user to move information without viewing the information that is being moved.
Print Postscript – Authorizes a user to print PostScriptTM files.
Print without Banner - Authorizes a user to print hard copy without a banner page.
Print without Label – Authorizes a user to print hard copy that does not display labels.
Remote Login – Authorizes a user to remotely log in.
Shutdown the System – Authorizes a user to shut down the system and to shut down a zone.
Upgrade DragNDrop or CutPaste Info – Authorizes a user to select information from a lower-level file and place that information in a higher-level file.
Upgrade File Label – Authorizes a user to heighten the security level of a file.
- Assign the rights profile to a user or a role.
For assistance, see the online help. For the step-by-step procedure, see How to Change the RBAC Properties of a User in System Administration Guide: Security Services.
Example 13-6 Assigning a Printing-Related Authorization to a Role
In the following example, the Security Administrator allows a role to print jobs
without labels on body pages.
In the Solaris Management Console, the security administrator navigates to Administrative Roles. She
views the rights profiles that are included in a particular role, then ensures
that the print-related authorizations are contained in one of the role's rights profiles.
How to Restrict a User's Set of Privileges
Site security might require that users be permitted fewer privileges than users are
assigned by default. For example, at a site that uses Trusted Extensions
on Sun Ray systems, you might want to prevent users from viewing other
users' processes on the Sun Ray server.
Before You Begin
You must be in the Security Administrator role in the global zone.
- Open a Trusted Extensions toolbox in the Solaris Management Console.
Use a toolbox of the appropriate scope. For details, see Initialize the Solaris Management Console Server in Trusted Extensions.
- Under System Configuration, navigate to User Accounts.
A password prompt might be displayed.
- Type the role password.
- Double–click the icon for the user.
- Remove one or more of the privileges in the basic set.
- Double-click the icon for the user.
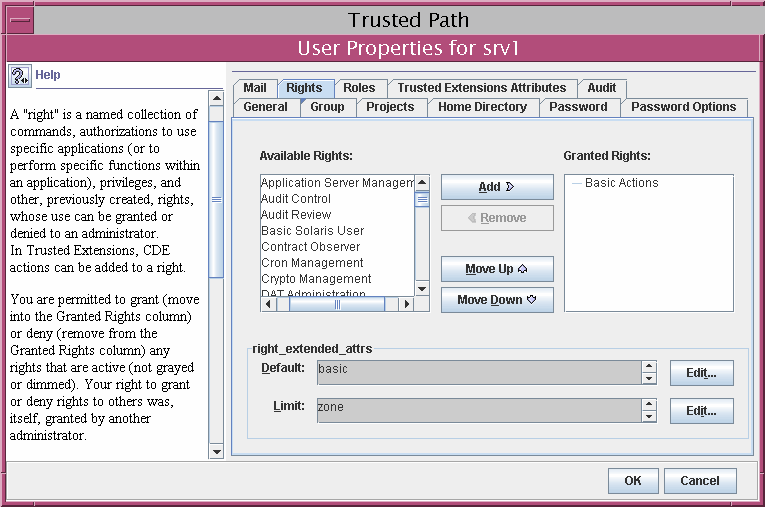
- Click the Rights tab.

- Click the Edit button to the right of the basic set in the
right_extended_attr field.
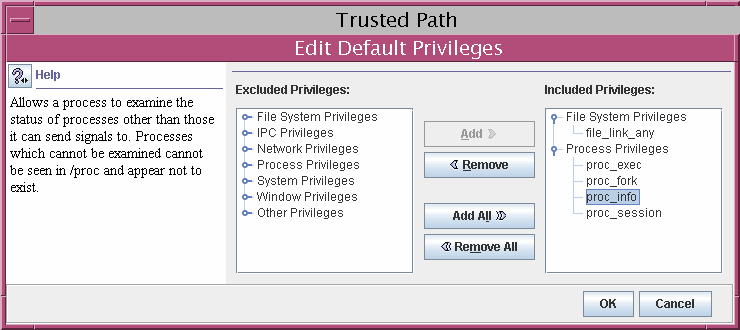
- Remove proc_session or file_link_any.
By removing the proc_session privilege, you prevent the user from examining any processes
outside the user's current session. By removing the file_link_any privilege, you prevent the user
from making hard links to files that are not owned by the
user.
Caution - Do not remove the proc_fork or the proc_exec privilege. Without these
privileges, the user would not be able to use the system.

- To save the changes, click OK.
How to Prevent Account Locking for Users
Trusted Extensions extends the user security features in the Solaris Management Console
to include account locking. Turn off account locking for users who can assume
a role.
Before You Begin
You must be in the Security Administrator role in the global zone.
- Start the Solaris Management Console.
Use a toolbox of the appropriate scope. For details, see Initialize the Solaris Management Console Server in Trusted Extensions.
- Under System Configuration, navigate to User Accounts.
A password prompt might be displayed.
- Type the role password.
- Double–click the icon for the user.
- Click the Trusted Extensions Attributes tab.
- In the Account Usage section, choose No from the pull-down menu next to
Lock account after maximum failed logins.
- To save the changes, click OK.
How to Hide Labels From a User
Hiding labels is useful at a site where users can work at
a single label only. An organization might not want regular users to see
labels or to be aware of mandatory access controls. Ordinary users can then
work whose desktop closely resembles the Java Desktop System, Release number or the
CDE desktop on a Solaris system.
Before You Begin
You must be in the Security Administrator role in the global zone.
- Open a Trusted Extensions toolbox in the Solaris Management Console.
Use a toolbox of the appropriate scope. For details, see Initialize the Solaris Management Console Server in Trusted Extensions.
- Under System Configuration, navigate to User Accounts.
A password prompt might be displayed.
- Type the role password.
- Double–click the icon for the user.
- Click the Trusted Extensions Attributes tab.
- Choose Hide from the Label: selection list.
This setting overrides the value of LABELVIEW in the system's policy.conf file. For
details, see Default User Security Attributes in Trusted Extensions.
- To save the changes, click OK.
How to Enable a User to Change the Security Level of Data
A regular user or a role can be authorized to change the
security level, or labels, of files and directories. The user or role, in
addition to having the authorization, must be configured to work at more than
one label. And, the labeled zones must be configured to permit relabeling. For
the procedure, see How to Enable Files to be Relabeled From a Labeled Zone.
Caution - Changing the security level of data is a privileged operation. This task is
for trustworthy users only.
Before You Begin
You must be in the Security Administrator role in the global zone.
- Follow the procedure How to Create a Rights Profile for Convenient Authorizations to create a rights profile.
The following authorizations enable a user to relabel a file:
Downgrade File Label
Upgrade File Label
The following authorizations enable a user to relabel information within a file:
Downgrade DragNDrop or CutPaste Info
DragNDrop or CutPaste Info Without Viewing
Upgrade DragNDrop or CutPaste Info
- Use the Solaris Management Console to assign the profile to the appropriate
users and roles.
For assistance, use the online help. For a step-by-step procedure, see How to Change the RBAC Properties of a User in System Administration Guide: Security Services.
How to Delete a User Account From a Trusted Extensions System
When a user is removed from the system, you must ensure that
the user's home directory and any objects that the user owns are also
deleted. As an alternative to deleting objects that are owned by the user,
you might change the ownership of these objects to a valid user.
You must also ensure that all batch jobs that are associated with
the user are also deleted. No objects or processes belonging to a removed
user can remain on the system.
Before You Begin
You must be in the System Administrator role.
- Archive the user's home directory at every label.
- Archive the user's mail files at every label.
- In the Solaris Management Console, delete the user account.
- Open a Trusted Extensions toolbox in the Solaris Management Console.
Use a toolbox of the appropriate scope. For details, see Initialize the Solaris Management Console Server in Trusted Extensions.
- Under System Configuration, navigate to User Accounts.
A password prompt might be displayed.
- Type the role password.
- Select the user account to be removed, and click the Delete button.
You are prompted to delete the user's home directory and mail files. When
you accept the prompt, the user's home directory and mail files are
deleted in the global zone only.
- In every labeled zone, manually delete the user's directories and mail files.
Note - You are responsible for finding and deleting the user's temporary files at all
labels, such as files in /tmp directories.
