Using Roles
After you have set up roles with default Solaris rights profiles, and assigned
the roles to users, the roles can be used. A role can
be assumed on the command line. In the Solaris Management Console, a role
can also be used for administering the system locally and over the network.
How to Assume a Role in a Terminal Window
Before You Begin
The role must already be assigned to you. The name service must
be updated with that information.
- In a terminal window, determine which roles you can assume.
% roles
Comma-separated list of role names is displayed
- Use the su command to assume a role.
% su - rolename
Password: <Type rolename password>
$
The su - rolename command changes the shell to a profile shell for the
role. A profile shell recognizes security attributes (authorizations, privileges, and set ID bits).
- Verify that you are now in a role.
$ /usr/ucb/whoami
rolename
You can now perform role tasks in this terminal window.
- (Optional) View the capabilities of your role.
For the procedure, see How to Determine the Privileged Commands That a Role Can Run.
Example 9-10 Assuming the Primary Administrator Role
In the following example, the user assumes the role of Primary Administrator. In
the default configuration, this role is equivalent to superuser. The role then checks
to see which privileges are available to any command that is typed in
the profile shell for the role.
% roles
sysadmin,oper,primaryadm
% su - primaryadm
Password: <Type primaryadm password>
$ /usr/ucb/whoami Prompt has changed to role prompt
primaryadm
$ ppriv $$
1200:   pfksh
flags = <none>
        E (Effective): all
        I (Inheritable): basic
        P (Permitted): all
        L (Limit): all
For information about privileges, see Privileges (Overview).
Example 9-11 Assuming the root Role
In the following example, the user assumes the root role. The role was
created in How to Make root User Into a Role
% roles
root
% su - root
Password: <Type root password>
# /usr/ucb/whoami Prompt has changed to role prompt
root
$ ppriv $$
1200:   pfksh
flags = <none>
        E: all
        I: basic
        P: all
        L: all
For information about privileges, see Privileges (Overview).
Example 9-12 Assuming the System Administrator Role
In the following example, the user assumes the role of System Administrator. In
contrast to the Primary Administrator role, the System Administrator has the basic set
of privileges in its effective set.
% roles
sysadmin,oper,primaryadm
% su - sysadmin
Password: <Type sysadmin password>
$ /usr/ucb/whoami Prompt has changed to role prompt
sysadmin
$ ppriv $$
1200:   pfksh
flags = <none>
        E: basic
        I: basic
        P: basic
        L: all
For information about privileges, see Privileges (Overview). For a short description of the
capabilities of the role, see System Administrator Rights Profile.
How to Assume a Role in the Solaris Management Console
To change information in the Solaris Management Console GUI requires administrative capabilities. A
role gives you administrative capabilities. If you want to view information, you must
have the solaris.admin.usermgr.read authorization. The Basic Solaris User rights profile includes this authorization.
Before You Begin
An administrative role that can change the properties of users or roles must
have already been assigned to you. For example, the Primary Administrator role can
change the properties of users or roles.
- Start the Solaris Management Console.
% /usr/sbin/smc &
For detailed instructions, see Using the Solaris Management Tools With RBAC (Task Map) in System Administration Guide: Basic Administration.
- Select the toolbox for your task.
Navigate to the toolbox that contains the tool or collection in the appropriate
name service scope and click the icon. The scopes are files (local), NIS,
NIS+, and LDAP. If the appropriate toolbox is not displayed in the navigation
pane, choose Open Toolbox from the Console menu and load the relevant toolbox.
- Select the tool that you want to use.
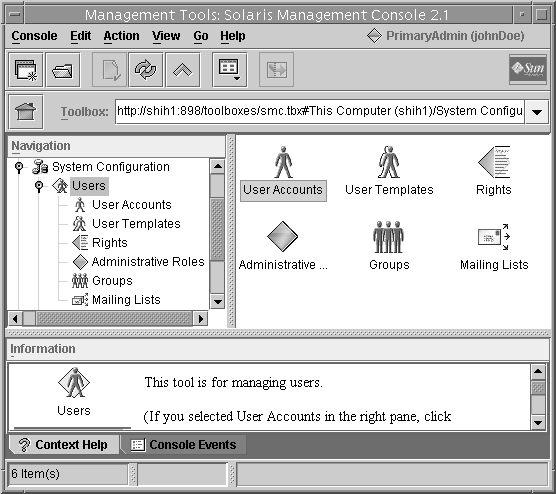
Navigate to the tool or collection and click the icon. The tools for
managing the RBAC elements are in the Users tool, as shown in the
following figure.

- Type your user name and password in the Login: User Name dialog box.
- Authenticate yourself in the Login: Role dialog box.
The Role option menu in the dialog box displays the roles that are
assigned to you. Choose a role and type the role password.
