Mounting and Unmounting File Systems
Before you can access the files on a file system, you need
to mount the file system. When you mount a file system, you attach
that file system to a directory (mount point) and make it available to the system.
The root (/) file system is always mounted. Any other file system can
be connected or disconnected from the root (/) file system.
When you mount a file system, any files or directories in the underlying
mount point directory are unavailable as long as the file system is mounted.
These files are not permanently affected by the mounting process. They become available
again when the file system is unmounted. However, mount directories are typically
empty because you usually do not want to obscure existing files.
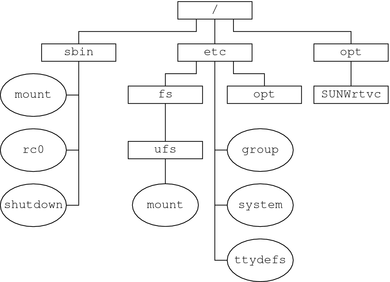
For example, the following figure shows a local file system, starting with a
root (/) file system and the sbin, etc, and opt subdirectories.
Figure 17-1 Sample root (/) File System

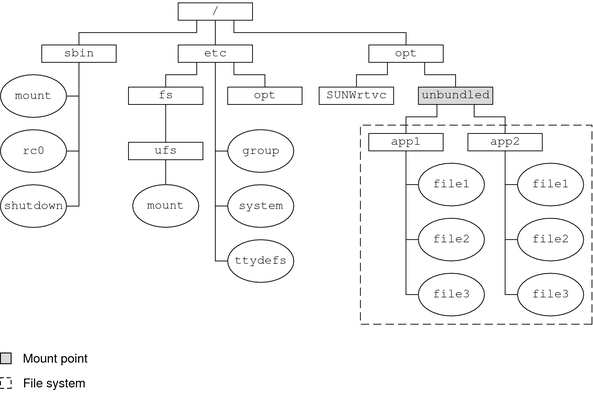
To access a local file system from the /opt file system that contains
a set of unbundled products, you must do the following:
First, you must create a directory to use as a mount point for the file system you want to mount, for example, /opt/unbundled.
Once the mount point is created, you can mount the file system by using the mount command. This command makes all of the files and directories in /opt/unbundled available, as shown in the following figure.
Figure 17-2 Mounting a File System

For step-by-step instructions on how to mount file systems, see Chapter 19, Mounting and Unmounting File Systems (Tasks).
The Mounted File System Table
Whenever you mount or unmount a file system, the /etc/mnttab (mount table) file
is modified with the list of currently mounted file systems. You can display the
contents of this file by using the cat or more commands. However, you
cannot edit this file. Here is an example of an /etc/mnttab file:
$ more /etc/mnttab
/dev/dsk/c0t0d0s0       /       ufs     rw,intr,largefiles,logging,xattr,onerror
=panic,dev=2200008      1093882623
/devices        /devices        devfs   dev=4340000     1093882603
ctfs    /system/contract        ctfs    dev=4380001     1093882603
proc    /proc   proc    dev=43c0000     1093882603
mnttab  /etc/mnttab     mntfs   dev=4400001     1093882603
swap    /etc/svc/volatile       tmpfs   xattr,dev=4440001       1093882603
/dev/dsk/c0t0d0s6       /usr    ufs     rw,intr,largefiles,logging,xattr,onerror
=panic,dev=220000e      1093882623
objfs   /system/object  objfs   dev=44c0001     1094150403
fd      /dev/fd fd      rw,dev=45c0001  1093882624
swap    /var/run        tmpfs   xattr,dev=4440002       1093882625
swap    /tmp    tmpfs   xattr,dev=4440003       1093882625
/dev/dsk/c0t0d0s7       /export/home    ufs     rw,intr,largefiles,logging,xattr
,onerror=panic,dev=220000f      1093882637
$
The Virtual File System Table
Manually mount file systems every time you wanted to access them would be
a very time-consuming and error-prone. To avoid these problems, the virtual file
system table (the /etc/vfstab file) provides a list of file systems and
information on how to mount them.
The /etc/vfstab file provides two important features:
You can specify file systems to automatically mount when the system boots.
You can mount file systems by using only the mount point name. The /etc/vfstab file contains the mapping between the mount point and the actual device slice name.
A default /etc/vfstab file is created when you install a system, depending on
the selections during installation. However, you can edit the /etc/vfstab file on a
system whenever you want. To add an entry, the information you need to
specify is as follows:
The device where the file system resides
The file system mount point
File system type
Whether you want the file system to mount automatically when the system boots (by using the mountall command)
Any mount options
The following is an example of an /etc/vfstab file. Comment lines begin with
#. This example shows an /etc/vfstab file for a system with two
disks (c0t0d0 and c0t3d0).
$ more /etc/vfstab
#device           device              mount            FS      fsck    mount   mount
#to mount         to fsck             point            type    pass    at boot options
#
fd                 -                  /dev/fd          fd      -       no      -
/proc              -                  /proc            proc    -       no      -
/dev/dsk/c0t0d0s1  -                  -                swap    -       no      -
/dev/dsk/c0t0d0s0  /dev/rdsk/c0t0d0s0 /                ufs     1       no      -
/dev/dsk/c0t0d0s6  /dev/rdsk/c0t0d0s6 /usr             ufs     1       no      -
/dev/dsk/c0t0d0s7  /dev/rdsk/c0t0d0s7 /export/home     ufs     2       yes     -
/dev/dsk/c0t0d0s5  /dev/rdsk/c0t0d0s5 /opt             ufs     2       yes     -
/devices           -                  /devices         devfs   -       no      -
ctfs               -                  /system/contract ctfs    -       no      -
objfs              -                  /system/object   objfs   -       no      -
swap               -                  /tmp             tmpfs   -       yes     -
$
In this example, the UFS file system entry for /export/home on the /dev/dsk/c0t0d0s7
slice will be automatically mounted on the /test mount point when the system
boots. Note that, for root (/) and /usr, the mount at boot field value is
specified as no. These file systems are mounted by the kernel as part
of the boot sequence before the mountall command is run.
For descriptions of each /etc/vfstab field and information on how to edit and
use the file, see Chapter 19, Mounting and Unmounting File Systems (Tasks).
The NFS Environment
NFS is a distributed file system service that can be used to share
resources (files or directories) from one system, typically a server, with other systems
on the network. For example, you might want to share third-party applications or
source files with users on other systems.
NFS makes the actual physical location of the resource irrelevant to the user.
Instead of placing copies of commonly used files on every system, NFS allows
you to place one copy on one system's disk and let all other
systems access it from the network. Under NFS, remote files are virtually indistinguishable
from local files.
For more information, see Chapter 4, Managing Network File Systems (Overview), in System Administration Guide: Network Services.
A system becomes an NFS server if it has resources to share on
the network. A server keeps a list of currently shared resources and their
access restrictions (such as read/write or read-only access).
When you share a resource, you make it available for mounting by
remote systems.
You can share a resource in these ways:
For information on how to share resources, see Chapter 19, Mounting and Unmounting File Systems (Tasks). For a complete
description of NFS, see Chapter 4, Managing Network File Systems (Overview), in System Administration Guide: Network Services.
NFS Version 4
Sun's implementation of the NFS version 4 distributed file access protocol is included
in the Solaris release.
NFS version 4 integrates file access, file locking, and mount protocols into a
single, unified protocol to ease traversal through a firewall and improve security. The
Solaris implementation of NFS version 4 is fully integrated with Kerberos V5, also
known as SEAM, thus providing authentication, integrity, and privacy. NFS version 4 also
enables the negotiation of security flavors to be used between the client and
the server. With NFS version 4, a server can offer different security flavors
for different file systems.
For more information about NFS Version 4 features, see What’s New With the NFS Service in System Administration Guide: Network Services.
Automounting or AutoFS
You can mount NFS file system resources by using a client-side service called
automounting (or AutoFS). AutoFS enables a system to automatically mount and unmount NFS
resources whenever you access them. The resource remains mounted as long as you
remain in the directory and are using a file within that directory. If
the resource is not accessed for a certain period of time, it is
automatically unmounted.
AutoFS provides the following features:
NFS resources don't need to be mounted when the system boots, which saves booting time.
Users don't need to know the root password to mount and unmount NFS resources.
Network traffic might be reduced because NFS resources are mounted only when they are in use.
The AutoFS service is initialized by the automount utility, which runs automatically
when a system is booted. The automountd daemon runs continuously and is
responsible for the mounting and unmounting of NFS file systems on an as-needed
basis. By default, the /home file system is mounted by the automount
daemon.
With AutoFS, you can specify multiple servers to provide the same file system.
This way, if one of these servers is down, AutoFS can try
to mount the file system from another machine.
For complete information on how to set up and administer AutoFS, see
System Administration Guide: IP Services.
