Resizing a graphic
It is possible, and quite likely, that the inserted image will not fit perfectly into the document because it is too big or too small. Therefore, you will probably need to resize the image.
The position of the image is not relevant for now. Changing the position of an image relative to the text is discussed in “Positioning graphics within the text“ on page 211.
You can modify the size of a graphic in two ways:
-
Unscaled resize
-
Scaled resize
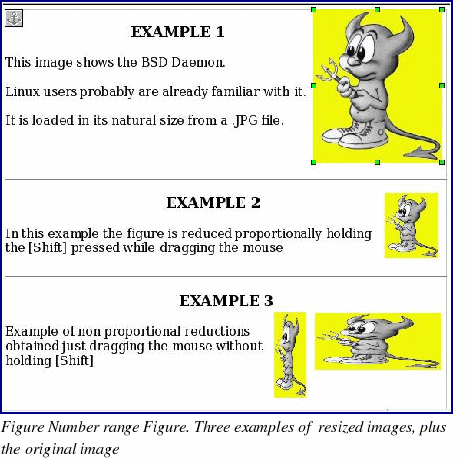
Figure 231 shows three examples of an image inserted into a document and resized.

Unscaled resize
In Example 1, the image is in its natural size. Whenyou add a new graphic (and also when you select an existing one by clicking on it), it displays some square points along its perimeter; these are called handles. To resize the graphic:
-
Move the cursor onto a point.
-
Click the left mouse button.
-
Drag the mouse to modify the size of the figure.
This basic resizing process is useful if you need to specify the size and the height independently of each other. The problem with this method, as demonstrated in Example 3, is that when the graphic is not changed to scale, it will be distorted.
You need to either carefully measure and calculate how much the image needs to be adjusted in both the horizontal and vertical directions in order to maintain the correct proportions or use the “scaled resizeâ€method described below.
Scaled resize
A scaled resize is usually the best option, because it automatically maintains the proportions of the graphic. To perform a scaled resize:
-
Press and hold the Shift key.
-
Click and drag a handle of the graphic. It will resize proportionally, as shown in EXAMPLE 2.
-
Release the mouse button to complete the resize.
