Type
or paste your text in the text box.
These
text boxes are known as AutoLayout text boxes. See also “Creating bulleted and numbered lists”
on page 65.
Using
text boxes created from the text box tool
In
Normal View:
Click
on the Text icon
 on the Drawing toolbar. If the toolbar with the text icon is not
visible, choose View >
Toolbars > Drawing.
Click
and drag to draw a box for the text on the slide. Do not worry
about the vertical size and position—the text box will expand if
needed as you type. To reposition the text box to a different part
of the slide, see “Moving a text box” on page 51; to change the
horizontal size, see “Resizing a text box” on page 51.
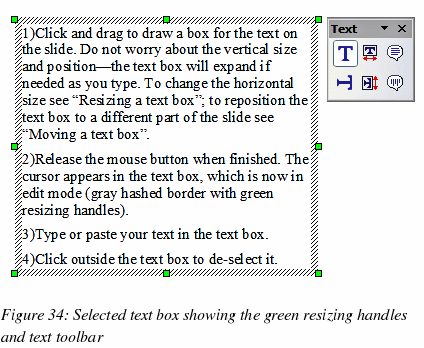
Release
the mouse button when finished. The cursor appears in the text box,
which is now in edit mode (gray hashed border with green resizing
handles shown in Figure 34).
Type
or paste your text in the text box.
Click
outside the text box to deselect it.

|
Note
|
In
addition to the normal text boxes where text is horizontally
aligned, it is possible to insert text boxes where the text is
aligned vertically.
This choice is available only when Asian
languages are enabled in Tools
> Options > Language Settings > Languages.
Click
on the
 button in the drawing toolbar to create a vertical text box. Note
that when editing the contents, the text is displayed
horizontally.
|
Moving
a text box
In
Normal view, notice how the pointer changes from an arrow to an
I-beam as you move it over the text in a text box.
Click
when the pointer becomes an I-beam. The text box is now in edit
mode, with a gray border and green resizing handles.
Move
the I-beam (or pointer) over the gray border. Notice how it changes
shape, becoming a four-headed arrow (or a similar shape depending
on the operating system and user’s settings).
When
the four-headed arrow appears, click and drag to move the text box.
An empty dashed-line box shows where your text box will be placed.
Release
the mouse button when the text box is in the desired position.
Resizing
a text box
In
Normal view, when the green resizing handles are displayed, move the
I-beam (or pointer) over any handle. Notice how the pointer changes
shape, indicating in what direction the text box will be resized.
The corner handles change the two dimensions of the text area
simultaneously while the four handles in the middle of the sides
modify only one of the dimensions.
When
the two-headed arrow is displayed, click and drag to resize the text
box.
|
Tip
|
To
maintain the proportions of a text box
while resizing, press and hold the Shift
key,
then click and drag. Make sure to release the mouse button before
releasing the Shift
key.
|
OOo
also provides a different type of text box which resizes
horizontally to automatically fit the text as it is inserted. To
insert an auto-resizing text box, click on the
 Icon in the text toolbar (see Figure 34) and then click on the place
in the slide where you want the first letter of the text to appear.
If the text toolbar is not visible, choose View
> Toolbars > Text.
For
more accurate control over the shape, size and position of the text
box, instead of using the mouse, use the Position and Size dialog.
Select the text box, then press F4
or select Format >
Position and Size from the
menu bar. The use of this dialog is explained in
Chapter 2.
Deleting
a text box
Click
the text once to display the gray border and green
resizing handles of the text box.
Position
the pointer anywhere on the gray border so that it becomes
either a four-headed or two-headed arrow.
Click
once. The gray border disappears, leaving only the green resizing
handles.
Press
Delete.
|
Tip
|
Sometimes
it is faster to to delete a text box by dragging a selection
rectangle around the text box and then hitting the Delete
key. Take care to avoid selecting and accidentally deleting other
text boxes or shapes.
|
