Putting together a slide show
OpenOffice.org
Impress gives you the tools to organize and display a slide show,
including:
Which slides to
show and in what sequence
Whether
to run the show automatically or manually
Transitions
between slides
Animations
on individual slides
Interactions:
what happens when you click a button or link
Most
tasks associated with putting together a show from your slides are
best done in Slide Sorter view. Choose View
> Slide Sorter from the menu bar or click the Slide
Sorter tab at the top of the workspace. All of your slides appear in
the workspace; you may need to scroll to see them all.
Choosing
basic settings for a slide show
Basic
settings for a slide show include which slide to start from, the way
you advance the slides, the type of presentation, and pointer
options.
Choose
Slide Show > Slide Show
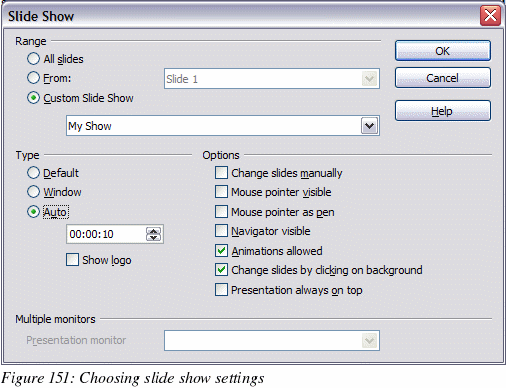
Settings. The Slide Show dialog (Figure 151) appears.

In the Range
section, choose which slides to include in the slide show:
All
slides includes all of the slides except for those
marked Hidden (see “Hiding slides so they do not appear in a show”
on page 200). Slides are shown in the sequence they occur in the
file. To change the sequence, either rearrange the slides in the
slide sorter or choose a custom slide show (see “Showing slides in a different order”
on page 201).
From:
starts the show at a slide other than the first. For
example, you might have several slides at the beginning that
describe you and your company, but when you present this show to
your work colleagues, you want to skip that introduction.
Custom
Slide Show shows the slides in a different sequence that
you have previously set up. This choice is not available until
after you set up a custom slide show (see “Showing slides in a different order”
on page 201). You can set up as many different custom shows as you
wish from one set of slides; they will appear in the drop-down list
under this choice.
In the Type
section, choose how the slides will be displayed:
Default
shows the slides full screen, without the OpenOffice.org program
controls visible, and exits the show after the last slide.
Window
runs the slide show in the OpenOffice.org program window and exits
the show after the last slide.
Auto
restarts the slide show after the last slide. A pause slide is
displayed between the last slide and the start slide. Press the Esc
key to stop the show.
In
the box under this choice, specify the length of time before the
show restarts. If you enter zero, the show restarts immediately
without showing a pause slide.
To
display the OpenOffice.org logo on the pause slide, select the Show
logo checkbox. The logo cannot be changed.
In
the Options
section:
Change
slides manually prevents slides from changing
automatically. This choice overrides the Auto
selection under Type.
Mouse
pointer visible shows the mouse pointer during a slide
show. If you do not have a laser pointer or other device, this can
be quite useful.
Mouse
pointer as pen enables you to write or draw on slides
during the presentation. Anything you write with the pen is not
saved when you exit the slide show. The color of the pen cannot be
changed.
Navigator
visible displays the Navigator during the slide show.
For more about the Navigator, see Chapter 1 (Introducing Impress).
Animations
allowed displays all frames of animated GIF files during
the slide show. If this option is not selected, only the first
frame of an animated GIF file is displayed. (This has nothing to so
with the slide animations described in “Using slide animation effects”
on page 207.)
Change
slides by clicking on background advances to the next
slide when you click on the background of a slide. (Other ways of
advancing to the next slide include pressing the spacebar on the
keyboard.)
Presentation
always on top prevents any other program window from
appearing on top of the presentation.
In
the Multiple
monitors section, you can choose which monitor to
use for full screen slide show mode, if the current desktop is
displayed on more than one monitor. If the current desktop spans
only one monitor, or if the multiple-monitor feature is not
supported on the current system, you cannot select another monitor.
By default the primary monitor is used for slide show mode.
|
Notes
|
This
feature is new in OpenOffice.org Impress 2.1.
This
setting is saved in the user configuration and not inside the
document.
|
Hiding
slides so they do not appear in a show
You
may not want to show all of the slides in a particular show. You can
either hide some of the slides or set up a custom slide show. Which
method is best depends on your needs. For example, you may have
draft slides that you will show when they are finished, or you may
have some slides that contain information for yourself, not your
audience.
To
hide a slide:
In
the Slides pane, or in Slide Sorter view, select the slides that
you want to hide.
Click
the Show/Hide Slide
icon on the Slide View toolbar, or choose Slide
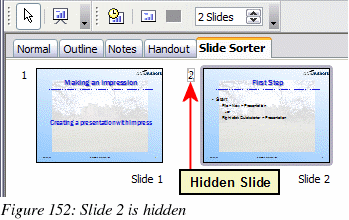
Show > Show/Hide Slide. The slide number is now in a
box with a diagonal line through it, to indicate that it is hidden
(see Figure 152). The slide remains in the file.

To show a hidden
slide:
In the Slides
pane, or in Slide Sorter view, select the hidden slides that you
want to show.
Click
the Show/Hide Slide
icon on the Slide View toolbar, or choose Slide
Show > Show/Hide Slide.
Showing
slides in a different order
To
show the slides in a different order, you can either rearrange them
in the slide sorter or set up a custom slide show. You can define as
many custom slide shows as you need from one set of slides. In a
custom slide show, you can choose which slides to include as well as
the order in which they are shown. Any slides marked Hidden will not
appear in a custom show.
Setting
up a custom slide show
To
set up a custom slide show:
Choose
Slide Show > Custom Slide
Show from the menu bar.
On
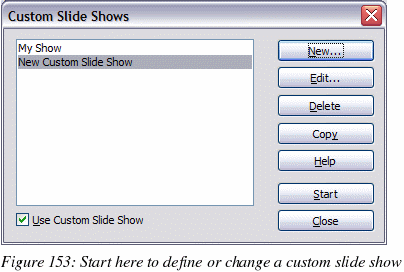
the Custom Slide Shows dialog (Figure 153), select the Use
Custom Slide Show checkbox and click New.

On
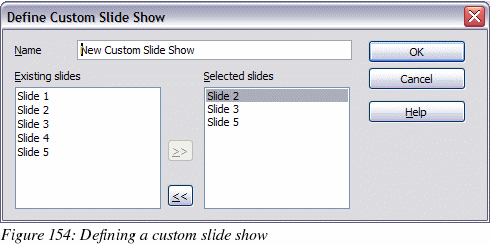
the Define Custom Slide Show dialog (Figure 154), type a name for
the new custom show. Then, in the Existing
slides list, select the slides to include in the
show, in the order you want
to show them. Click the >>
button to include the slides in the Selected
slides list. In Figure 154, Slide 1 has been
included, and Slide 2 has been selected but not yet included.
You
can select and include several slides at the same time. Hold down
the Shift
key and click the first and last slide in a group to select that
group (for example, slides 3 through 7), or hold down the Control
key and click on individual slides to select them (for example,
slides 3, 5, and 9).
When
you are done arranging the order of the slides, click OK
to save this custom show and return to the Custom Shows dialog.

|
Note
|
If
you include several slides at the same time, they are added to
the Selected
slides list in numerical order regardless of
the order in which you selected them. In other words, if you
click on slides 3, 9, and 5 in that order and add them all at the
same time, they will be included in the Selected
slides list in this order: 3, 5, 9. To put them
in a different order, either select and include them one at a
time or select and drag them up or down the list.
|
|
Tip
|
Slides
are added to the Selected
slides list after the slide that is highlighted
in that list. The last slide added is highlighted unless you
select a different one. For example, you may have added slides 1,
2, 3 and 9, in that order. Slide 9 will be highlighted. If you
now want to add slide 15 between slides 2 and 3, select 2 in the
Selected
slides list, then select slide 15 in the
Existing
slides list and click >>.
You
can also add slide 15 at the end of the Selected
slides list and then drag it up to where you
want it in the sequence.
|
Editing,
deleting, or copying a custom slide show
To
edit a custom slide show (add, remove, or change the order of
slides, or change the name of the show), select it in the Custom
Shows dialog (Figure 153) and click Edit.
To
delete a custom slide show, select it in the Custom Shows dialog and
click Delete.
Deletion is immediate; no confirmation message appears.
To
create a copy of a slide show, select it in the Custom Shows dialog
and click Copy.
You can now edit the copy to rename it or add, remove, or change the
order of slides in it.
You
can run a custom slide show (for example, to test it) from the
Custom Shows dialog, if the Use
Custom Slide Show checkbox is selected. Select the slide
show from the list and click Start.
When
you are done working with custom slides shows, click Close
to save all changes and close the Custom Shows dialog.
