Inserting pictures
This
section describes several ways to insert a picture from an external
source into the presentation. Once the picture has been inserted, it
can be formatted extensively as explained later in this chapter.
Inserting
a picture from a file
Inserting
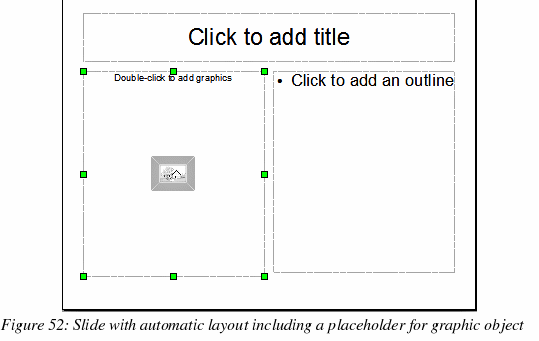
a picture from a file is quick and easy. If the layout of the slide
already contains a placeholder for a graphic (see Figure 52),
double-click anywhere in the graphics frame. This opens a dialog for
selecting the file to be inserted. The detailed procedure is given
below.

Whether you are
using an AutoLayout for the placement of the picture, or you are
just inserting a picture, follow these steps:
Select Insert
>
Picture. (When using an AutoLayout; double-click in the
graphics frame instead.)
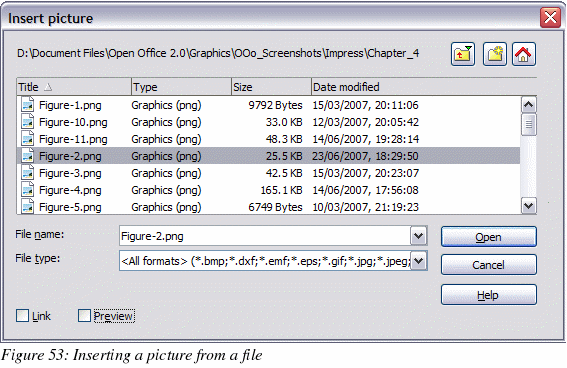
In
the Insert Picture dialog
(Figure 53), browse to the directory containing the desired
picture.
Select
the file. OOo recognizes a very large number of image types and, if
the Preview check box is selected, will display a reduced copy of
the selected file.
Click
Open to place the
picture on the current (selected) slide. The picture is now
displayed on the slide with green resizing handles around it.

Notice
in the Insert picture dialog (Figure 53) the two checkboxes called
Link and Preview.
Their position is determined by the operating system, but they are
normally in the bottom part of the dialog.
If
Preview is
checked, and if the selected file is in one of the many formats that
OOo recognizes, a thumbnail of the selected image shows in a preview
area on the right (not shown in Figure 53).
Select
the Link checkbox
to insert the picture as a link to the file rather than embedding
the file itself. In general it is preferable to embed images so that
the presentation can be copied to other computers, however on some
occasions it makes sense to link the image rather than embed it:
When
the image file is quite large (linking rather than embedding will
dramatically reduce the size of the presentation file)
When
the same image file is used in many presentations (for example when
using the same background image for all the presentations created)
When
the linked file will be available when loading the presentation
(for example if the presentation is a slide show of holiday
pictures)
Inserting
a picture from a scanner
Inserting
an image from a scanner is normally fairly straightforward. Make
sure that the scanner is supported by the SANE system if you are
running the Linux (or other UNIX-like) operating system, or TWAIN if
you are using a Windows version, and that it is already configured
on the machine on which OOo is running. In case more than one
scanner or equivalent device are present, select the source from
Insert > Picture > Scan
> Select Source.
To
insert an image from the scanner:
Prepare
the image in the scanner and make sure that the scanner is ready.
Select
Insert > Picture >
Scan > Request.
The
rest of the procedure depends on the scanner driver and interface.
You will normally be required to specify the resolution, a scan
window and other parameters. Consult the scanner’s documentation
for more information.
When
the image is ready, Impress places it in the slide. At this point
it can be edited as any other image.
Inserting
a picture from the Gallery
The Gallery
contains a collection of images that you can use in a presentation.
You can also add your own images to the Gallery, making it an
essential tool for creating presentations quickly and with a
consistent look. The Gallery is available in all components of
OpenOffice.org. For an introduction to the Gallery, see Chapter 14
(Working with the Gallery) in the Getting
Started guide.
Select
Tools
> Gallery or click the Gallery icon
 on the Drawing toolbar.
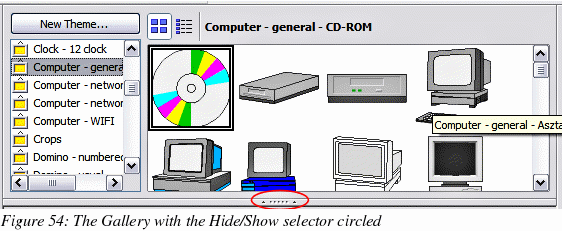
By
default, the Gallery (shown in Figure 54) is docked above the
Impress workspace. To expand the Gallery, position the pointer over
the line that divides it from the top of the workspace. When the
pointer changes to parallel lines with arrows, click and drag
downward. The workspace will resize in response.

To
expand the Gallery without affecting the Impress workspace, undock
it so it floats over the workspace. To do so, hold down the Control
key and double-click on the upper part of the Gallery next to the
View icons (see Figure 54). Double-click in the same area to dock it
again (restore it to its position over the workspace).
When
the Gallery is docked, to hide it and view the full Impress
workspace, click the Hide/Show
button in the middle of the thin bar separating the Gallery from the
workspace (see Figure 54). The Hide/Show
button lets you
keep the Gallery open for quick access while you create your slide
show, yet out of the way when you need it to be. Additional
information on the use of the Gallery can be found in “Managing the Gallery themes”
on page 90.
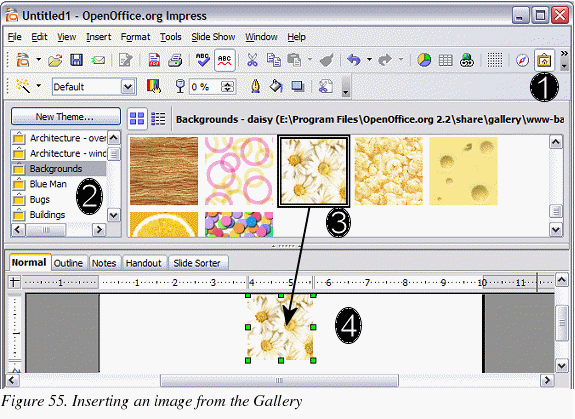
Once
you are satisfied with the Gallery display, select a theme from the
left pane and then scroll as necessary through the right pane to
find a suitable image. Click on the image and drag it onto the
workspace.
Figure 55 shows
an example of an image dragged from the Gallery.

At
this point the image will be in your slide, but may not be of a
satisfactory size; if necessary, re-size it as described in “Resizing a picture”
on page 83.
