Customizing toolbars
Using
the Alt
key to drag icons on the toolbars does not work in OpenOffice.org
2.0. The other concepts for customizing the toolbars in
OpenOffice.org are similar to those in Microsoft Office. The specific
steps are outlined below.
Customizing
toolbars
You
can get to the toolbar customization menu
in three ways:
Tools
> Customize > Toolbars
tab.
Click
the arrow at the end of any toolbar and choose Customize
Toolbar.
View
> Toolbars > Customize
>
Toolbars tab (same
as Microsoft Office).

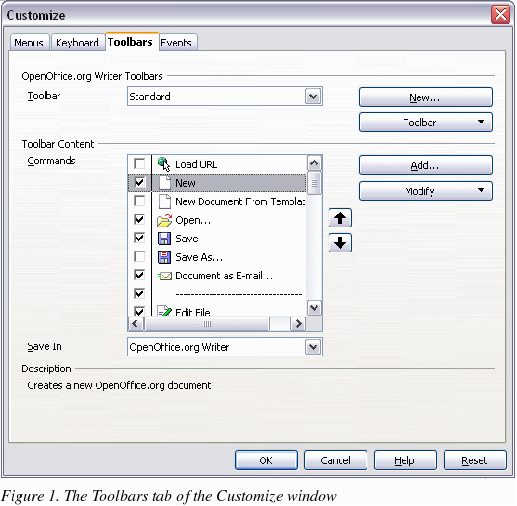
However, rather than
dragging buttons onto the toolbar as is required in Microsoft Office,
you need to use the Customize
dialog (Figure 1):
OpenOffice.org
<name of the program (example: Writer)> Toolbars:
Activate the drop-down list to select the toolbar.
Toolbar
Content: The checkboxes
determine whether the button gets displayed or not.
The
Move
Up or Move
Down buttons
change the order.
If
the function you require is not already listed for the toolbar, use
the Add button to
insert it.
Use
Modify
for things like changing an icon, renaming, or restoring the default
settings.
|
Note
|
There
is no in-built tool-button editor. To use a custom icon, save it
to the
{install
path}/share/config/symbol directory
in *.bmp format. OOo automatically searches this directory for new
icons each time the Customize Buttons dialog is opened. Custom
icons must be 16 x 16 pixels in size and cannot contain more than
256 colors.
|
Creating
a new toolbar
To
create a new toolbar:
Select
Tools > Customize >
Toolbars tab.
Click
New to display a
dialog where you can name the new toolbar. Click OK.
Customize
the new toolbar as above.
