Contributed by Marc Silver.
A Mail User Agent (MUA) is an application that is
used to send and receive email. Furthermore, as email “evolves” and becomes
more complex, MUA's are becoming increasingly powerful
in the way they interact with email; this gives users increased functionality and
flexibility. FreeBSD contains support for numerous mail user agents, all of which can be
easily installed using the FreeBSD Ports Collection. Users may
choose between graphical email clients such as evolution or balsa, console based clients such as mutt, pine or mail, or the web interfaces used by some large organizations.
mail(1) is the default
Mail User Agent (MUA) in FreeBSD. It is a console
based MUA that offers all the basic functionality
required to send and receive text-based email, though it is limited in interaction
abilities with attachments and can only support local mailboxes.
Although mail does not natively support interaction with
POP or IMAP
servers, these mailboxes may be downloaded to a local mbox file
using an application such as fetchmail, which will be
discussed later in this chapter (Section 26.12).
In order to send and receive email, simply invoke the mail
command as per the following example:
% mail
The contents of the user mailbox in /var/mail are
automatically read by the mail utility. Should the mailbox be
empty, the utility exits with a message indicating that no mails could be found. Once the
mailbox has been read, the application interface is started, and a list of messages will
be displayed. Messages are automatically numbered, as can be seen in the following
example:
Mail version 8.1 6/6/93.  Type ? for help.
"/var/mail/marcs": 3 messages 3 new
>N  1 root@localhost        Mon Mar  8 14:05  14/510   "test"
 N  2 root@localhost        Mon Mar  8 14:05  14/509   "user account"
 N  3 root@localhost        Mon Mar  8 14:05  14/509   "sample"
Messages can now be read by using the t mail command, suffixed by the message number that should be
displayed. In this example, we will read the first email:
& t 1
Message 1:
From root@localhost  Mon Mar  8 14:05:52 2004
X-Original-To: marcs@localhost
Delivered-To: marcs@localhost
To: marcs@localhost
Subject: test
Date: Mon,  8 Mar 2004 14:05:52 +0200 (SAST)
From: root@localhost (Charlie Root)

This is a test message, please reply if you receive it.
As can be seen in the example above, the t key will cause the
message to be displayed with full headers. To display the list of messages again, the h key should be used.
If the email requires a response, you may use mail to reply,
by using either the R or r mail keys. The R key instructs mail to reply only to the sender of the email, while r replies not only to the sender, but also to other recipients of the
message. You may also suffix these commands with the mail number which you would like
make a reply to. Once this has been done, the response should be entered, and the end of
the message should be marked by a single . on a new line. An
example can be seen below:
& R 1
To: root@localhost
Subject: Re: test

Thank you, I did get your email.
.
EOT
In order to send new email, the m key should be used, followed
by the recipient email address. Multiple recipients may also be specified by separating
each address with the , delimiter. The subject of the message may
then be entered, followed by the message contents. The end of the message should be
specified by putting a single . on a new line.
& mail root@localhost
Subject: I mastered mail

Now I can send and receive email using mail ... :)
.
EOT
While inside the mail utility, the ?
command may be used to display help at any time, the mail(1) manual page
should also be consulted for more help with mail.
Note: As previously mentioned, the mail(1) command was
not originally designed to handle attachments, and thus deals with them very poorly.
Newer MUAs such as mutt
handle attachments in a much more intelligent way. But should you still wish to use the
mail command, the converters/mpack port may be of considerable use.
mutt is a small yet very powerful Mail User Agent, with
excellent features, just some of which include:
All of these features help to make mutt one of the most
advanced mail user agents available. See https://www.mutt.org for more information on mutt.
The stable version of mutt may be installed using the mail/mutt port, while the current development version may be
installed via the mail/mutt-devel port. After the port has been installed, mutt can be started by issuing the following command:
% mutt
mutt will automatically read the contents of the user
mailbox in /var/mail and display the contents if applicable. If
no mails are found in the user mailbox, then mutt will wait
for commands from the user. The example below shows mutt
displaying a list of messages:
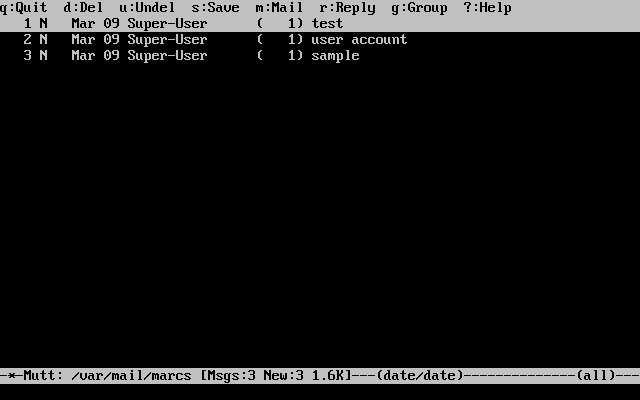
In order to read an email, simply select it using the cursor keys, and press the Enter key. An example of mutt displaying
email can be seen below:
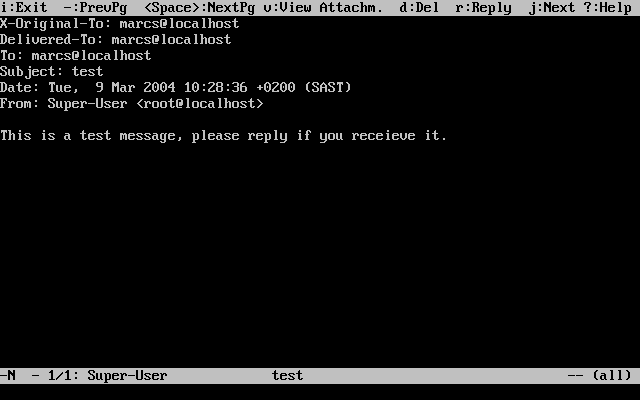
As with the mail(1) command, mutt allows users to reply only to the sender of the message as
well as to all recipients. To reply only to the sender of the email, use the r keyboard shortcut. To send a group reply, which will be sent to the
original sender as well as all the message recipients, use the g
shortcut.
Note: mutt makes use of the vi(1) command as an
editor for creating and replying to emails. This may be customized by the user by
creating or editing their own .muttrc file in their home
directory and setting the editor variable or by setting the EDITOR environment variable. See https://www.mutt.org/ for more information about configuring mutt.
In order to compose a new mail message, press m. After a valid
subject has been given, mutt will start vi(1) and the mail can
be written. Once the contents of the mail are complete, save and quit from vi and mutt will resume, displaying a
summary screen of the mail that is to be delivered. In order to send the mail, press y. An example of the summary screen can be seen below:
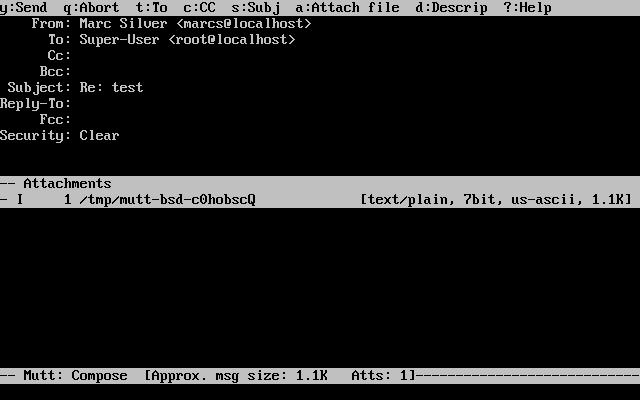
mutt also contains extensive help, which can be accessed
from most of the menus by pressing the ? key. The top line also
displays the keyboard shortcuts where appropriate.
pine is aimed at a beginner user, but also includes some
advanced features.
Warning: The pine software has had several remote
vulnerabilities discovered in the past, which allowed remote attackers to execute
arbitrary code as users on the local system, by the action of sending a
specially-prepared email. All such known problems have been fixed, but the pine code is written in a very insecure style and the FreeBSD
Security Officer believes there are likely to be other undiscovered vulnerabilities. You
install pine at your own risk.
The current version of pine may be installed using the mail/pine4 port. Once the port has installed, pine can be started by issuing the following command:
% pine
The first time that pine is run it displays a greeting page
with a brief introduction, as well as a request from the pine
development team to send an anonymous email message allowing them to judge how many users
are using their client. To send this anonymous message, press Enter, or alternatively press E to exit the
greeting without sending an anonymous message. An example of the greeting page can be
seen below:
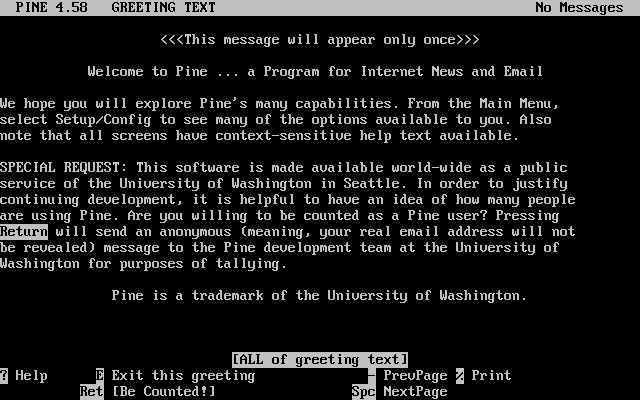
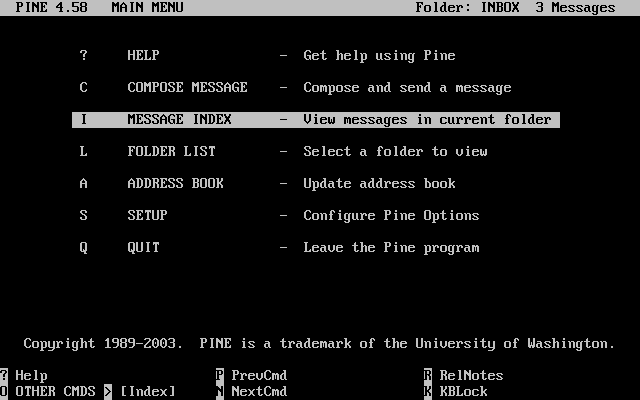
Users are then presented with the main menu, which can be easily navigated using the
cursor keys. This main menu provides shortcuts for the composing new mails, browsing of
mail directories, and even the administration of address book entries. Below the main
menu, relevant keyboard shortcuts to perform functions specific to the task at hand are
shown.
The default directory opened by pine is the inbox. To view the message index, press I, or
select the option as seen below:
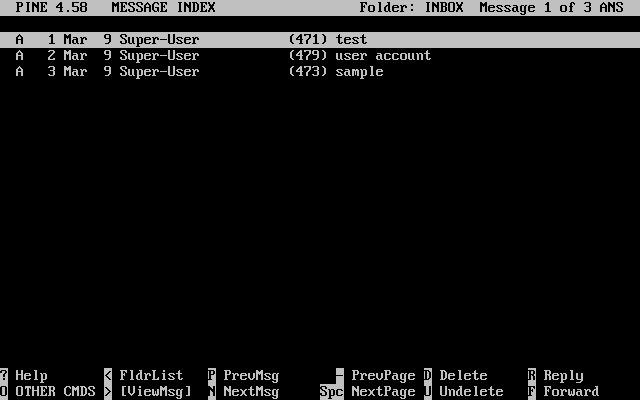
The message index shows messages in the current directory, and can be navigated by
using the cursor keys. Highlighted messages can be read by pressing the Enter key.
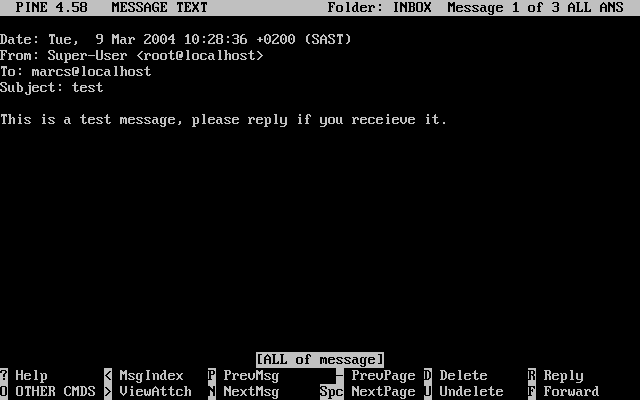
In the screenshot below, a sample message is displayed by pine. Keyboard shortcuts are displayed as a reference at the
bottom of the screen. An example of one of these shortcuts is the r
key, which tells the MUA to reply to the current
message being displayed.
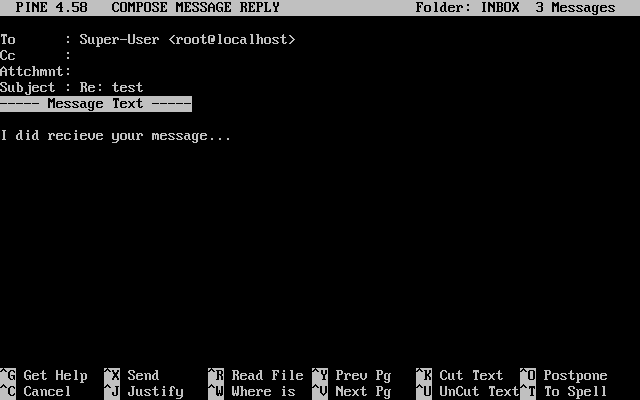
Replying to an email in pine is done using the pico editor, which is installed by default with pine. The pico utility makes it easy
to navigate around the message and is slightly more forgiving on novice users than vi(1) or mail(1). Once the
reply is complete, the message can be sent by pressing Ctrl+X. The pine application will ask for
confirmation.
The pine application can be customized using the option from the main menu. Consult https://www.washington.edu/pine/
for more information.
