Follow Techotopia on Twitter

On-line Guides
All Guides
eBook Store
iOS / Android
Linux for Beginners
Office Productivity
Linux Installation
Linux Security
Linux Utilities
Linux Virtualization
Linux Kernel
System/Network Admin
Programming
Scripting Languages
Development Tools
Web Development
GUI Toolkits/Desktop
Databases
Mail Systems
openSolaris
Eclipse Documentation
Techotopia.com
Virtuatopia.com
Answertopia.com

How To Guides
Virtualization
General System Admin
Linux Security
Linux Filesystems
Web Servers
Graphics & Desktop
PC Hardware
Windows
Problem Solutions
Privacy Policy


Red Hat Enterprise Linux 9 Essentials Book now available.

Purchase a copy of Red Hat Enterprise Linux 9 (RHEL 9) Essentials

Red Hat Enterprise Linux 9 Essentials Print and eBook (PDF) editions contain 34 chapters and 298 pages

Preview Book

3.6.3. Configuring A Node with Redundant Power

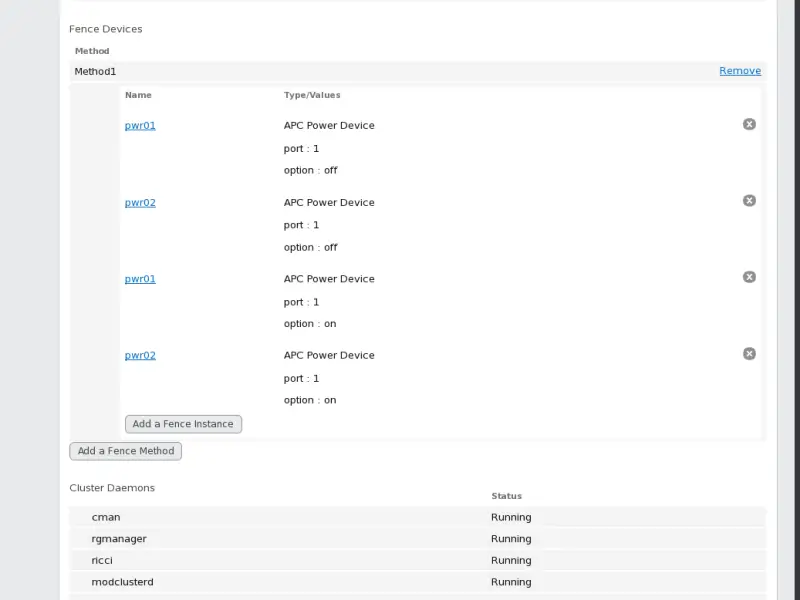
If your cluster is configured with redundant power supplies for your nodes, you must be sure to configure fencing so that your nodes fully shut down when they need to be fenced. If you configure each power supply as a separate fence method, each power supply will be fenced separately; the second power supply will allow the system to continue running when the first power supply is fenced and the system will not be fenced at all. To configure a system with dual power supplies, you must configure your fence devices so that both power supplies are shut off and the system is taken completely down. When configuring your system using Conga, this requires that you configure two instances within a single fencing method.
To configure fencing for a node with dual power supplies, follow the steps in this section.
  1. Before you can configure fencing for a node with redundant power, you must configure each of the power switches as a fence device for the cluster. For information on configuring fence devices, see Section 3.5, “Configuring Fence Devices”.
  2. From the cluster-specific page, click on Nodes along the top of the cluster display. This displays the nodes that constitute the cluster. This is also the default page that appears when you click on the cluster name beneath Manage Clusters from the menu on the left side of the luci Homebase page.
  3. Click on a node name. Clicking a link for a node causes a page to be displayed for that link showing how that node is configured.
  4. On the node-specific page, click Add a fence method.
  5. Enter a name for the fencing method that you are configuring for this node.
  6. Click Submit. This displays the node-specific screen that now displays the method you have just added under Fence Devices.
  7. Configure the first power supply as a fence instance for this method by clicking Add a Fence Instance. This displays a drop-down menu from which you can select one of the power fencing devices you have previously configured, as described in Section 3.5.1, “Creating a Fence Device”.
  8. Select one of the power fence devices for this method and enter the appropriate parameters for this device.
  9. Click Submit. This returns you to the node-specific screen with the fence method and fence instance displayed.
  10. Under the same fence method for which you have configured the first power fencing device, click Add a Fence Instance. This displays a drop-down menu from which you can select the second power fencing devices you have previously configured, as described in Section 3.5.1, “Creating a Fence Device”.
  11. Select the second of the power fence devices for this method and enter the appropriate parameters for this device.
  12. Click Submit. This returns you to the node-specific screen with the fence methods and fence instances displayed, showing that each device will power the system off in sequence and power the system on in sequence. This is shown in Figure 3.6, “Dual-Power Fencing Configuration”.
    Dual-Power Fencing Configuration
    Dual-power fencing configuration
    Figure 3.6. Dual-Power Fencing Configuration


  Published under the terms of the Creative Commons License Design by Interspire