|
 |
|
| |
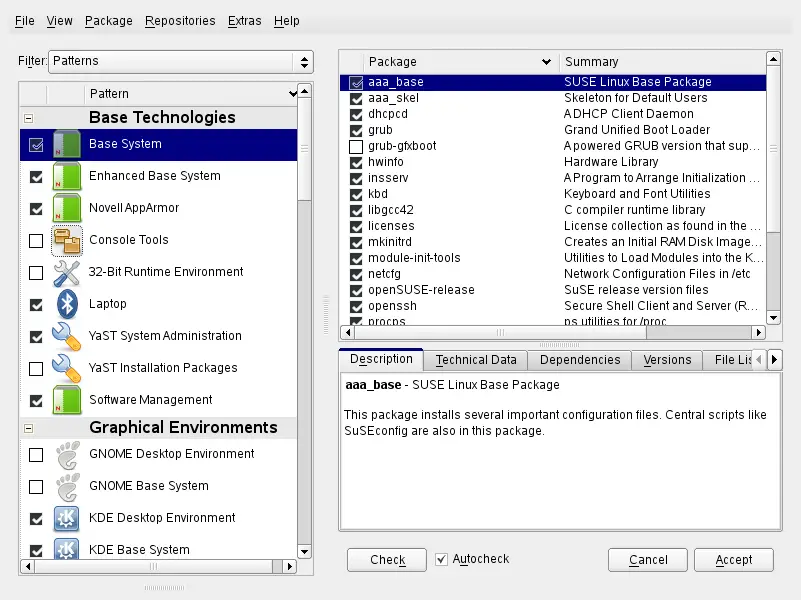
3.2 Using the Qt Interface
3.2.1 Installing Software
Software is available via RPM packages. Each package contains the
program itself, the configuration files, and additional documentation.
If you want to add more software to the system, proceed as follows:
-
Click to start the YaST package
manager.
-
In the search field enter the name of the software you want to install
(for example, jhead, a tool for manipulating
JPEG meta data) and press Enter.
-
The package is listed in the right frame. Select it for installation.
Once done, you can search for more packages and select them for
installation in one go.
-
Click .
-
When all selected packages are installed, YaST asks you whether you
want to install or remove additional packages. Press
to close YaST.
By specifying various search criteria, you can restrict the search to
display a few or even only one package. You can also define special
search patterns using wild cards and regular expressions in
.
HINT: Quick Search
In addition to the filter, all lists of the
package manager feature a quick search. Click the respective list to
gain focus (for example, the list) and enter
a letter to move the cursor to the first package in the list whose name
begins with this letter.
If you do not know the name of the software you are interested in, you
can browse through the software catalog in various ways. For example,
you can filter by patterns, package groups, languages, repositories, or
installation summaries. Filter by patterns, if you are looking for
software for a specific task:
-
From the filter list in the upper left corner, select
. Now you see various pattern sets listed
in the area below.
-
From the patterns select one or more patterns you are interested in.
If you click on the name of a pattern, for example on , you see the packages it contains, in the right
frame. If you activate it, the status markers at the beginning of the
line will change: all packages get marked either with the status
or . The meaning of
all the symbols and of font color changes is explained in
.
-
Click .
Alternatively, filter by package groups. The package groups feature
offers a more detailed view of the software grouped by categories. Often
packages depend on other packages; if you select a package, you might be
requested to install additional packages to resolve possible package
dependencies.
Filtering by languages is similar to filtering by package groups. Using
the languages view enables you to select packages like translated
program messages, documentation, or special fonts which are needed to
support a specific language.
For installing corresponding source packages, use
zypper. For more information, see
Section 7.1.2, Installing and Removing Software with Zypper.
Using the installation summary filter you see an overview of the
packages you have scheduled for installation. It is convenient for
double-checking if many packages are pending for installation.
3.2.2 Checking Software Dependencies
The software of one package might only work properly if the required
package is also installed. If packages with identical or similar
functionality use the same system resource, they should not be installed
at the same time, because this would cause a package conflict.
When the package manager starts, it examines the system and displays the
installed packages. When you select to install and remove packages, the
package manager automatically checks the dependencies and selects any
other required packages (resolution of dependencies). If you select or
deselect conflicting packages, the package manager indicates this and
suggests possible solutions to this problem (resolution of conflicts).
and
are located under the information window. If you click , the package manager checks if the current
package selection results in any unresolved package dependencies or
conflicts. In the event of unresolved dependencies, the required
additional packages are selected automatically. For package conflicts,
the package manager opens a dialog that shows the conflict and offers
various options for solving the problem.
If you activate , any change of a package
status triggers an automatic check. This is a useful feature, because
the consistency of the package selection is monitored permanently.
However, this process consumes resources and can slow down the package
manager. For this reason, is not activated
by default. In either case, a consistency check is performed when you
confirm your selection with .
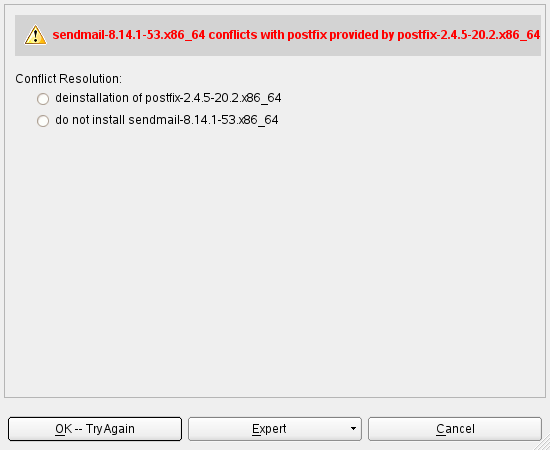
For example, sendmail and
postfix may not be installed concurrently.
Figure 3-1 shows the conflict
message prompting you to take a decision.
postfix is already installed. Accordingly, you
can refrain from installing sendmail, remove
postfix, or take the risk and ignore the
conflict.
WARNING: Handling Package Conflicts
Unless you are very experienced, follow the suggestions of YaST when
handling package conflicts, because otherwise the stability and
functionality of your system could be endangered by the existing
conflict.
3.2.3 Packages and Software Repositories
If you want to search for packages originating from one particular
software repository, use the filter. In
the default configuration, this filter shows a list of all packages from
the selected installation source. To restrict the list, use a secondary
filter.
To view a list of the all installed packages from the selected
repository, select the filter then
select from list and deactivate all check boxes except
.
If you are interested in the opposite and want to detect packages not
belonging to any repository, also use the
filter and select as the .
3.2.4 Removing Software
If you want to remove software from the system, proceed as follows:
-
Make use of a search strategy explained in
Section 3.2.1, Installing Software.
-
Depending on the search strategy, you can either select a complete set
or single packages one by one. For patterns, both ways are possible.
-
Click and either watch the de-installation
progress or adjust your selection, if YaST complains about
dependency issues.
|
|
|