|
 |
|
| |
28.2 Configuring Apache
Apache in
openSUSE
can be configured in two different ways: with YaST or manually. Manual
configuration offers a higher level of detail, but lacks the convenience
of the YaST GUI.
IMPORTANT: Configuration Changes
Changes to most configuration values for Apache only take effect after
Apache is restarted or reloaded. This happens automatically when using
YaST and finishing the configuration with
checked for the . Manual restart is
described in Section 28.3, Starting and Stopping Apache. Most
configuration changes only require a reload with rcapache2
reload.
28.2.1 Configuring Apache Manually
Configuring Apache manually involves editing the plain text
configuration files as the user
root.
Configuration Files
Apache configuration files can be found in two different locations:
-
/etc/sysconfig/apache2
-
/etc/apache2/
/etc/sysconfig/apache2
/etc/sysconfig/apache2 controls some global
settings of Apache, like modules to load, additional configuration
files to include, flags with which the server should be started, and
flags that should be added to the command line. Every configuration
option in this file is extensively documented and therefore not
mentioned here. For a general-purpose Web server, the settings in
/etc/sysconfig/apache2 should be sufficient for
any configuration needs.
/etc/apache2/
/etc/apache2/ hosts all configuration files for
Apache. In the following, the purpose of each file is explained. Each
file includes several configuration options (also referred to as
directives). Every configuration option in these
files is extensively documented and therefore not mentioned here.
The Apache configuration files are organized as follows:
/etc/apache2/
 |
 |- charset.conv
 |- conf.d/
 |   |
 |   |- *.conf
 |
 |- default-server.conf
 |- errors.conf
 |- httpd.conf
 |- listen.conf
 |- magic
 |- mime.types
 |- mod_*.conf
 |- server-tuning.conf
 |- ssl.*
 |- ssl-global.conf
 |- sysconfig.d
 |   |
 |   |- global.conf
 |   |- include.conf
 |   |- loadmodule.conf . .
 |
 |- uid.conf
 |- vhosts.d
 |   |- *.conf
- Apache Configuration Files in /etc/apache2/
- charset.conv
-
Specifies which character sets to use for different languages. Do
not edit.
- conf.d/*.conf
-
Configuration files added by other modules. These configuration
files can be included into your virtual host configuration where
needed. See vhosts.d/vhost.template for
examples. By doing so, you can provide different module sets for
different virtual hosts.
- default-server.conf
-
Global configuration for all virtual hosts with reasonable
defaults. Instead of changing the values, overwrite them with a
virtual host configuration.
- errors.conf
-
Defines how Apache responds to errors. To customize these messages
for all virtual hosts, edit this file. Otherwise overwrite these
directives in your virtual host configurations.
- httpd.conf
-
The main Apache server configuration file. Avoid changing this
file. It mainly contains include statements and global settings.
Overwrite global settings in the respective configuration files
listed here. Change host-specific settings (such as document root)
in your virtual host configuration.
- listen.conf
-
Binds Apache to specific IP addresses and ports. Name-based virtual
hosting (see
Name-Based Virtual Hosts
is also configured here.
- magic
-
Data for the mime_magic module that helps Apache automatically
determine the MIME type of an unknown file. Do not change.
- mime.types
-
MIME types known by the system (this actually is a link to
/etc/mime.types). Do not edit. If you need to
add MIME types not listed here, add them to
mod_mime-defaults.conf.
- mod_*.conf
-
Configuration files for the modules that are installed by default.
Refer to Section 28.4, Installing, Activating, and Configuring Modules for details. Note
that configuration files for optional modules reside in the
directory conf.d.
- server-tuning.conf
-
Contains configuration directives for the different MPMs (see
Section 28.4.4, Multiprocessing Modules) as well as general
configuration options that control Apache's performance. Properly
test your Web server when making changes here.
- ssl-global.conf and ssl.*
-
Global SSL configuration and SSL certificate data. Refer to
Section 28.6, Setting Up a Secure Web Server with SSL for details.
- sysconfig.d/*.conf
-
Configuration files automatically generated from
/etc/sysconfig/apache2. Do not change any of
these files—edit /etc/sysconfig/apache2
instead. Put no other configuration files in this directory.
- uid.conf
-
Specifies under which user and group ID Apache runs. Do not change.
- vhosts.d/*.conf
-
Your virtual host configuration should go here.The directory
contains template files for virtual hosts with and without SSL.
Every file in this directory ending in .conf
is automatically included in the Apache configuration. Refer to
Virtual Host Configuration for
details.
Virtual Host Configuration
The term virtual host refers to Apache's ability
to serve multiple URIs (universal resource identifiers) from the same
physical machine. This means that several domains, such as www.example.com
and www.example.net, are run by a single Web server on one physical machine.
It is common practice to use virtual hosts to save administrative
effort (only a single Web server needs to be maintained) and hardware
expenses (each domain does not require a dedicated server). Virtual
hosts can be name based, IP based, or port based.
To list all existing virtual hosts, use the command httpd2
-S. It outputs a list showing the default
server and all virtual hosts together with their IP addresses and
listening ports. Furthermore, the list also contains an entry for each
virtual host showing its location in the configuration files.
Virtual hosts can be configured via YaST (see
Virtual Hosts)
or by manually editing a configuration file. By default, Apache in
openSUSE
is prepared for one configuration file per virtual host in
/etc/apache2/vhosts.d/. All files in this
directory with the extension .conf are
automatically included to the configuration. A basic template for a
virtual host is provided in this directory
(vhost.template or
vhost-ssl.template for a virtual host with SSL
support).
HINT: Always Create a Virtual Host Configuration
It is recommended to always create a virtual host configuration file,
even if your Web server only hosts one domain. In doing so, you not
only have the domain-specific configuration in one file, but you can
always fall back to a working basic configuration by simply moving,
deleting, or renaming the configuration file for the virtual host. For
the same reason, you should also create separate configuration files
for each virtual host.
The
<VirtualHost></VirtualHost>
block holds the information that applies to a particular domain. When
Apache receives a client request for a defined virtual host, it uses
the directives enclosed in this section. Almost all directives can be
used in a virtual host context. See
https://httpd.apache.org/docs/2.2/mod/quickreference.html
for further information about Apache's configuration directives.
Name-Based Virtual Hosts
With name-based virtual hosts, more than one Web site is served per IP
address. Apache uses the host field in the HTTP header sent by the
client to connect the request to a matching
ServerName entry of one of the virtual host
declarations. If no matching ServerName is
found, the first specified virtual host is used as a default.
The directive NameVirtualHost tells Apache on
which IP address and, optionally, which port to listen for requests by
clients containing the domain name in the HTTP header. This option is
configured in the configuration file
/etc/apache2/listen.conf.
The first argument can be a fully qualified domain name, but it is
recommended to use the IP address. The second argument is the port and
is optional. By default, port 80 is used and is configured via the
Listen directive.
The wild card * can be used for both the IP address
and the port number to receive requests on all interfaces. IPv6
addresses must be enclosed in square brackets.
Example 28-1 Variations of Name-Based VirtualHost Entries
# NameVirtualHost IP-address[:Port]
NameVirtualHost 192.168.3.100:80
NameVirtualHost 192.168.3.100
NameVirtualHost *:80
NameVirtualHost *
NameVirtualHost [2002:c0a8:364::]:80
The opening VirtualHost tag takes the IP
address (or fully qualified domain name) previously declared with the
NameVirtualHost as an argument in a
name-based virtual host configuration. A port number previously
declared with the NameVirtualHost directive
is optional.
The wild card * is also allowed as a substitute
for the IP address. This syntax is only valid in combination with the
wild card usage in NameVirtualHost * . When
using IPv6 addresses, the address must be included in square brackets.
Example 28-2 Name-Based VirtualHost Directives
<VirtualHost 192.168.3.100:80>
  ...
</VirtualHost>

<VirtualHost 192.168.3.100>
  ...
</VirtualHost>

<VirtualHost *:80>
  ...
</VirtualHost>

<VirtualHost *>
  ...
</VirtualHost>

<VirtualHost [2002:c0a8:364::]>
  ...
</VirtualHost>
IP-Based Virtual Hosts
This alternative virtual host configuration requires the setup of
multiple IPs for a machine. One instance of Apache hosts several
domains, each of which is assigned a different IP.
The physical server must have one IP address for each IP-based virtual
host. If the machine does not have multiple network cards, virtual
network interfaces (IP aliasing) can also be used.
The following example shows Apache running on a machine with the IP
192.168.3.100, hosting two
domains on the additional IPs
192.168.3.101 and
192.168.3.102. A separate
VirtualHost block is needed for every virtual
server.
Example 28-3 IP-Based VirtualHost Directives
<VirtualHost 192.168.3.101>
  ...
</VirtualHost>

<VirtualHost 192.168.3.102>
  ...
</VirtualHost>
Here, VirtualHost directives are only
specified for interfaces other than 192.168.3.100.
When a Listen directive is also configured
for 192.168.3.100, a separate IP-based virtual host
must be created to answer HTTP requests to that
interface—otherwise the directives found in the default server
configuration (/etc/apache2/default-server.conf)
are applied.
Basic Virtual Host Configuration
At least the following directives should be present in each virtual
host configuration in order to set up a virtual host. See
/etc/apache2/vhosts.d/vhost.template for more
options.
- ServerName
-
The fully qualified domain name under which the host should be
addressed.
- DocumentRoot
-
Path to the directory from which Apache should serve files for this
host. For security reasons, access to the entire file system is
forbidden by default, so you must explicitly unlock this directory
within a Directory container.
- ServerAdmin
-
E-mail address of the server administrator. This address is, for
example, shown on error pages Apache creates.
- ErrorLog
-
The error log file for this virtual host. Although it is not
necessary to create separate error log files for each virtual host,
it is common practice to do so, because it makes debugging of
errors much easier. /var/log/apache2/ is the
default directory where Apache's log files should be kept.
- CustomLog
-
The access log file for this virtual host. Although it is not
necessary to create separate access log files for each virtual
host, it is common practice to do so, because it allows separate
analysis of access statistics for each host.
/var/log/apache2/ is the default directory
where Apache's log files should be kept.
As mentioned above, access to the whole file system is forbidden by
default for security reasons. Therefore, explicitly unlock the
directories in which you have placed the files Apache should
serve—for example the DocumentRoot:
<Directory "/srv/www/www.example.com/htdocs">
  Order allow,deny
  Allow from all
</Directory>
The complete configuration file looks like this:
Example 28-4 Basic VirtualHost Configuration
<VirtualHost 192.168.3.100>
  ServerName www.example.com;
  DocumentRoot /srv/www/www.example.com/htdocs
  ServerAdmin [email protected]
  ErrorLog /var/log/apache2/www.example.com_log
  CustomLog /var/log/apache2/www.example.com-access_log common
  <Directory "/srv/www/www.example.com/htdocs">
    Order allow,deny
    Allow from all
  </Directory>
</VirtualHost>
28.2.2 Configuring Apache with YaST
To configure your Web server with YaST, start YaST and select
. When starting the module for the first
time, the HTTP Server Wizard starts, prompting you to
make just a few basic decisions concerning administration of the server.
After having finished the wizard, the dialog in
HTTP Server Configuration
starts every time you call the module.
HTTP Server Wizard
The HTTP Server Wizard consists of five steps. In the last step of the
dialog, you are given the opportunity to enter the expert configuration
mode to make even more specific settings.
Network Device Selection
Here, specify the network interfaces and ports Apache uses to listen for
incoming requests. You can select any combination of existing network
interfaces and their respective IP addresses. Ports from all three
ranges (well-known ports, registered ports, and dynamic or private
ports) that are not reserved by other services can be used. The default
setting is to listen on all network interfaces (IP addresses) on port
80.
Check to open the
ports in the firewall that the Web server listens on. This is necessary
to make the Web server available on the network, which can be a LAN,
WAN, or the public Internet. Keeping the port closed is only useful in
test situations where no external access to the Web server is necessary.
If you have multiple network interfaces, click on to specify on which interface(s) the port(s) should
be opened.
Click to continue with configuration.
Modules
The configuration option allows for the
activation or deactivation of the script languages, the Web server
should support. For the activation or deactivation of other modules,
refer to
Server Modules.
Click to advance to the next dialog.
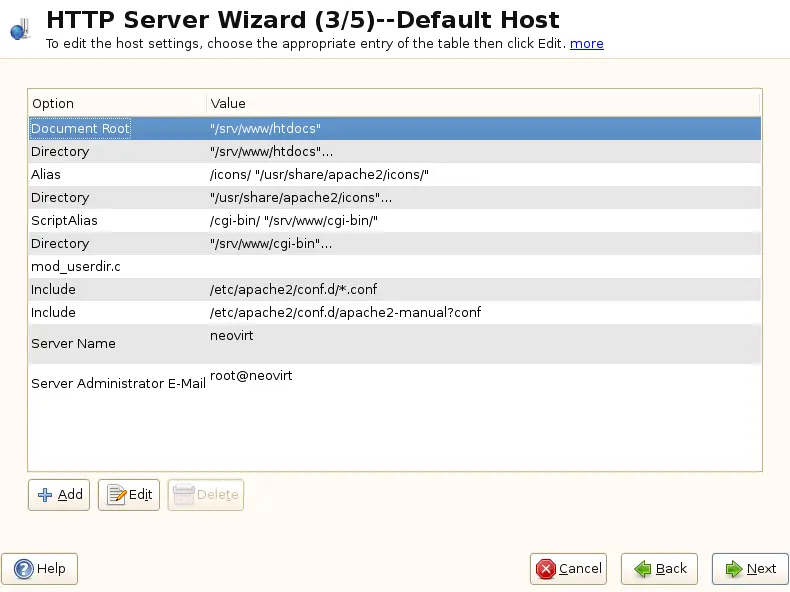
Default Host
This option pertains to the default Web server. As explained in
Virtual Host Configuration, Apache can
serve multiple virtual hosts from a single physical machine. The first
declared virtual host in the configuration file is commonly referred to
as the default host. Each virtual host inherits the
default host's configuration.
To edit the host settings (also called directives),
choose the appropriate entry in the table then click
. To add new directives, click
. To delete a directive, select it and click
.
Here is list of the default settings of the server:
- Document Root
-
Path to the directory from which Apache serves files for this host.
/srv/www/htdocs is the default location.
- Alias
-
With the help of Alias directives, URLs can
be mapped to physical file system locations. This means that a
certain path even outside the Document Root in the
file system can be accessed via a URL aliasing that path.
The default openSUSE Alias
/icons points to
/usr/share/apache2/icons for the Apache icons
displayed in the directory index view.
- ScriptAlias
-
Similar to the Alias directive, the
ScriptAlias directive maps a URL to a file
system location. The difference is that
ScriptAlias designates the target directory
as a CGI location, meaning that CGI scripts should be executed in
that location.
- Directory
-
With the Directory setting, you can enclose
a group of configuration options that will only apply to the
specified directory.
Access and display options for the directories
/usr/share/apache2/icons and
/srv/www/cgi-bin are configured here. It should
not be necessary to change the defaults.
- Include
-
With include, additional configuration files can be specified. Two
Include directives are already
preconfigured: /etc/apache2/conf.d/ is the
directory containing the configuration files that come with external
modules. With this directive, all files in this directory ending in
.conf are included. With the second directive,
/etc/apache2/conf.d/apache2-manual.conf, the
apache2-manual configuration file is included.
- Server Name
-
This specifies the default URL used by clients to contact the Web
server. Use a fully qualified domain name (FQDN) to reach the Web
server at https://FQDN/
or its IP address. You cannot choose an arbitrary name here—the
server must be known under this name.
- Server Administrator E-Mail
-
E-mail address of the server administrator. This address is, for
example, shown on error pages Apache creates.
After finishing with the step, click
to continue with the configuration.
Virtual Hosts
In this step, the wizard displays a list of already configured virtual
hosts (see Virtual Host Configuration).
If you have not made manual changes prior to starting the YaST HTTP
wizard, no virtual host is present.
To add a host, click to open a dialog in which to
enter basic information about the host, such as ,
(DocumentRoot), and the . is used to
determine how a host is identified (name based or IP based). Specify the
name or IP address with
Clicking advances to the second part of the
virtual host configuration dialog.
In part two of the virtual host configuration you can specify whether to
enable CGI scripts and which directory to use for these scripts. It is
also possible to enable SSL. If you do so, you must specify the path to
the certificate as well. See
Section 28.6.2, Configuring Apache with SSL for details on SSL
and certificates. With the option,
you can specify which file to display when the client requests a
directory (by default, index.html). Add one or more filenames
(space-separated) if you want to change this. With , the content of the users public directories
(~user/public_html/) is
made available on the server under
https://www.example.com/~user.
IMPORTANT: Creating Virtual Hosts
It is not possible to add virtual hosts at will. If using name-based
virtual hosts, each hostname must be resolved on the network. If using
IP-based virtual hosts, you can assign only one host to each IP address
available.
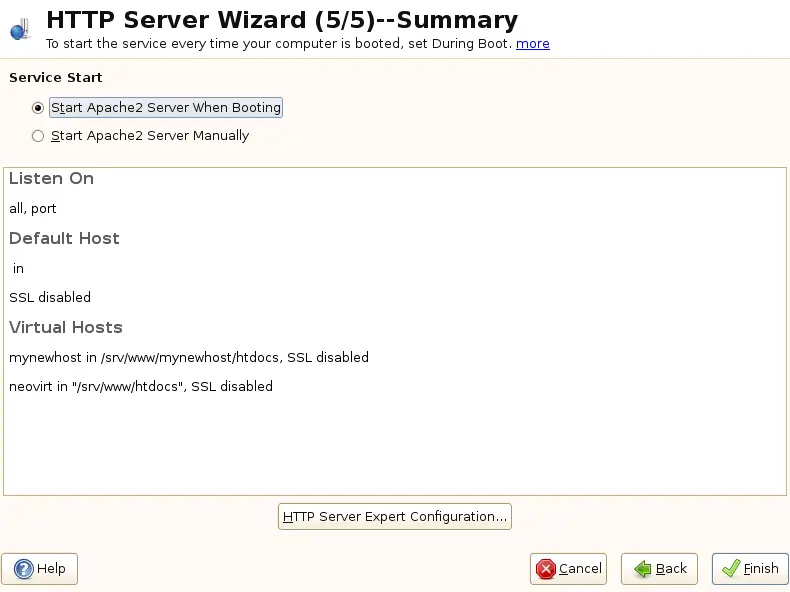
Summary
This is the final step of the wizard. Here, determine how and when the
Apache server is started: when booting or manually. Also see a short
summary of the configuration made so far. If you are satisfied with your
settings, click to complete configuration. If
you want to change something, click until you
have reached the desired dialog. Clicking opens the dialog described in
HTTP Server Configuration.
HTTP Server Configuration
The dialog also lets you
make even more adjustments to the configuration than the wizard (which
only runs if you configure your Web server for the first time). It
consists of four tabs described in the following. No configuration option
you change here is effective immediately—you always must confirm
your changes with to make them effective.
Clicking leaves the configuration module and
discards your changes.
Listen Ports and Addresses
In , select whether Apache should be
running () or stopped
(). In ,
, , or
addresses and ports on which the server should
be available. The default is to listen on all interfaces on port 80. You
should always check ,
because otherwise the Web server is not reachable from the outside.
Keeping the port closed is only useful in test situations where no
external access to the Web server is necessary. If you have multiple
network interfaces, click on to
specify on which interface(s) the port(s) should be opened.
With , watch either the access log or the
error log. This is useful if you want to test your configuration. The
log file opens in a separate window from which you can also restart or
reload the Web server (see Section 28.3, Starting and Stopping Apache
for details). These commands are effective immediately.
|
|
|