|
 |
|
| |
3.3 Using the Gtk Interface
Change the software collection of your system using YaST. In YaST's
software management tool search for software components you want to add or
remove. YaST resolves all the dependencies for you. Add additional
software repositories to your setup to install packages not shipped with
the installation media and let YaST manage them. Keep your system
up-to-date by managing software updates with openSUSE Updater.
3.3.1 Installing Software
Software is available via RPM packages. Each package contains the program
itself, the configuration files, and additional documentation. If you
want to add more software to the system, proceed as follows:
-
Click to start the YaST package manager.
-
In the package search field at the right window border enter the name
of the software you want to install (for example,
jhead, a tool for manipulating JPEG meta
data). YaST starts searching for the package while you enter the
name. When the search is finished, select the desired package in the
main pane and click .
-
You are able to search for more packages and list them the same way.
-
When finished, click to perform the
installation of the listed packages.
If you do not know the name of the software you are interested in, you
can browse through the software catalog in various ways. For example, you
can group by patterns, package groups, languages, or repositories. Group
by patterns, if you are looking for software for a specific task:
-
From the grouping menu in the upper left corner, select
. Now you see various pattern sets listed in
the area below.
-
From the patterns select one or more patterns you are interested in. If
you click the name of a pattern, for example, , you see the packages it contains in the right
frame. If you activate this pattern by clicking , the packages will get listed in the changes overview on
the right side.
-
Click to install all selected packages.
Alternatively, group by package groups. The package groups feature offers
a more detailed view of the software grouped by categories. Packages
often depend on other packages; if you select a package, you might be
requested to install additional packages to resolve possible package
dependencies.
Grouping by languages is similar to grouping by package groups. Using the
languages view enables you to select packages like translated program
messages, documentation, or special fonts which are needed to support a
specific language.
For installing corresponding source packages, use
zypper. For more information, see
Section 7.1.2, Installing and Removing Software with Zypper.
3.3.2 Checking Software Dependencies
The software of one package might only work properly if the required
package is also installed. If packages with identical or similar
functionality use the same system resource, they should not be installed
at the same time, because this would cause a package conflict.
When the package manager starts, it examines the system and displays the
installed packages. When you select a packag to install and remove it,
the package manager automatically checks the dependencies and selects any
other required packages (resolution of dependencies). If you select or
deselect conflicting packages, the package manager indicates this and
suggests possible solutions to this problem (resolution of conflicts).
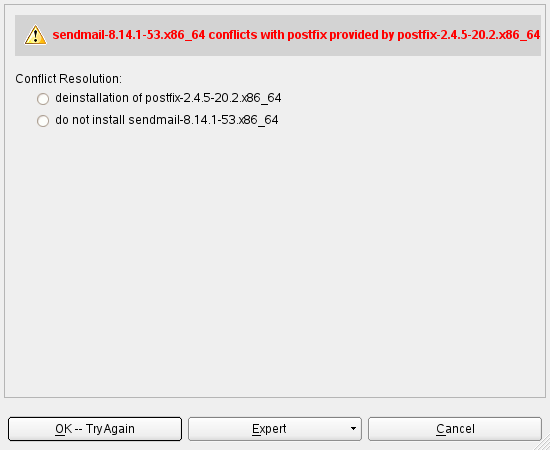
For example, sendmail and
postfix should not be installed concurrently.
Figure 3-1 shows a conflict
message prompting you to make a decision.
postfix is already installed. Accordingly, you
can decide wheter to install sendmail or remove
postfix
.
WARNING: Handling Package Conflicts
Unless you are very experienced, follow the suggestions of YaST when
handling package conflicts, because otherwise the stability and
functionality of your system could be endangered by the existing
conflict.
3.3.3 Packages and Software Repositories
If you want to search for packages originating from one particular
software repository, use grouping by .
This view shows a list of all packages from the selected installation
source.
To view a list of the all installed packages from the selected
repository, click . From this listing select
packages for removing. To accomplish the opposite action, click
and select packages for installation.
3.3.4 Removing Software
If you want to remove software from the system, proceed as follows:
-
Make use of a search strategy explained in
Section 3.3.1, Installing Software.
-
In the mark the packages you want
to remove. To mark all of them with one click, right-click in the
pane and and choose .
-
Click .
If you try to remove a package which is required by installed software,
the conflict manager will complain about dependency issues and you must
resolve the conflicts first as descripted in
Section 3.3.2, Checking Software Dependencies.
When all conflicts are resolved, the package scheduled for removing is
listed in the pane on the right side.
-
Click to perform all actions listed in the
pane.
|
|
|