Upgrading With Solaris Live Upgrade and Installed Non-Global Zones (Overview)
Starting with the Solaris Express 2/07 release, you can upgrade or patch a system
that contains non-global zones with Solaris Live Upgrade. If you have a system
that contains non-global zones, Solaris Live Upgrade is the recommended program to upgrade
and to add patches. Other upgrade programs might require extensive upgrade time,
because the time required to complete the upgrade increases linearly with the number
of installed non-global zones. If you are patching a system with Solaris
Live Upgrade, you do not have to take the system to single-user
mode and you can maximize your system's uptime. The following list summarizes changes
to accommodate systems that have non-global zones installed.
Understanding Solaris Zones and Solaris Live Upgrade
The Solaris Zones partitioning technology is used to virtualize operating system services and provide
an isolated and secure environment for running applications. A non-global zone is
a virtualized operating system environment created within a single instance of the Solaris
OS, the global zone. When you create a non-global zone, you produce an
application execution environment in which processes are isolated from the rest of the
system.
Solaris Live Upgrade is a mechanism to copy the currently running system onto
new slices. When non-global zones are installed, they can be copied to the
inactive boot environment along with the global zone's file systems.
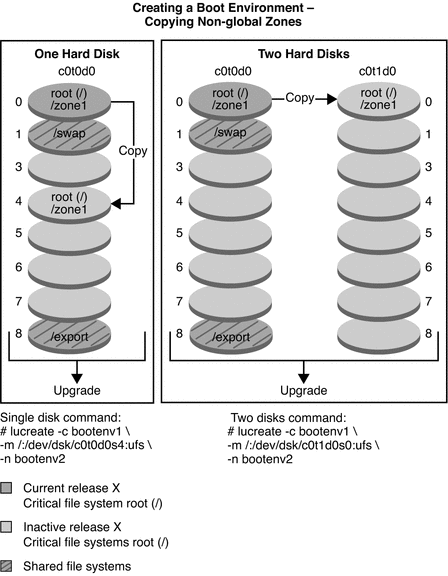
Figure 9-1 shows a non-global zone that is copied to the inactive boot environment
along with the global zone's file system.
Figure 9-1 Creating a Boot Environment – Copying Non-Global Zones

In this example of a system with a single disk, the root (/) file system is copied to c0t0d0s4. All non-global zones that are associated with the file system are also copied to s4. The /export and /swap file systems are shared between the current boot environment, bootenv1, and the inactive boot environment, bootenv2. The lucreate command is the following:
# lucreate -c bootenv1 -m /:/dev/dsk/c0t0d0s4:ufs -n bootenv2
In this example of a system with two disks, the root (/) file system is copied to c0t1d0s0. All non-global zones that are associated with the file system are also copied to s0. The /export and /swap file systems are shared between the current boot environment, bootenv1, and the inactive boot environment, bootenv2. The lucreate command is the following:
# lucreate -c bootenv1 -m /:/dev/dsk/c0t1d0s0:ufs -n bootenv2
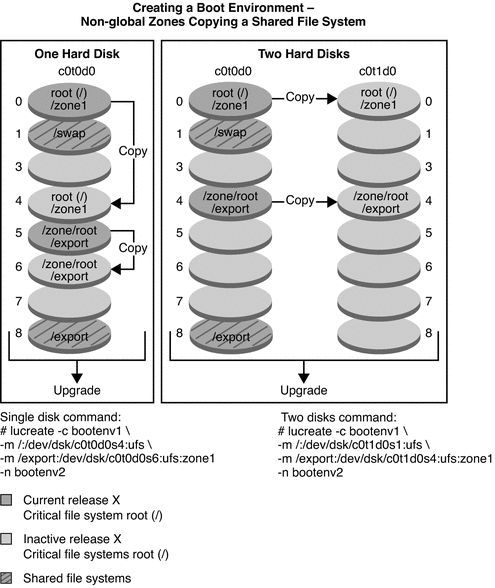
Figure 9-2 shows that a non-global zone is copied to the inactive boot environment.
Figure 9-2 Creating a Boot Environment – Copying a Shared File System From a Non-Global Zone

In this example of a system with a single disk, the root (/) file system is copied to c0t0d0s4. All non-global zones that are associated with the file system are also copied to s4. The non-global zone, zone1, has a separate file system that was created by the zonecfg add fs command. The zone path is /zone1/root/export. To prevent this file system from being shared by the inactive boot environment, the file system is placed on a separate slice, c0t0d0s6. The /export and /swap file systems are shared between the current boot environment, bootenv1, and the inactive boot environment, bootenv2. The lucreate command is the following:
# lucreate -c bootenv1 -m /:/dev/dsk/c0t0d0s4:ufs \
-m /export:/dev/dsk/c0t0d0s6:ufs:zone1 -n bootenv2
In this example of a system with two disks, the root (/) file system is copied to c0t1d0s0. All non-global zones that are associated with the file system are also copied to s0. The non-global zone, zone1, has a separate file system that was created by the zonecfg add fs command. The zone path is /zone1/root/export. To prevent this file system from being shared by the inactive boot environment, the file system is placed on a separate slice, c0t1d0s4. The /export and /swap file systems are shared between the current boot environment, bootenv1, and the inactive boot environment, bootenv2. The lucreate command is the following:
# lucreate -c bootenv1 -m /:/dev/dsk/c0t1d0s0:ufs \
-m /export:/dev/desk/c0t1d0s4:ufs:zone1 -n bootenv2
