| |
Printing envelopes
Printing envelopes involves two steps: setup and printing.
To set up an envelope to be printed by itself or with your document:
-
Click Insert > Envelope from the menu bar.
-
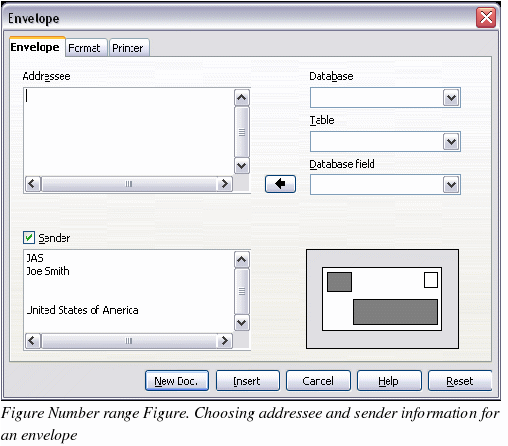
In the Envelope dialog box, start with the Envelope tab (Figure 129). Verify, add, or edit the information in the Addressee and Sender boxes (the “from†on the envelope).
You can use the right-hand dropdown lists to select the database or table from which you can draw the envelope information, if desired. See “Setting up envelope details from a database†on page 123 for details.
-
On the Format tab (Figure 130), verify or edit the positioning of the addressee and the sender information. The preview area on the lower right shows the effect of your positioning choices.
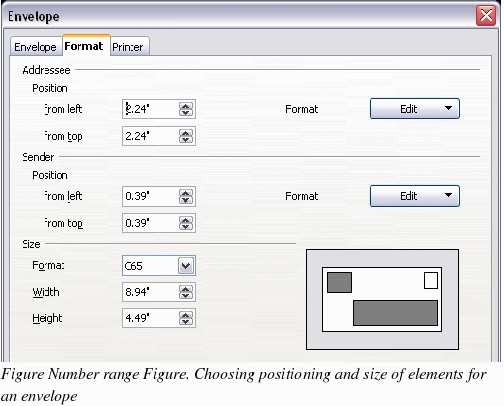
To format the text of these blocks, click the Edit buttons to the right.
-
In Character , you can choose fonts, sizes, underlines or color, rotating/scaling, backgrounds and more.
-
In Paragraph, you can choose indenting, alignment, flow, tabs and more.
-
In the lower left of this tab, choose the envelope format from the dropdown list. The width and height of the selected envelope then show in the boxes below the selected format. If you chose a pre-existing format, just verify these sizes. If you chose User defined in the Format list, edit the sizes.
-
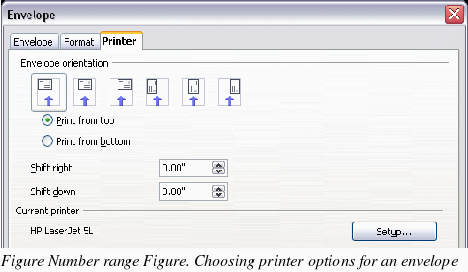
After formatting, select the Printer tab (Figure 131) to choose printer options such as envelope orientation and shifting. You may need to experiment a bit to see what works best for your printer.
You can also choose a different printer or alter printer setup (for example, specify the tray that holds envelopes) for this print job.
-
When you have finished formatting and are ready to print, click either the New Doc or Insert button to finish. New Doc makes only an envelope or starts a new document with the envelope. Insert inserts the envelope into your existing document as page 1.
To not proceed with this envelope, click Cancel or press the Esc key. You can also click Reset to remove your changes and return to the original settings when the dialog box opened.
When the Envelope dialog box closes, you are returned to your document, which now has the envelope in the same file as the document. Save this file before you do anything else.
To print the envelope:
-
Choose File > Print from the menu bar.
-
On the Print dialog box, under Print range, choose Pages and type 1 in the box. Click OK to print.
|
|


