Adding, renaming, and removing slides
Adding
a new slide
There
are several equivalent ways to add a slide to a presentation:
Select
Insert > Slide
(works in Normal and Outline view).
Right-click
on the Slides pane and select New
Slide from the pop-up menu (works in Normal, Outline and
Notes view).
Right-click
on the main work area while in Slide Sorter view and select New
Slide from the pop-up menu.
On
the work area in Normal view, right click on the active slide and
select Slide > New Slide.
The
new slide is inserted after the current slide or in the position
where the mouse was clicked.
If
multiple slide masters exist, the new slide will apply the master of
the previous slide in the sequence.
Inserting
a slide from another presentation
You
can insert slides from other presentations in three ways:
Using
Insert > File.
With this method, you can optionally link
the slides instead of copying (embedding) them into the
presentation.
Copying
and pasting.
Dragging
and dropping, to copy or move slides.
To
insert a slide from another presentation:
In
Normal view, select the slide after which you want to insert the
new slide, then choose Insert
> File from the menu bar.
In
the file browser, locate the file containing the slide that you
want to insert, and click Insert.
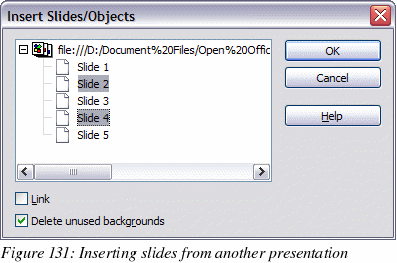
In
the Insert Slides/Objects dialog (Figure 131), click the plus sign
next to the icon for the presentation file, and then select the
slides that you want to insert. (You can see that the slides would
be easier to select if they had more descriptive names.)
Optionally
select the Link
checkbox.
Click
OK. The slides
are inserted after the selected slide in the presentation.
To copy and paste
slides between presentations:
Open the
presentations that you want to copy from and paste into.
In
the presentation containing the slides that you want to copy,
choose View > Slide
Sorter.
Select
the slides, and then choose Edit
> Copy, or click the Copy
button on the main toolbar, or press Control+C.
Change
to the presentation where you want to paste the slides, and then
choose View > Normal.
Select
the slide that you want the copied slides to follow, and then
choose Edit > Paste,
or click the Paste
button on the main toolbar, or press Control+V.
To
copy or move slides between presentations:
Open the
presentations that you want to copy or move slides between. Arrange
the windows so both presentations are visible. Choose View
> Slide Sorter in each window.
In
the presentation containing the slides that you want to copy or
move, select the required slides. To move
the slides, drag and drop them into the other presentation. To copy
the slides, hold down the Control
key while dragging and dropping.
Duplicating
a slide
Duplicating
a slide is a convenient way to add slides, since the new slide is an
exact copy of the selected slide. To duplicate a slide:
Go
to Normal view either by clicking on the tab on the work area or
selecting View > Normal
from the menu bar.
Make
sure that the slide to be duplicated is on the work area.
Select
Insert > Duplicate Slide
from the menu bar.
The
duplicated slide is inserted after the original slide and is
displayed in the work area.
Here is another way
to duplicate a slide:
In Normal view, go
to the slide after which you want to insert the new slide.
Open
the Navigator and select the slide you want to duplicate (see Figure 132).
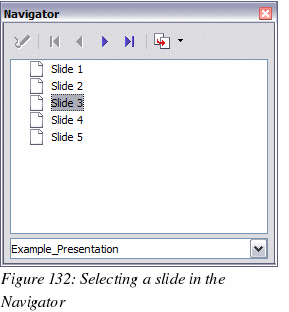
Drag
the slide into the workspace and release the mouse button. The Name
Object dialog (Figure 133) opens.
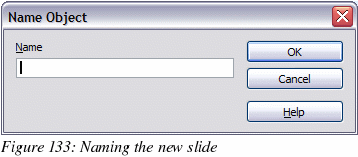
Type
a name for the duplicated slide and then click OK.
The new slide is inserted after the selected slide.
|
Tip
|
Duplicating
a slide is a good way to prevent having slides with too much
information crowded on them. Try duplicating the “busy” slide
and split the points over two or more slides. All the formatting,
backgrounds and so on will be preserved.
|
Expanding
a slide
Sometimes you will
have a slide with too many subpoints to fit in the space available.
Instead of reducing the font size or using other methods to squeeze
more text into the space, it is usually better to subdivide the
contents of the slide into two or more slides.
As
mentioned in the Tip above, you can duplicate the slide and manually
split the points. Another way is to “expand” the contents of the
slide. To do this:
[optional]
Duplicate the slide (in case it is needed later).
Choose
Insert > Expand
Slide from the menu bar.
Impress creates a new slide for each highest level of the outline.
The outline text becomes the title of the new slide. Outline points
below the top level on the original slide are moved up one level on
the new slide.
If
required, repeat steps 2 and 3 on any slide where level 2 entries
of the outline exist, to expand those as well.
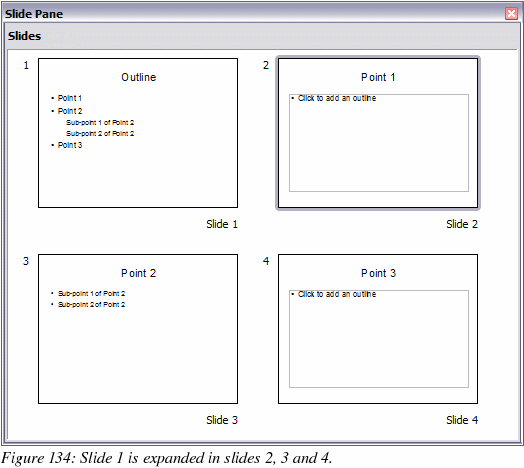
Figure 134 shows
a slide with an outline consisting of three high level points and
two second-level points under bullet point 2. The Expand
command has generated three slides, each having as title the first
level outline and (if present) the second level points in the text
area.
Creating
a summary slide
It
is also possible to “reverse” the Expand operation to create
summaries. The Summary command is useful to create an agenda
for the presentation.
Select
the slide that will be the first one to appear in the summary. Do
this by clicking on it in the Slides Pane or in Slide Sorter view.
Select
Insert > Summary Slide.
Impress creates a new slide at the end of the presentation where
all the titles of the slides from the one after the selected one to
the last are written as bullet points in the body of the slide.
Move
this slide to wherever you want it to appear in the presentation.
Renaming
a slide
To
rename a slide, do one of the following:
Right-click
on the slide thumbnail in the Slides pane or in the main area when
in Slide Sorter view and select Rename
Slide from the pop up menu.
In
Normal view, right-click on the slide in the work area, then select
Slide > Rename Slide
from the pop up menu.
In
the Rename Slide dialog, type a new name for the slide and then
click OK.
Deleting
a slide
To
delete a slide, use the most convenient among these options:
In
Normal, Outline or Slide Sorter view, select a slide and then click
Edit > Delete Slide or press the Delete
key.
In
the Slides Pane (not available in Slide Sorter view) right-click on
the slide to be deleted and select Delete Slide
from the pop-up menu, otherwise just select the slide and then
press the Delete
key.
In
Normal view, right-click on the work area, then select Slide
> Delete Slide from the
pop up menu.
|
Tip
|
When
working in the Slide sorter view (View
> Slide sorter) it is possible to delete multiple
slides simultaneously by selecting them with the mouse and
pressing the Delete
key.
|


