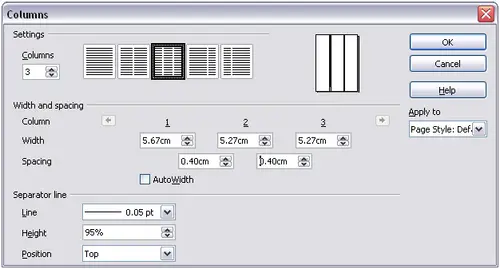
Defining the number of columns on a page
It is a good idea to define your basic page style (such as Default) with the most common layout to be used in your document, either single-column or multiple-column. You can then either define extra page styles for pages with different numbers of columns or use sections (described in
Using sections for page layout) for pages or parts of pages with different numbers of columns.
To define the number of columns on a page:
- Choose Format > Columns or go to the Columns page of the Page Style dialog box.
- On the Columns dialog box, choose the number of columns and specify any spacing between the columns and whether you want a vertical separator line to appear between the columns. You can use one of Writer's predefined column layouts, or you can create a customized column layout. The preview box, located to the right of the Settings area, shows how the column layout will look.
- Notice the Apply to box on the right-hand side of the dialog box. In this case, the changes are being applied to the Default page style.
- Click OK to save the changes.
-

Defining the number of columns on a page.
Using a predefined column layout
The Settings area displays five predefined column layouts. To use one of them, click the desired layout.
Specifying the number of columns
If you prefer to create a customized column layout, you must specify the number of columns that you want. Enter the desired number in the Columns box in the Settings area.
Formatting column width and spacing
To create evenly-spaced columns that are all the same width, check the AutoWidth checkbox in the Width and spacing area.
To customize the width and spacing of the columns, follow these steps:
- In the Width and spacing area, clear the AutoWidth checkbox.
- On the Width line, enter a width for each column.
- On the Spacing line, enter the amount of space that you want between each pair of columns.
If you specify more than three columns, use the arrow keys on the Column line to scroll among the columns.
Formatting separator lines
To display separator lines between the columns:
- Eighteen separator line options exist: None or various lines of thicknesses which range from 0.05 to 9 pt). From the Line drop-down list in the Separator line area, select the type of line that you want. (1 pt = 1 point = 1/12 pica = 1⁄72 inch = 127⁄360 mm = 0.3527 mm.)
- The default format is for the separator lines to have the same height as the columns. If you want the separator lines to be shorter than the columns, use the Height box to enter the height of the separator lines as a percentage of the height of the columns. For example, if you enter 50%, the separator lines will be half as high as the columns.
- If you entered a height of less than 100%, use the Position drop-down list to select a vertical alignment for the separator lines. The vertical-positioning options are: Top, Centered, or Bottom.
Reverting to a single-column layout
To revert to a single-column layout for the page style, go to the Settings area and either reset the number in the Columns box to 1 or click the single-column layout icon.
