| |
Selecting background colors and graphics
A table background can greatly improve the readability of the data, visually highlight important parts of the table (such as the heading or a specific cell), or just make the table more appealing. You can choose between two types of background when formatting the table: solid color or graphic. The background can be applied to the whole table, to a single cell, or to a row. The background selected for a cell will be in front of the row background which in turn will hide the table background.
The row background option is quite handy when you want to create alternate color rows or assign a different background to the heading of the table. The tables in this guide adopt this technique.
To set the background for a cell, row, or table:
- Place the cursor anywhere inside the cell, row or table you want to work with. If you want to apply a background to a group of cells, select the group.
- Right-click and select Table from the pop-up menu, or select Table > Table Properties from the main menu.
- In the Table Format dialog box, select the Background tab.
- In the For section, chose whether to apply the settings to cell, row, or table.
- If you choose Cell, changes apply only to the selected cells, or the cell where the cursor currently resides. Even when selecting a group of cells, the background settings are applied to each cell individually.
- If you choose Row, changes affect the entire row where the cursor resides.
- If you choose Table, changes will set the background for the entire table, regardless of the cursor position or selected cells.
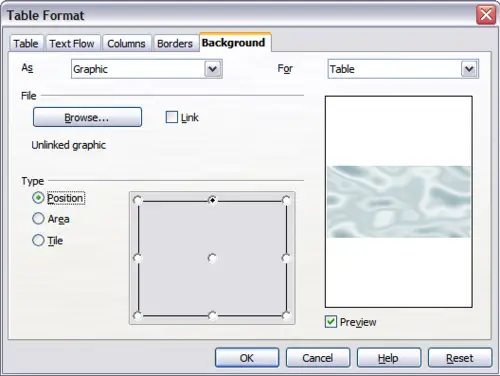 Table Format dialog: inserting a graphic table background - In the As section, choose whether the background is a color or a graphic.
To apply a color, select the color and click OK. Remember that you can add custom colors by choosing Tools > Options > Colors.
To apply a graphic:
- First select the graphic from your computer's file system with the Browse button. (Writer supports a large number of graphics formats.)
- You can use the Link option to link the graphic file. If it is linked, changes to the graphic (for example, if you edit it in a different software package) are reflected in your document. However, you also need to keep the linked graphic file with the document file. If, for example, you email the document without the graphic file, the graphic will no longer be visible.
- Under Type, select the type of placement for the graphic.
- If you choose Position, you can select in the position map where the graphic will be displayed in the selected area.
- If you choose Area, the graphic is stretched to fill the whole area.
- If Tile, the graphic is tiled (repeated horizontally and vertically) to fill the area.
- If the Preview option is checked, the graphic displays in the pane on the right.
- To apply the graphic, click OK.
The figure below shows an example of a table set with a background image, and the first row background colored. As you can see, the row background covers the table background.
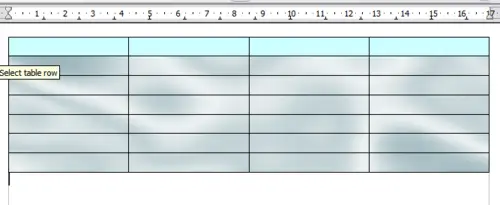 Example of table with different row and table backgrounds
|
|


