Book chapters typically start on a right-hand page, with the first page of the chapter having a different layout from the rest of the pages. The other pages in the chapter are “mirrored” for double-sided printing. For example, page numbers in the header or footer may be positioned on the outside edge of pages and a wider margin (allowing for binding) may be placed on the inside edge.
Table 2 shows the properties of two page styles (Right Page and Default) set up for a typical book chapter’s sequence of pages.
Table 2. Properties of customized page styles for book chapter
| Page Style
| Desired effect
| Property: setting
|
| Right Page
|
| First page always on the right (an odd-numbered page)
| Page > Page layout > Only right
|
| No header or footer
| Header > Header > Header on: Not selected
|
| Top margin of page larger than on other pages
| Page > Margins > Top: 6.00cm
|
|
| Default
|
| Mirrored margins
| Page > Page layout: Mirrored
|
| Header with page number on the top outside of the page and chapter title in the top middle center of the page
| Header > Header on: Selected
Header > Header > Same content left/right: Not selected
|
|
The figure below illustrates the transitions from the Right Page to Default page styles, with the change of header between left and right pages shown by the # symbol.
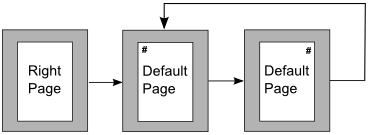
Right Page and then the Default page style with different headers for alternate pages.
Step 1. Set up the Right Page style.
- On the Styles and Formatting window, click the Page Styles icon
 (fourth from left) to display a list of page styles.
- Right-click on Right Page and select Modify from the pop-up menu.
- On the Organizer page of the Page Style: Right Page dialog box, change Next Style to Default.
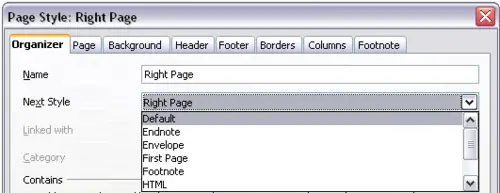
Specifying the next style after the first page of a chapter.
- On the Page page, specify a larger left margin for binding, and a larger top margin to move the chapter title down the page.
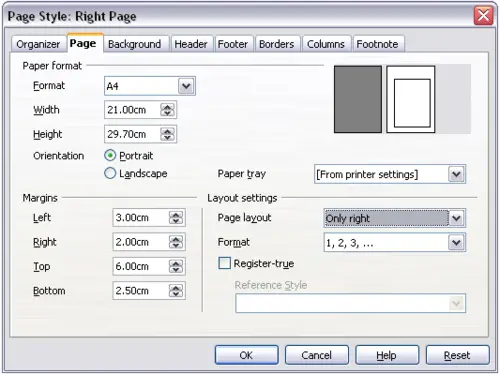
Setting page margins and layout for the Right Page style.
- On the Header and Footer pages, be sure the Header on and Footer on options are not selected. Click OK to save your changes.
- On the Styles and Formatting window, in the list of page styles, right-click on Default and select Modify from the pop-up menu.
- On the Organizer page of the Page Style: Default dialog box, be sure Next Style is set to Default.
Step 2. Set up the Default page style.
- On the Page page of the Page Style: Default dialog box, select Mirrored for Page layout and set the Inner and Outer margins to the same width as the Left and Right margins, respectively, on the Right Page style.

Setting page margins and layout for the Default page style.
- On the Header page of the Page Style: Default dialog box, select the Header on option and deselect the Same content left/right option. Click OK to save your changes.
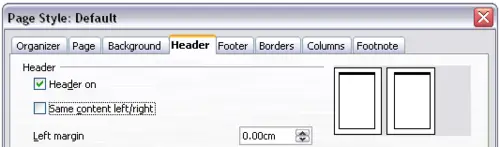
Setting up the header properties for the Default page style.
Step 3. Set up the Heading 1 paragraph style to start on a new right-hand page.
- In the Styles and Formatting window, right-click on Heading 1 and select Modify.
- On the Text Flow page of the Paragraph Style dialog box, in the Breaks section, select Insert, With Page Style, and Right Page. Click OK to save your changes.
-

Setting a paragraph style to start on a page of a selected style.
Step 4. Start a new chapter.
Apply the Heading 1 paragraph style to the first paragraph, which will be the title of the chapter.
 | By default, the Heading 1 paragraph style is assigned to Outline Level 1. The assignment of paragraph styles to outline levels is done through Tools > Outline Numbering.
|
Step 5. Set up the page headers.
- On a left page, put the cursor in the header and insert a page number field on the left (Insert > Fields > Page Number).
- Press Tab to put the cursor in the middle and insert a Chapter reference:
Press Control+F2 to display the Fields dialog box.
On the Document page, for Type, select Chapter and for Format, select Chapter name. Make sure that Layer is set to 1 and then click Insert.

Inserting a chapter title into the header of a page.
- On a right page, put the cursor in the header, press the Tab key, insert a Chapter reference, press Tab again, and insert a page number field.
- If you need to adjust the tab stops for the header, modify the Header paragraph style. Do not manually adjust the tab stops.


