Changing the appearance of the list
You can fully customize the appearance of a list, changing the bullet type or numbering for the entire list or for single entry. All the changes can be made using the Bullets and Numbering dialog box, which is accessed by selecting Format > Bullets and Numbering or by clicking on the Bullets and Numbering icon
 on the text formatting toolbar.
Selecting the entries
For the entire list:
- Select the entire list or click on the gray border of the text box so that just the green resizing handles are displayed.
- Select Format > Bullets and Numbering or click on the Bullets and Numbering icon.
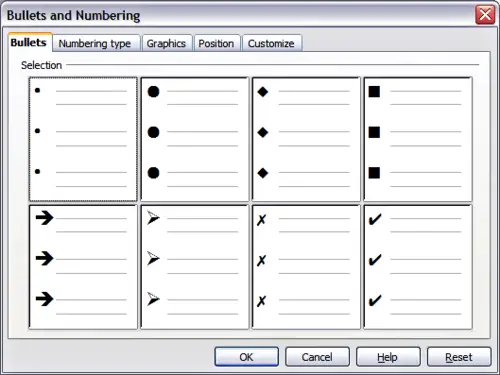
- The Bullets and Numbering dialog box contains five tabs: Bullets, Numbering type, Graphics, Position, and Customize.
- If a bulleted list is needed, select the desired bullet style from the six default styles available on the Bullets page.
- If a graphics style is needed, select one from those available on the Graphics page.
- If a numbered list is needed, select one of the 6 default numbering styles on the Numbering type page.
Later in this section is an explanation on how to add further bullets and numbering styles to the existing ones.
The Bullets and Numbering dialog box
For a single line in the list:
- Click anywhere in the line to place the cursor in it.
- Follow steps 2–4 of the previous instruction set.
If the list was created in an AutoLayout text box, then an alternative way to change the entire list is to modify the Outline styles. Changes made to the outline style will apply to all the slides using them. Sometimes this is what you want; sometimes it is not, so some care must be taken. Follow the procedure to change the Presentation style described in
Modifying a style. The tabs related to list management are the same ones described below.
Bullets, Numbering type and Graphics pages
These three tabs contain predefined formatting for either the bullet type (Bullets and Graphics tabs) or for the numbering. To apply a specific one, it is sufficient to click on the image. A thick border will indicate the selection.
Position page
Use the Position page to fine tune the indentation and spacing of the bullet point and its text. This page is particularly effective when used in combination with the Customize page.
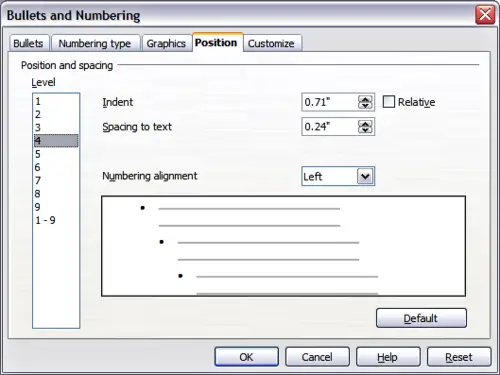
The Position page used to set list indentation
To set up an outline level, first select it from the list on the left hand side of the page. Then set the Indent, which is the spacing between the bullet or number and the text. If you select the Relative option, the indent value will be measured relative to the previous level and not from the margin.
The numbering alignment is only useful when creating a numbered list; use it to specify the alignment of the numbers. For example, you may want to align them to the right to line up one- and two-digit numbers in a pleasing way.
 | To fully appreciate how the Numbering alignment works, try to create a numbered list with more than 10 elements and make sure that enough room has been made for a two (or more) digit number.
|
The Position page is not available if you are modifying a presentation style or graphics style, however the same effects can be obtained by using the Indents and Spacing page of the dialog box for creating or modifying a slide (see Figure 10).
Customize page
Use the Customize page to alter the style of all the outline levels.
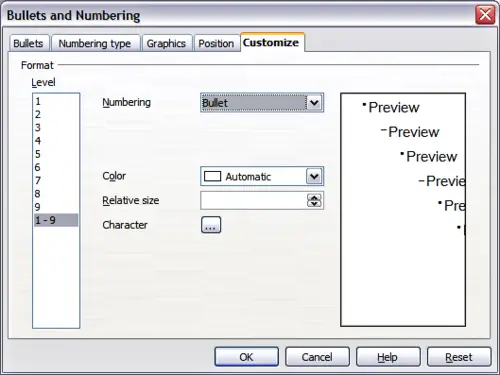
The Customize page for the list outline
The options available on this page depend on the type of marker selected for the list. Select first the level you want to modify on the left hand side of the box. To modify all 9 levels at once, select 1 – 9 as the level. Because the levels are arranged in a hierarchical structure, changing for example the font attribute of one of the levels ripples through all the lower levels.
Depending on the numbering style selected in the Numbering box (bullet, graphic, numbering), some of the following options become available on the page:
- Before: Enter any text to appear before the number (for example, Step).
- After: Enter any text to appear after the number (for example, a punctuation mark).
- Color: Pick the color for the list marker (number or bullet character).
- Relative size: Specify the size of the number relative to the size of the characters in the paragraph of the list.
- Start at: Enter the first value of the list (for example, you might want the list to start at 4 instead of 1).
- Character button: Click this button to select the character for the bullet.
- Graphics selection button: Opens a list of available graphics (Gallery) or allows the selection of a file on the hard disk to be used as marker.
- Width and Height: Specify the dimensions of the graphic marker.
- Keep ratio checkbox: If selected, the ratio between the width and the height of the graphic marker is fixed.
The right hand side of the screen shows a preview of the modifications made.
To revert to the default values, click the Reset button in the bottom right corner.
Using the Customize page, you can create complex structured layouts, for example a nested list with numbering followed by bullets.
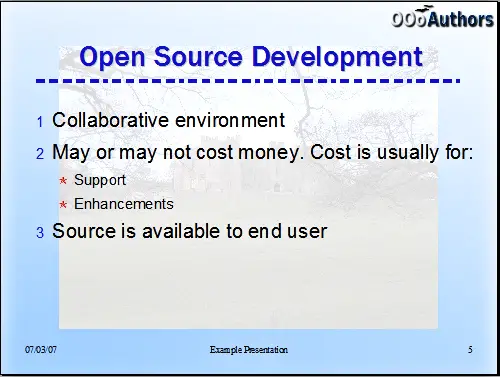
Nested list with mixture of numbers and bullets


