Using the Design View to create a query
Creating a query using Design View is not as hard as it may first seem. It may take multiple steps, but each step is fairly simple.
What fuel economy is our vehicle getting (miles per gallon in the USA)? This question requires creating two queries, with the first query being used as part of the second query.
 | The procedures we will be using only work with relational databases. This is because of how relational databases are constructed. The elements of a relational database are unique. (The primary key insures this uniqueness.) That is, there are no two elements which are exactly alike. This allows us to select specific elements to place into our queries. Without the elements of the relational database being unique from all other elements, we could not perform these procedures.
|
Top of page
Step 1: Open the first query in Design View.
Click Create Query in Design View.
Step 2: Add tables.
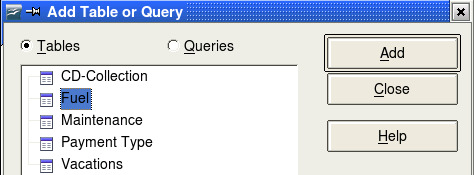
Add Tables or Query window.
- Click Fuel to highlight it.
- Click Add.
- Click Close.
 | Move the cursor over the bottom edge of the fuel table. The cursor become a single arrow with two heads. Drag the bottom of the table to make it longer and easier to see all of the fields in the table.
|
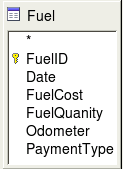
Fuel table in query.
Top of page
Step 3: Add fields to the table at the bottom.
- Double-click the FuelID field in the Fuel table.
- Double-click the Odometer field.
- Double-click the FuelQuantity field.
The table at the bottom of the query window should now have three columns.
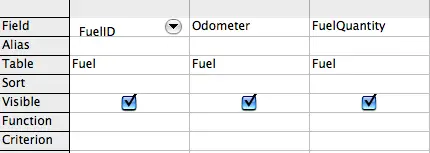
Query table.
Top of page
Step 4: Set the criterion for the query.
We want to the query's FuelID to begin with the numeral 1.
- Type >0 in the Criterion cell under FuelID in the query table
- Click the Run Query icon in the Query Design toolbar. This icon is circled in red below.
-

Query Design toolbar.
The figures below contain the Fuel table with my entries and the query results based upon the Fuel table.
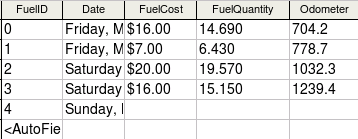
Fuel table.
Step 5: Save and close the query.
Since this query contains the ending odometer reading for our calculations, name it End-Reading when saving it. Then close the query.
Top of page
Step 6: Create the query to calculate the fuel economy.
- Click Create Query in Design View to open a new query.
- Add the Fuel table to the query just as you did in step 2: Add tables. But, do not close the Add Tables window.
- Add the End-Reading query to this query.
- Click the Query radio button to get the list of queries in the database.
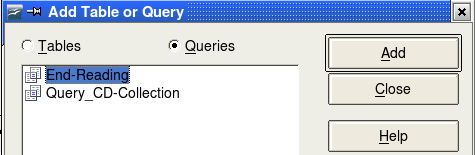
Selecting queries to add to another query.
- Click End-Reading.
- Click Add, and then click Close.
Top of page
Step 7: Add fields to the table at the bottom of the query.
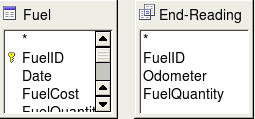
Tables in this query.
We are going to calculate the fuel economy. To do this we need the FuelQuantity and distance traveled. Since the FuelQuantity we want to use is at the ending odometer reading, we will use the End-Reading query to get it. We will also use the Odometer field from the Fuel table and End-Reading query.
- Double-click FuelQuantity in the End-Reading query.
- Double-click Odometer in the End-Reading query.
- Double-click Odometer in the Fuel table.
-
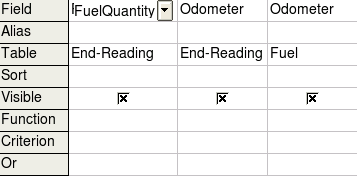
Added fields to the query.
Top of page
Step 8: Enter the FuelID difference field.
We want the difference between the FuelID value of the Fuel table and FuelID value of the End-Reading query to equal one (1).
- Type "End-Reading".FuelID - Fuel.FuelID in the field to the right of the Odometer field of the Fuel Table.
Type the numeral 1 (one) in the Criterion cell of this column.
-
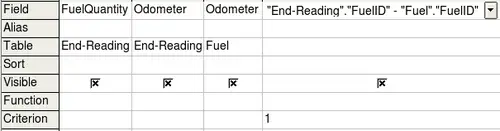
Typing in calculation of fields.
|
| When entering fields for these calculations, you must follow this format: table or query name followed by a period follow by the field name. For hyphenated or multiple-word names (table or query), use double quotes around the table or query name. The query will then add the rest of the double quotes as in the figure above.
Use the arithmetical symbol between the two. More than one calculation can be done by using parentheses to group the arithmetical operations.
|
- Calculate the distance traveled:
- Type "End-Reading".Odometer - Fuel.Odometer in the Field cell.
- Type >0 in the Criterion cell.
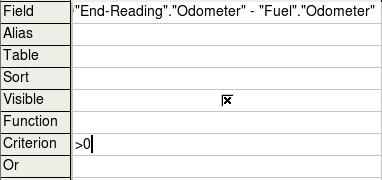
Field for distance traveled calculations.
- Calculate fuel economy:
Type ("End-Reading".Odometer - Fuel.Odometer)/"End-Reading".FuelQuantity in the Field in the next column to the right.
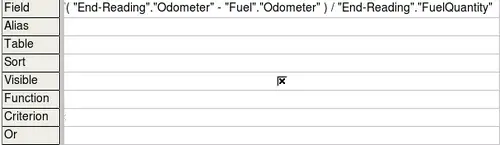
Fuel economy calculation field.
Top of page
Step 9: Run the query and make some modification.
After we run the query to make sure it works correctly, we will hide all of the fields that we do not need.
- Click the Run Query icon in the Design Query toolbar. The results are below.
Notice that not all of the last column label is visible because some of the labels are long. We can fix this problem by using an alias for many of the fields. The labels are replaced by their aliases.

Result of running the fuel economy query.
- Add Aliases: Type in aliases as they are listed below.

Query table with aliases added.
- Run the query again. The results are below.

Query run with aliases.
We really do not need the column showing the difference between the FuelID fields from the table and query. So, we will hide it. While it will not be visible, it will still be used in the calculations.
- Hide a field that does not need to be seen.
Remove the check in the box of the Visible cell.

Making a field invisible in a query run.
- Rerun the query.

Query run with aliases.
Top of page
Step 10: Close, save, and name the query.
My suggestion for a name is Fuel Economy.
There are obviously other calculations that can be made in this query such as cost per distance traveled and how much of the cost belongs to each of the payments types.
 | To fully use queries requires a knowledge of mathematics and specifically set operations (unions, intersections, and, or, complements, and any combinations of these). For example, we listed all of our criteria in one row. That means that all of these criteria have to be met before a row of values will be created in the query. This is how the and operator works on sets.
It also requires having a copy of the Hsqldb User Guide available from
https://hsqldb.org/
|
Top of page


