Using the Wizard to create a form
We will use the Wizard to create two forms: CD Collection and Vacations. The CD Collection form will be a simple form, while the Vacations form will contain a form and a subform. We will create the Vacations form with its subform and let you modify the CD Collection form using the same process.
In the main database window, click the Form icon. Double-click Use Wizard to Create Form to open the wizard. Simple forms require only some of these steps, while more complex forms may use all of them.
Top of page
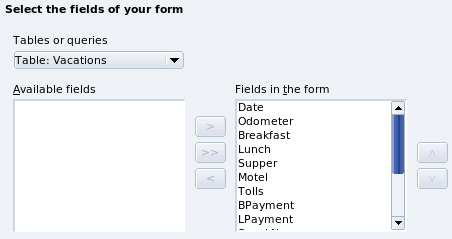
Step 1: Select fields.
- Under Tables or queries, select Vacations as the table. Available fields lists the fields for the Vacations table.
- Click the right double arrow to move all of these fields to the Fields in the form list. Click Next.
-
Form Wizard steps.
Top of page
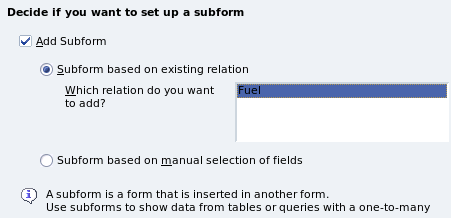
Step 2: Set up a subform.
Since we have already created a relationship between the Fuel and Vacations tables, we will use that relationship. If no relationship had been defined, this would be done in step 4.
- Click the box labeled Add Subform.
- Click the radio button labeled Subform based upon existing relation.
- Fuel is listed as a relation we want to add. So, click Fuel to highlight it, as shown below. Click Next.
-
Adding a subform.
Top of page
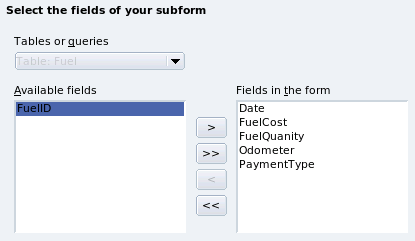
Step 3: Add subform fields.
This step is exactly the same as step 1. The only difference is that not all of the fields will be used in the subform.
- Select Fuel under Tables or queries.
- Use the >> button to move all the fields to the right.
- Click the FuelID field to highlight it.
- Use the < button to move the FuelID to the left.
- Click Next.
-
Selecting fields of a subform.
Top of page
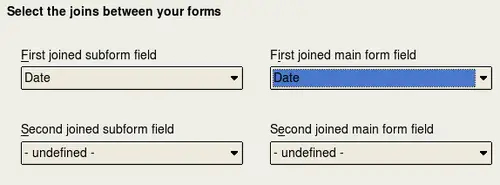
Step 4: Get joined fields.
This step is for tables or queries for which no relationship has been defined. Since we want to list all expenses by the day they occur in both the form and subform, we will join the Date fields of these two tables.
-
Selection of joined subform and main form fields.
- Select Date from the First joined subform field dropdown list. This is the Date field in the Fuel table. This is not the Primary key for the Fuel table, but it is known as a Foreign key.
- Select Date from the First joined main form field dropdown list. This is the Date field in the Vacations table. This is the Primary key for the Vacations table. Click Next.
 | It is possible to create a relationship between two tables that is based upon more than one pair of fields. How to do that and why is discussed in the Base Guide (not yet written).
|
 | When selecting a pair of fields from two tables to use as a relationship, they have to have the same field type. That is why we used the Date field from both tables: both their field types are Date[DATE].
Whether a single pair of fields from two tables are chosen as the relationship or two or more pairs are chosen, certain requirements must be met for the form to work.
- No field from the subform can be the Primary key for its table. (FuelID cannot be used.)
- Each pair of joined fields must have the same file type.
- One of the fields from the main form must be the Primary key for its table. (Date would have to be used.)
|
Top of page
Step 5: Arrange controls.
|
| Each control in a form consists of two parts: label and field. This step in creating the form determines where a control's label and field are placed in relationship with each other. The four choices from left to right are Columnar left, Columnar - Labels on top, As Data Sheet, and In Blocks - Labels Above.
|
- Arrangement of the main form: Click Columnar - Labels on top. The labels will be placed above their field.
- Arrangement of the subform: Click As Data Sheet. (The labels are column headings and the field entries are in spreadsheet format.) Click Next.
-
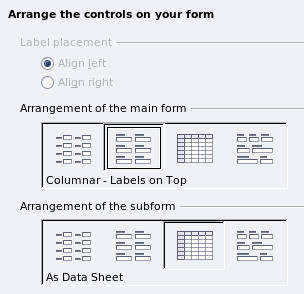
Control arrangements.
Top of page
Step 6: Set data entry.
Unless you have a need for any of these entries to be checked, accept the default settings. Click Next.
Top of page
Step 7: Apply styles.
- Select the color you want in the Apply Styles list. (I chose the beige which is Orange 4 in the Color table.)
- Select the Field border you want. (I prefer the 3-D look. You might want to experiment with the different possible settings.)
- Click Next.
Top of page
Step 8: Set name.
- Enter the name for the form. In this case, it is Fuel.
- Click the circle in from of Modify the form. (This circle is called a radio button.)
- Click Next. The form opens in Edit mode.
Top of page


