This section will detail all the options available to format paragraphs.
To format a paragraph, place the cursor in the paragraph. To format more than
one paragraph at a time, simply select the paragraphs with the mouse or keyboard.
You can format one or more paragraphs one of three ways:
A dialog will appear.
The
Paragraph Settings
dialog consists of five tabbed sections
labeled Indent and Spacing, General Layout, Borders,
Bullets/Numbering, and
Tabulators.
With this dialog box the
spacing between lines, and the spacing between paragraphs can be specified.
The first section of this dialog box is labeled
Indent
, and consists of three spin boxes:
-
Left
-
Enter a value in this box to indent the lines of the selected paragraphs away from the left margin.
The first line is unaffected by this spin box. To
alter the first line, specify that value in the spin box labeled
First Line
.
-
Right
-
Enter a value in this spin box to indent all lines of the selected paragraph
(including the first line) away from the right
margin.
-
First Line
-
Enter a number in this spin box to indent the first line of a paragraph away from the left
margin.
The next section is labeled
Line Spacing
. It
consists of a combo box and a spin box.
The combo box determines the method of calculating the spacing between lines. It has several choices:
-
Single, 1.5 Lines and Double
-
If any of these options are selected, the paragraph will have single, 1 and 1/2 or double spacing respectively.
-
Proportional
-
If this option is selected, the spin box is enabled. When you enter a number in the spin box, KWord uses that number as a multiplier for line spacing. To look at it another way, if you enter 1.00 in this box, KWord will use single spacing. If you enter 2.00 in this box, KWord will use double spacing. If you enter 3.00 in this box, KWord will use triple spacing, etc. You are not limited to whole numbers. You could enter 1.87 in this box and KWord would use 1.87 line spacing.
-
Line Distance
-
If this option is selected, the spin box is enabled. When you enter a number in the spin box, KWord places a measured amount of space between each line. As an example, if you enter 0.75 and the units used by KWord are inches, then KWord will place 0.75 inches between each line.
-
At least
-
This sets the minimum line spacing value. This can be useful if you have paragraphs with widely differing font sizes. Typically, KWord calculates the distance between lines by looking at the tallest character in the line. You can use this feature to overide close linespacing in small font paragraphs to make them even with large font paragraphs. KWord will not cause any fonts to overlap using this spacing technique.
-
Fixed
-
This sets the distance between the tops of each line to a specific unit of measure. If this option is set too small, KWord will overlap characters, which will obscure the bottom parts of the characters.
This should not be confused with
Line Distance
which inserts a specific unit of space between lines.
Fixed
specifies the distance between the top of one line and the top of the next line.
The last section is labeled
Paragraph Space
.
It consists of two entries:
-
Before
-
By entering a value here, additional spacing is added before each paragraph.
-
After
-
By entering a value here, additional spacing is added after each paragraph.
On the right of the dialog box, is a preview box, which will
approximate
the final layout of your
document.
This section determines how the text is placed
within
the line
. With other applications, you may have referred to
this simply as
alignment
, or
justification
.
Once again, a preview pane is shown on the right side of the dialog box.
In the upper left corner of the dialog box is a section labeled
Alignment
.
If
Left
,
Right
or
Center
are selected, the text will
be moved on the line so that it aligns with the left margin, aligns with
the right margin, or is centered between the margins
respectively.
If
Justify
is selected, KWord will increase
the space
between
words, so that each line (with
the exception of the last line in a paragraph), reaches both the left
and right margins.
Tip
You can use toolbar buttons to quickly change the justification of one or more paragraphs
The lower section controls how KWord divides paragraphs when a
paragraph will not fit entirely within the current frame or page.
The first option is labeled
Keep lines
together
. If this option is selected, then all of the lines
of the paragraph will remain on the same page. If this is not selected,
KWord may choose to move part of a paragraph to a new page or frame.
For most work, this option is usually left
unchecked.
The next two options are labeled
Insert Break Before Paragraph
and
Insert Break After Paragraph
.
When one of these options is checked, and the paragraph moves to the
next frame in the frame set, a hard frame break will be inserted in front
of the current paragraph or after the previous paragraph (depending on the option selected).
This will serve to keep the paragraph in the
next frame, even if text prior to that frame is deleted. This option is
often used in conjunction with
Keep lines together
,
to ensure that the paragraph does not creep back onto the page during
editing.
The next section is used to define the background color of the current paragraphs and configure graphical borders
around your paragraphs.
Clicking the color button to the right of
Background color:
, will let you select a color to serve as the background
of your paragraph.
KWord can surround (on some or all sides) a
paragraph with a border. This border can be solid or not, of any color
and of many sizes. This dialog panel is used to adjust the
borders.
-
Style
-
Use this combo box to select the overall type
of the new border.
The choices are previewed in each selection.
-
Width
-
This will determine how wide the resulting border will be. It is
measured in points.
-
Color
-
Clicking on the color bar will allow you to select a color using the color selection dialog
box.
Now that it is determined how the borders should look, specify which edges of the paragraphs need borders.
Tip
It is possible to mix and match border styles, widths and colors in one paragraph.
Simply determine the border style, width and color for one border edge, and select the border
using the border buttons. Now alter the style width or color to create a new border look and click the new border button.
The
Preview
window will show you how your
paragraph borders will look.
A very common element of a document, is a list of items. The list
contains several elements which may be numbered, for easy
reference. Alternatively, the list elements may be simply set off from
the rest of the text with a special character preceding each element. These special characters
are called bullets.
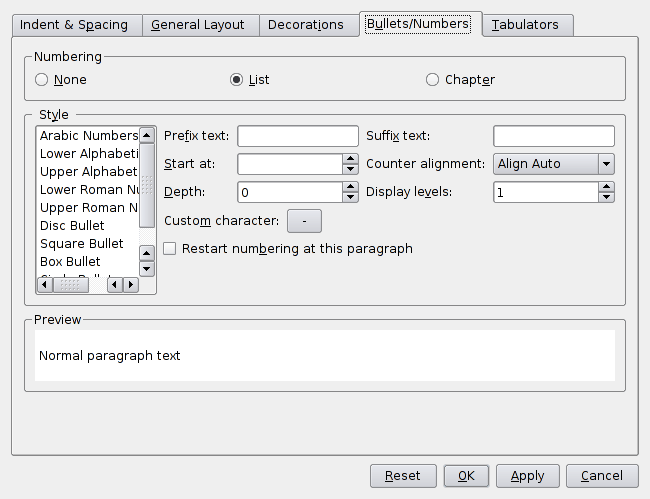
This dialog box is used to define your bullets or the
numbering method of lists in the document. This dialog box can also be used to number chapters and sections.
The top section of the dialog box has three options:
None
,
List
and
Chapter
.
If
None
is selected, the text is not marked as
either a list or a chapter. No other features of this dialog
box will alter the text when this option is chosen.
List
is used to create
lists in the document. These lists are
automatically numbered and formatted to appear similar.
For more information on lists, see the section entitled Lists.
Chapter
is used to
number chapters and sections of a document.
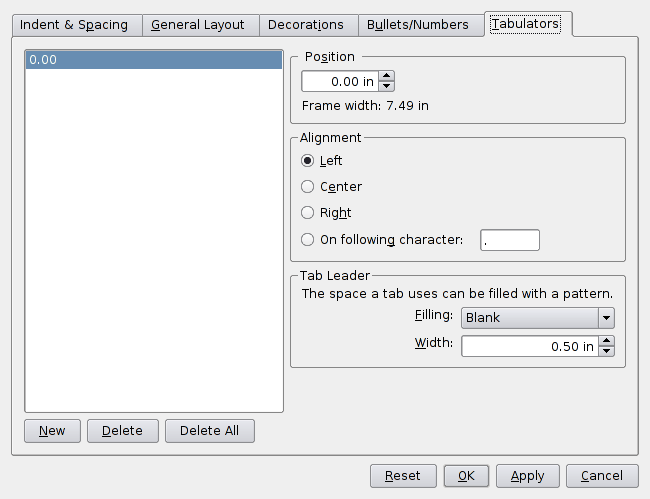
This dialog is used to adjust the tab stops. For more details,
see Using Tab Stops.