When you select Start... from the Capture menu (or use the corresponding
item in the "Main" toolbar), Wireshark pops
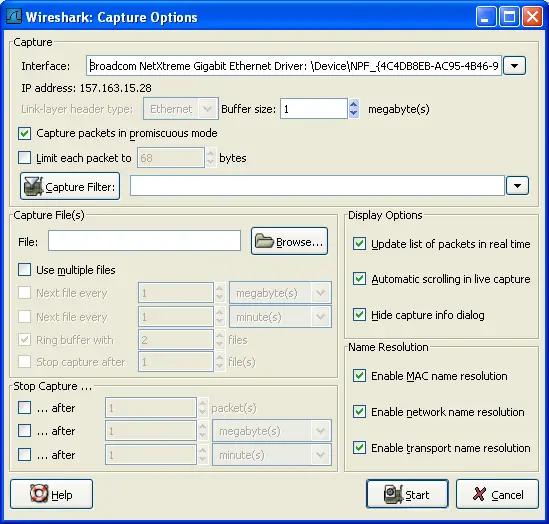
up the "Capture Options" dialog box as shown in
Figure 4.3, “The "Capture Options" dialog box”.
Figure 4.3. The "Capture Options" dialog box
Tip!
If you are unsure which options to choose in this dialog box, just try
keeping the defaults as this should work well in many cases.
You can set the following fields in this dialog box:
4.5.1. Capture frame
Interface
This field specifies the interface you want to capture on.
You can only capture on one interface, and you can only
capture on interfaces that Wireshark has found on the
system. It is a drop-down list, so simply click on the
button on the right hand side and select the interface you
want. It defaults to the first non-loopback interface that
supports capturing, and if there are none, the first
loopback interface. On some systems, loopback interfaces
cannot be used for capturing (loopback interfaces are not available
on Windows platforms).
This field performs the same function as the
-i <interface> command line option.
IP address
The IP address(es) of the selected interface. If no address could
be resolved from the system, "unknown" will be shown.
Link-layer header type
Unless you are in the rare situation that you need this, just keep
the default. For a detailed description, see
Section 4.8, “Link-layer header type”
Buffer size: n megabyte(s)
Enter the buffer size to be used while capturing. This is the size
of the kernel buffer which will keep the captured packets, until
they are written to disk. If you encounter packet drops, try
increasing this value.
Note
This option is only available on Windows platforms.
Capture packets in promiscuous mode
This checkbox allows you to specify that Wireshark
should put the interface in promiscuous mode when capturing.
If you do not specify this, Wireshark will only capture the
packets going to or from your computer (not
all packets on your LAN segment).
Note
If some other process has put the interface in
promiscuous mode you may be capturing in promiscuous
mode even if you turn off this option
This field allows you to specify the maximum amount of
data that will be captured for each packet, and is
sometimes referred to as the snaplen. If disabled,
the default is 65535, which will be sufficient for most
protocols. Some rules of thumb:
If you are unsure, just keep the default value.
If you don't need all of the data in a packet - for example, if you
only need the link-layer, IP, and TCP headers - you might want to
choose a small snapshot length, as less CPU time is required for
copying packets, less buffer space is required for packets, and thus
perhaps fewer packets will be dropped if traffic is very heavy.
If you don't capture all of the data in a packet, you might find that
the packet data you want is in the part that's dropped, or that
reassembly isn't possible as the data required for reassembly is
missing.
Capture Filter
This field allows you to specify a capture filter.
Capture filters are discussed in more details in
Section 4.9, “Filtering while capturing”. It defaults to empty, or
no filter.
You can also click on the button labeled "Capture Filter", and Wireshark
will bring up the Capture Filters dialog box and allow you to create
and/or select a filter. Please see
Section 6.6, “Defining and saving filters”
This field allows you to specify the file name that will be
used for the capture file. This field is left blank by default.
If the field is left blank, the capture data will be stored in a
temporary file, see Section 4.7, “Capture files and file modes” for
details.
You can also click on the button to the right of this field to
browse through the filesystem.
Use multiple files
Instead of using a single file, Wireshark will automatically switch
to a new one, if a specific trigger condition is reached.
Next file every n megabyte(s)
Multiple files only: Switch to the next file after the given
number of byte(s)/kilobyte(s)/megabyte(s)/gigabyte(s) have been
captured.
Next file every n minute(s)
Multiple files only: Switch to the next file after the given
number of second(s)/minutes(s)/hours(s)/days(s) have elapsed.
Ring buffer with n files
Multiple files only: Form a ring buffer of the capture files, with
the given number of files.
Stop capture after n file(s)
Multiple files only: Stop capturing after switching to the next
file the given number of times.
4.5.3. Stop Capture... frame
... after n packet(s)
Stop capturing after the given number of packets have been
captured.
... after n megabytes(s)
Stop capturing after the given number of
byte(s)/kilobyte(s)/megabyte(s)/gigabyte(s) have been captured.
This option is greyed out, if "Use multiple files" is selected.
... after n minute(s)
Stop capturing after the given number of
second(s)/minutes(s)/hours(s)/days(s) have elapsed.
4.5.4. Display Options frame
Update list of packets in real time
This option allows you to specify that Wireshark
should update the packet list pane in real time. If you
do not specify this, Wireshark does not display any
packets until you stop the capture. When you check this,
Wireshark captures in a separate process
and feeds the captures to the display process.
Automatic scrolling in live capture
This option allows you to specify that Wireshark
should scroll the packet list pane as new packets come
in, so you are always looking at the last packet. If you
do not specify this, Wireshark simply adds new packets onto
the end of the list, but does not scroll the packet list
pane. This option is greyed out if
"Update list of packets in real time" is disabled.
This option allows you to control whether or not
Wireshark translates MAC addresses into names, see
Section 7.7, “Name Resolution”.
Enable network name resolution
This option allows you to control whether or not
Wireshark translates network addresses into names, see
Section 7.7, “Name Resolution”.
Enable transport name resolution
This option allows you to control whether or not
Wireshark translates transport addresses into protocols, see
Section 7.7, “Name Resolution”.
4.5.6. Buttons
Once you have set the values you desire and have selected the
options you need, simply click on Start to commence the
capture, or Cancel to cancel the capture.


![[Tip]](wsug_graphics/tip.png)
![[Note]](wsug_graphics/note.png)