|
 |
|
| |
Browser Mode
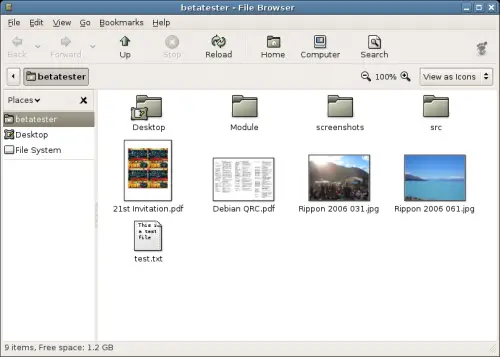
The following section describes how to browse your system using the Nautilus file manager when configured in browser mode. In browser mode, opening a folder updates the current file manager to show the contents of the new folder.
For a comparison of browser mode and spatial mode, see the section called “File Manager Presentation”.
You can access the file browser in the following ways:
Choose ->->. While in spatial mode you may open a folder in browser mode by right clicking on that folder and selecting Browse Folder. A new file browser window will then open and display the contents of the selected folder in the view pane. If nautilus is set to always open browser windows, double clicking any folder will open a browser window, see the section called “Behavior Preferences”.  | Note |
|---|
In some distributions of the GNOME Desktop, the Home toolbar button might have another designation, for example, Documents. |
The File Browser Window Components
Table 6.2, “File Browser Window Components” describes the components of a file
browser window.
Table 6.2. File Browser Window Components
Component |
Description |
Menubar |
Contains menus that you use to perform tasks in the file manager.
You can also open a popup menu from file manager windows. To open this
popup menu right-click in a file manager window. The items in this menu depend
on where you right-click. For example, when you right-click on a file or folder,
you can choose items related to the file or folder. When you right-click on
the background of a view pane, you can choose items related to the display
of items in the view pane.
|
Toolbar |
Contains buttons that you use to perform tasks in the file manager.
Back Returns to the previously visited location. The adjacent drop down list also contains a list of the most recently visited locations to allow you to return to them faster. Performs the opposite function to the Back toolbar item. If you have previously navigated back in time then this button returns you to the present. Up Moves up one level to the parent of the current folder. Reload Refreshes the contents of the current folder. Home Opens your Home Folder. Computer Opens your Computer folder. Search Opens the search bar. |
Location bar |
The location bar is a very powerful tool for navigating your computer. It can appear in three different ways depending on your selection. For more on using the location bar see the section called “Using the Location Bar”. In all three configurations the location bar always contains the following items.
|
|
Side pane
|
Performs the following functions:
To display the side pane, choose ->. The side pane contains a drop-down list that enables
you to choose what to show in the side pane. You can choose from the following
options:
-
Places
Displays places of particular interest.
-
Information
Displays the icon and information about the current folder. Buttons may appear in the side pane, these buttons
enable you to perform actions on the current folder, other than the default action.
-
Tree
Displays a hierarchical representation of your file system. You can
use the Tree to navigate through your files.
-
History
Contains a history list of files, folders, FTP sites, and URIs that
you have recently visited.
-
Notes
Enables you to add notes to your files and folders.
-
Emblems
Contains emblems that you can add to a file or folder.
To close the side pane, click on the X button
at the top right of the side pane.
|
|
View pane
|
Shows the contents of the following:
|
Statusbar |
Displays status information. |
Showing and Hiding File Browser Window Components
To show or hide any of the components of the file browser described in Table 6.2, “File Browser Window Components” select any of the following items from the menu:
To hide the side pane, choose ->. To display the
side pane again, choose -> again. Alternatively you may press F9 to toggle the visibility of the side pane. To hide the toolbar, choose ->. To display the
toolbar again, choose -> again. To hide the location bar, choose ->. To display
the location bar again, choose -> again. To hide the statusbar, choose ->. To display the
statusbar again, choose -> again.
Depending on your selection, the location bar can show either a location field, a button bar, or a search field. Each is useful in different situations and as you become experienced working with the Nautilus file manager you will become proficient at switching between them.
-
Location field
By pressing Ctrl+L or Leading Slash (/) or choosing -> the Location : field will appear and allow you to type the location you wish to browse to manually. To make the location field disappear hit the Esc key. The location field is particularly useful for jumping to a known folder very quickly.
-
Button bar
By default the button bar is shown. Each button represents a folder, by clicking on them you can change your location. You can also drag buttons, for example to another location, in order to copy a folder. The button bar is excellent for jumping quickly between frequently accessed folders.
-
Search bar
By pressing Ctrl+F or selecting the Search toolbar button the search bar appears. For more information on searching see the section called “Searching For Files”. The search bar is excellent for locating files of folders when you are not sure of their exact location.
If you prefer the location field over the button bar you can choose for this to be shown by default. See the section called “Behavior Preferences” for instructions on how to do this.
Displaying Your Home Folder
To quickly display your Home Folder,
perform one of the following actions from a file browser window:
The file browser window displays the contents of your Home Folder.
The contents of a folder can be displayed in either list or icon view by selecting the appropriate item in the location bar View as menu. For more information on the list and icon view see the section called “Using Views to Display Your Files and Folders”
Double-click on the folder in the view pane. Use the Tree in the side pane. For more
information, see the section called “Using the Tree From the Side Pane”. Click on the Location buttons in the location bar.
Press Ctrl+L to show the text Location field, type the path
of the folder that you want to display, then press Return.
The Location field includes an autocomplete feature.
As you type a path, the file manager reads your file system. When you type
enough characters to uniquely identify a directory, the file manager completes
the name of the directory in the Location field. Use the Back toolbar button and the Forward toolbar button to browse through your navigation history. To change to the folder that is one level above the current folder,
choose ->. Alternatively, click on the Up toolbar
button.
Displaying a Parent Folder
The parent folder of the current folder which you are browsing is the one which exists, in a hierarchical representation, one level above the current. To display the contents of parent folder, perform one of the
following steps:
Using the Tree From the Side Pane
The Tree view is one of the most useful features of the side pane. It displays a hierarchical representation of your file system and provides a convenient way to browse and to navigate
your file system. To display the Tree in the side pane, choose from the drop-down list at the top of the side pane.
In the Treeview, open folders are represented as downwards facing arrows.
Table 6.3, “Tree Tasks” describes tasks you can
perform with the Tree, and how to do so.
Table 6.3. Tree Tasks
Task |
Action |
Open the Tree. |
Choose Tree from the drop-down
list at the top of the side pane. |
Close the Tree. |
Choose another item from the drop-down list at the
top of the side pane. |
Expand a folder in the Tree. |
Click on the arrow next to the folder in the Tree. |
Collapse a folder in the Tree. |
Click on the arrow next to the folder in the Tree. |
Display the contents of
a folder in the view pane. |
Select the folder in the Tree. |
Open a file. |
Select the file in the Tree. |
You can set your preferences so that the Tree does
not display files. For more information, see the section called “Views Preferences”.
Using Your Navigation History
The file browser window maintains a history
list of files, folders, FTP sites, and URI locations you have recently visited. You can use the history
list to navigate to quickly return to these places. Your history list contains the last ten items that
you viewed.
To clear your history list choose ->.
Navigating Your History List Using the Go Menu
To display a list of previously-viewed items, choose the menu. Your history list is displayed in the lower part of the menu. To open an item in your history list, simply click on the item.
Navigating Your History List Using the Toolbar
To use the toolbar to navigate your history list, perform one of the
following actions:
To open the folder or URI in your history
list, click on the Back toolbar button. To open the folder or URI in your history list,
click on the Forward toolbar button. To display a list of previously-viewed items, click on the
down arrow to the right of the Back toolbar button.
To open an item from this list, click on the item. To display a list of items that you viewed after you viewed
the current item, click on the down arrow to the right of the Forward toolbar button. To open an item from this list, click
on the item.
Navigating Your History List Using History in the Side Pane
To display the History list in the side pane, choose History from the drop-down list at the top of the side pane. The History list in the side pane displays a list of your previously-viewed
items.
To display an item from your history list in the view pane, double-click on
the item in the History list.
|
|
|