The GIMP is capable of reading and writing a large
variety of graphics file formats. With the exception of
GIMP's native XCF file type, file handling is done by
plug-ins. Thus, it is relatively easy to extend GIMP
to new file types when the need arises.
Not all file types are equally good for all purposes. This part of the
documentation should help you understand the advantages and disadvantages
of each type.
1.1.
Creating new Files
You can create new files in GIMP by using the
following menuitem:
File->New.
This opens the Create a new image dialog,
where you can modify the initial width and height of the file or
using the standard values. More information about this dialog can
be found in Section 5.2, “
New
”.
1.2.
Opening Files
There are several ways of opening an existing image in
GIMP:
Open File
The most obvious is to open it using a menu, by choosing
File->Open
from either the Toolbox menu or an image menu. This brings
up a File Chooser dialog, allowing you to navigate to the
file and click on its name. This method works well if you
know the name of the file you want to open, and where it is
located. It is not so convenient if you want to find the
file on the basis of a thumbnail.
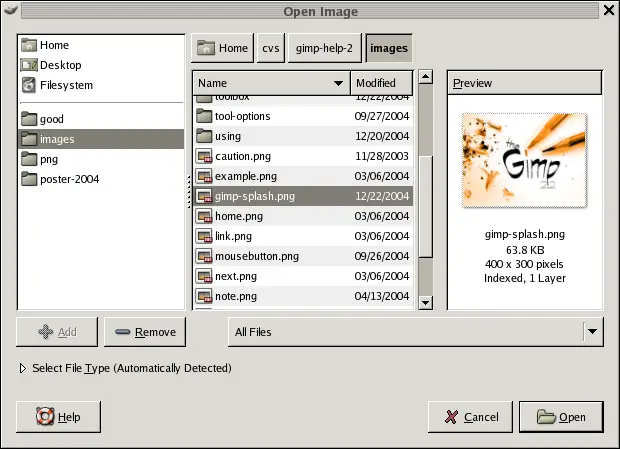
Figure 5.1.
The “File Open” dialog.
GIMP
2.2 introduced a new File Chooser that provides several features to
help you navigate quickly to the file you are looking for. Perhaps
the most important is the ability to create “bookmarks”
for folders that you use often. Your list of bookmarks appears on
the left side of the dialog. The ones at the top (
“Home”, “Desktop”,
etc) come automatically; the others you create using the
“Add”
button at the bottom of the list. Double-clicking on a bookmark
takes you straight to that directory.
At the center of the dialog appears a listing of the contents of the
selected directory. Subdirectories are shown at the top of the list,
files below them. By default all files in the directory are listed,
but you can restrict the listing to image files of a specific type
using the File Type selection menu that appears beneath the
directory listing.
When you click on a file entry in the listing, if it is an image
file, a preview will appear on the right side of the dialog, along
with some basic information about the properties of the image. Note
that previews are cached when they are generated, and there are some
things you can do that may cause a preview to be incorrect. If you
suspect that this may be happening, you can force a new preview to
be generated by holding down the Ctrl key and clicking in the
Preview area.
One thing that strikes many people when they first see the
File Open dialog is that there is no way to enter the name
of the file using the keyboard. Actually this can be done,
but the feature is a bit hidden: if you type
Ctrl-L
with the dialog focused, an "Open Location" dialog pops up,
with a space to type the file name. This dialog is
described in more detail below.
Note
In the great majority of cases, if you select a file name from the
list, and click the “Open” button in the lower right
corner or the dialog, GIMP will automatically
determine the file type for you. On rare occasions, mainly if the
file type is unusual and the name lacks a meaningful extension,
this may fail. If this happens, you can tell
GIMP specifically what type of file it is by
expanding the “Select File Typ” option at the bottom
of the dialog, and choosing an entry from the list that appears.
More commonly, though, if GIMP fails to open an
image file, it is either corrupt or not in a supported format.
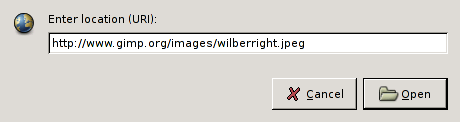
Open Location
If instead of a file name, you have a URI
(i.e., a web address) for the image, you can open it using the
menu, by choosing
File->Open Location
from either the Toolbox menu or an image menu. This brings up a
small dialog that allows you to enter (or paste) the
URI.
Figure 5.2.
The “Open Location” dialog.
The “Open Location” dialog.
Open Recent
If the image is one that you previously created using
GIMP,
perhaps the easiest way to open it is from the menu, using
File->Open Recent.
This gives you a scrollable list of the images you
have most recently worked on in, with icons beside them.
You need only select the one you want, and it will be
opened.
File Browser
If you have associated the file type of the image with
GIMP,
either when you installed GIMP or later, then you can
navigate to the file using a file manager (such as Nautilus
in Linux, or Windows Explorer in Windows), and once you have
found it, double-click on the icon. If things are set up
properly, this will cause the image to open in
GIMP.
Drag and Drop
Alternatively, once you have found the file, you can click on its icon
and drag it into the GIMP Toolbox. (If instead you
drag it into an existing GIMP image, it will be added
to that image as a new layer or set of layers.)
For many applications, you can click on a displayed image (a
full image, not just a thumbnail) and drag it into the
GIMP
toolbox.
Copy and Paste
For some applications, if the application gives you a
way of copying the image to the clipboard, you can then open
the image in GIMP by choosing
File->Acquire->Paste as New
from the Toolbox menu. Support for this is somewhat
variable, however, so your best bet is to try it and see
whether it works.
Image Browser
In Linux, you might want to take a look at a program called
gthumb, an image-management
application that in several ways nicely complements
GIMP. In gthumb,
you can cause an image to open in GIMP
either by right-clicking on the icon and selecting
GIMP from among the list of options, or by
dragging the icon into the GIMP Toolbox.
See the gthumb home
page for more information. Other similar applications :
gqview,
xnview
When you open a file, using the File menu or any other method,
GIMP
needs to determine what type of file it is. Unless there is no
alternative, GIMP
does not simply rely on the extension (such as ".jpg") to determine the
file type, because extensions are not reliable: they vary from system to
system; any file can be renamed to have any extension; and there are
many reasons why a file name might lack an extension. Instead,
GIMP
first tries to recognize a file by examining its contents: most of the
commonly used graphics file formats have "magic headers" that permit
them to be recognized. Only if the magic yields no result does
GIMP resort to using the extension.
1.3.
Saving Files
There are several commands for saving images. A list, and information on
how to use them, can be found in the section covering the
File menu.
GIMP allows you to save the images you create in a
wide variety of formats. It is important to realize that the only
format capable of saving all of the information in
an image, including layers, transparency, etc., is GIMP's native XCF
format. Every other format preserves some image properties and loses
others. When you save an image, GIMP tries to let
you know about this, but basically it is up to you to understand the
capabilities of the format you choose.
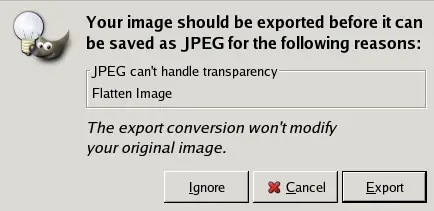
Figure 5.3.
Example of an Export dialog
As stated above, there is no file format, with the exception of GIMP's
native XCF
format, that is capable of storing all the data in a
GIMP
image. When you ask to save an image in a format that will not
completely represent it, GIMP
notifies you of this, tells you what kind of information will be lost,
and asks you whether you would like to "export" the image in a form that
the file type can handle. Exporting an image does not modify the image
itself, so you do not lose anything by doing this.
Note
When you close an image (possibly by
quitting GIMP), you are warned if the image is "dirty"; that is,
if it has been changed without subsequently being saved. Saving
an image in any file format will cause the image to be
considered "not dirty", even if the file format does not
represent all of the information from the image.
Published under the terms of the GNU General Public License


![[Note]](../images/note.png)