Figure 11.52.
From left to right: Original image, FilterPack (more Blue, more
Saturation)
This tool offers you a collection of unified filters to treat the
image. Of course, same functions can be performed by particular
filters, but you have here an interesting, intuitive, overview.
3.16.2.
Starting filter
You can find this filter through
Filters->Colors->Filter Pack.
3.16.3.
Options
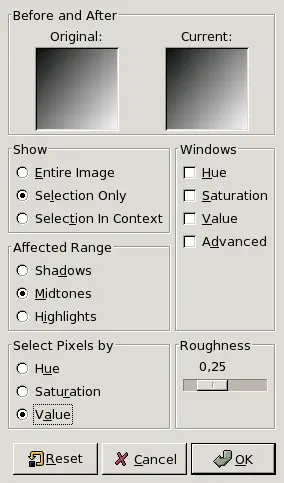
Figure 11.53.
All the options for filter “Filter Pack”
Original and Current previews
Two previews display respectively before treatment and after
treatment images.
Show
Show sets what you want to preview:
Entire image
Selection only: if a selection exists
(default is the whole image).
Selection in context: the selection
within the image.
Windows
You can choose between:
Hue makes one preview for each of the
three primary colors and the three complementary colors of the
RGB color model. By clicking successively on a color, you add
to this color into the affected range, according to Roughness.
To subtract color, click on the opposite color, the
complementary color.
Figure 11.54.
Hue option of the “Filterpack” filter
Saturation: Three previews for more or
less saturation.
Figure 11.55.
The saturation option of the “Filterpack”
filter
Value: Three previews for more or less
luminosity.
Figure 11.56.
Value option of the “Filterpack” filter
Advanced: developed later.
Affected range
Affected Range allows you to set which
brightness you want to work with.
Shadows: dark tones.
Midtones
Highlights: bright tones
Select pixels by
Determines what HSV channel the selected range will affect. You
can choose between:
Hue
Saturation
Value
Roughness
This slider sets how image will change when you click on a
window: taking a short step or a large one (0 - 1).
Advanced Options
Figure 11.57.
Advanced options of the “Filterpack” filter
These advanced options let you work more precisely on the
changes applied to the image and on the preview size.
Preview Size
Something like a zoom on previews. Normal size is 80.
Tip
In spite of Preview Size option, this size is often too
small. You can compensate this by working on an enlarged
selection, for instance a face on a photo. Then, you
invert selection to work on the other part of the image.
Preview as You Drag
FIXME
Smoothness of Aliasing
This option should be called “Importance of changes
”. Here, “aliasing” does not mean as
usually in GIMP: It refers to evolution steps when you
click on previews to increase or reduce the action of the
filter.
The curve in this window represents the importance of the
changes applied to the image. The aspect of this curve
depends on the Affected range you have selected: Shadows,
Midtons or Highlights. You can set the curve amplitude by
using the Roughness slider in the
main window of the filter.
By using the available sliders, you can set precisely set
the form of this action curve.
Published under the terms of the GNU General Public License


![[Tip]](../images/tip.png)

