Selection tools are designed to select regions from images or layers so
you can work on them without affecting the unselected areas. Each tool has
its own individual properties, but the selection tools also share a number
of options and features in common. These common features are described
here; the variations are explained in the following sections for each tool
specifically. If you need help with what a “selection”
is in GIMP, and how it works, see
Selection.
There are six selection tools:
Rectangle Select
Ellipse Select
Free Select (the Lasso)
Select Contiguous Regions (the Magic Wand)
Select by Color
Select Shapes from Image (Intelligent Scissors)
In some ways the Path tool can also be thought of as a selection tool: any
closed path can be converted into a selection. It also can do a great deal
more, though, and does not share the same set of options with the other
selection tools.
2.1.1.
Key modifiers (Defaults)
The behavior of selection tools is modified if you hold down the
Ctrl, Shift, and/or
Alt keys while you use them.
Note
Advanced users find the modifier keys very valuable, but novice users
often find them confusing. Fortunately, it is possible for most
purposes to use the Mode buttons (described below) instead of modifier
keys.
Ctrl
When creating a selection, holding down the
Ctrl key can have two different actions
according to the way you use it:
If you hold down the key before
clicking to start the selection, this
selection will be in Subtraction
mode as long as you press the key.
If you hold down the Ctrl key
after clicking to start the selection,
the effect will depend on the tool you are using.
Alt
Holding Alt will allow movement of the
current selection (only its frame, not its content). If the
whole image is moved instead of the selection only, try
Shift+Alt. Note that the
Alt key is sometimes intercepted by the
windowing system (meaning that GIMP never knows that it was
pressed), so this may not work for everybody.
Shift
When creating a selection, holding down the
Shift key can have two different actions
according to the way you use it:
If you hold down the key before
clicking to start the selection, this
selection will be in Addition
mode as long as you press the key.
If you hold down the Shift key
after clicking to start the selection,
the effect will depend on the tool you are using: for
example, the selection will be a square with the
Rectangle Select tool.
Ctrl-Shift
Using
Ctrl-Shift
together can do a variety of things, depending on which
tool is used. Common to all selection tools is that the
selection mode will be switched to intersection, so that
after the operation is finished, the selection will
consist of the intersection of the region traced out with
the pre-existing selection. It is an exercise for the
reader to play with the various combinations available
when performing selections while holding Ctrl-Shift
and releasing either both or either prior to releasing the
mouse button.
Space bar
Pressing the Space Bar while using a selection
tool transforms this tool into Move tool as long as you press
the bar.
2.1.2.
Options
Here we describe the tool options that apply to all selection tools:
options that apply only to some tools, or that affect each tool
differently, are described in the sections devoted to the individual
tools. The current settings for these options can be seen in the Tool
Options dialog, which you should always have visible when you are using
tools. (Most users keep it docked directly below the Toolbox.) To make
the interface consistent, the same options are presented for all
selection tools, even though some of them don't have any effect for some
of the tools.
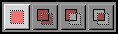
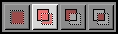
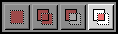
Mode
This determines the way that the selection you create is combined
with any pre-existing selection. Note that the functions performed
by these buttons can be duplicated using modifier keys, as described
above. For the most part, advanced users use the modifier keys;
novice users find the mode buttons easier.
Replace mode will cause any existing selection to be destroyed or
replaced when the new selection is created.
Add mode will cause the new selection to be added to any existing
selection regions.
Subtract mode will remove the new selection area from any existing
selection regions.
Intersection mode will make a new selection from the area where the
existing selection region and the new selection region overlap.
Antialiasing
This option only affects a few of the selection tools: it causes the
boundary of the selection to be drawn more smoothly.
Feather Edges
This options allows the boundary of the selection to be
blurred, so that points near the boundary are only partially
selected. For further information regarding feathering, see
the glossary entry
Feathering.
2.1.3.
Additional information
Note
When moving a selection beyond the boundaries of the image canvas, the
selection will be cropped to the image area. Selections can exist on
the visible canvas only. Selection movements and changes are, however,
kept in the undo buffer should you need to repair an error.
Published under the terms of the GNU General Public License


![[Note]](../images/note.png)