Follow Techotopia on Twitter

On-line Guides
All Guides
eBook Store
iOS / Android
Linux for Beginners
Office Productivity
Linux Installation
Linux Security
Linux Utilities
Linux Virtualization
Linux Kernel
System/Network Admin
Programming
Scripting Languages
Development Tools
Web Development
GUI Toolkits/Desktop
Databases
Mail Systems
openSolaris
Eclipse Documentation
Techotopia.com
Virtuatopia.com
Answertopia.com

How To Guides
Virtualization
General System Admin
Linux Security
Linux Filesystems
Web Servers
Graphics & Desktop
PC Hardware
Windows
Problem Solutions
Privacy Policy


6.5. Texttool

Revision History
Revision $Revision: 1.43 $ 2006-07-03 j.h

Figure 8.77.  The Text tool in Toolbox

The Text tool in Toolbox

The Text tool places text into an image. When you click on an image with this tool the Text Editor dialog is opened where you can type your text, and a text layer is added in the Layer Dialog. In the Text Option dialog, you can change the font, color and size of your text, and justify it, interactively.

6.5.1.  Activate Tool

  • The Text Tool can be called in the following order, from the image-menu: Tools->Text.

  • The Tool can also be called by clicking the tool icon:

  • or by using the T keyboard shortcut.

6.5.2.  Options

Figure 8.78.  Text tool options

Text tool options
Overview

The available tool options for the Texttool can be accessed by double clicking the texttool icon:

Font

There are two ways of selecting fonts in the GIMP. The first is from the image Dialogs/Fonts menu. The second is with the Font selector in this tool. Both methods select from the installed X fonts. When you select a font it is interactively applied to your text.

[Note] Note

You can get special characters in the same way as you get them in other text editors: AltGr + key in Linux, Alt + number key pad in Windows.

Size

This control sets the size of the font in any of several selectable units.

Hinting

Uses the indices of adjustment to modify the characters in order to produce clear letters in small font sizes.

Force Auto-Hinter

Auto Hinter tries to automatically compute information for better representation of the character font.

Antialiasing

Antialiasing will render the text with much smoother edges and curves. This is achieved by slight blurring and merging of the edges. This option can radically improve the visual appearance of the rendered typeface. Caution should be exercised when using antialiasing on images that are not in RGB color space.

Color

Color of the text that will be drawn next. Defaults to black. Selectable from the color picker dialog box that opens when the current color sample is clicked.

[Tip] Tip

You can also click-and-drag the color from the Toolbox color area onto the text.

Justify

Causes the text to be justified according to any of four rules selectable from the associated icons.

Indent

Controls the indent spacing from the left margin.

Line Spacing

Controls the spacing between successive lines of text. This setting is interactive: it appears at the same time in image text. The number is not the space between lines itself, but how many pixels must be added to or substracted from this space (the value can be negative).

Create Path from Text

This tool creates a selection path from the selected text. You can retrieve it later in Path Dialog to modify it.

6.5.3.  Text Editor

Figure 8.79.  The Text Editor options

The Text Editor options
Overview

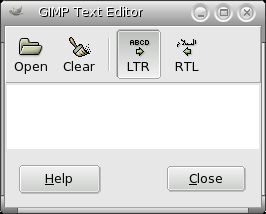
This dialog window is opened when you click on the image with the Text Tool. It's a still basic text editor that nevertheless allows you to write on several lines. Word wrap is not possible - the text layer lengthens gradually - and you have to press the Enter key to move to the next line.

The text you type appears interactively in the image. If the option “Show Layer Boundary” is checked in the View menu, this text will be surrounded with black and yellow dashes that mark the layer boundary. Now look, it's not a selection: if you want to move the text, you must click on the text itself and not inside this frame only.

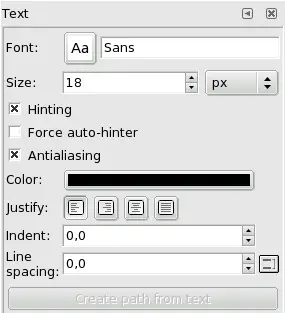
You can correct the text you are writing and you can change the text font with the Font Editor.

You can move the text by using the Move Tool, but you loose the Editor then. You can re-edit this text as you will see now.

As soon as you start writing, a Text layer is created in the Layer Dialog. On an image with such a layer (the image you are working on, or a .xcf image), you can resume text editing by activating this text layer then clicking on it (double click).

To add another text to your image click on a non-text layer: a new Text Editor will appear and a new text layer will be created. To pass from a text to another one activate the corresponding text layer and click on it to activate the editor.

Load Text from File

Text can be loaded from a text file by clicking the folder icon in the text editor.

Clear all Text

Clicking this icon clears the editor and the associated text on the image.

From Left to Right

This option causes text to be entered from left to right, as is the case with most Western languages and may Eastern languages.

From Right to Left

This option allows text to be entered from right to left, as is the case with some Eastern languages, such as Arabic (illustrated in the icon).


  Published under the terms of the GNU General Public License Design by Interspire