The Level tool provides features similar to the Histogram tool but can
also change the intensity range of the active layer or selection.
5.6.1.
Activate Tool
You can call the Level Tool in the following
order, from the image-menu:
Tools->Color Tools->Levels
5.6.2.
Options
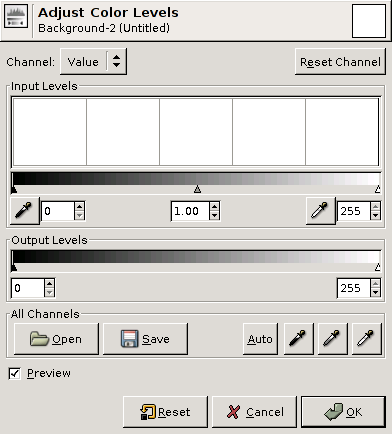
Figure 8.68.
Level tool options
Modify Levels for Channel
You can select the specific channel which will be modified by the
tool: Value makes changes to the luminosity of all pixels in the
image. Color channels allow to change saturation. Alpha channel
works on transparency. Initialize channel
cancels changes to the selected channel.
Input Levels
The main area is a graphic representation of image dark, mid and
light tones content (the Histogram). They are on abscissa from level
0 (black) to level 255 (white). Pixel number for a level is on
ordinate axis. The curve surface represents all the pixels of the
image for the selected channel. A well balanced image is an image
with levels (tones) distributed all over the whole range. An image
with a blue predominant color, for example, will produce a histogram
shifted to the left in Green and Red channels, signified by green
and red lacking on highlights.
Level ranges can be modified in three ways:
Three triangles as sliders: one black for dark tones, one grey
for midtones (often called Gamma value), one white for light
tones.
Two eyedroppers: use the left one to pick the darkest color and
the right one to pick the lightest color on the image. You can
use View/Info Window (Cursor tab) to find these colors.
Three input boxes to enter values directly.
Output Levels
Output Levels allows manual selection of a constrained output level
range. There are also arrow-heads located here that can be used to
interactively change the Output Levels.
All Channels
Open: This button allows you to
select a file holding level settings.
Save: Allows you to save any levels
you have set to a file that can be loaded later.
Auto: Performs an automatic setting
of the levels.
Three eyedroppers:
These three controls determine three points on the grayscale. Any
level below the "Black Point" is black; any point above the "White
Point" is white. The "Gray Point", which must be between the other
two, determines the middle level of Gray. All shades of gray are
calculated from these three levels.
Preview
The Preview button makes all changes to the levels dynamically so
that the new level settings can be viewed straight away.
Tool Options dialog
Although this tool is not present in Tool box, nevertheless it has a
Tool Option Dialog under the Toolbox. These options are described here:
Histogram Scale
These two options have the same action as the logarithmic and Linear
buttons in the Levels dialog.
Sample Average
This slider sets the “radius” of the color-picking
area. This area appears as a more or less enlarged square when
you maintain the click on a pixel.
Published under the terms of the GNU General Public License