In GIMP, a pattern
is a small image used to fill areas by placing copies of side by side. See
the Patterns
section for basic information on patterns and how they can be created and
used.
The Patterns dialog is used to select a pattern, by clicking on it in a
list or grid view: the selected pattern will then be shown in the
Brush/Pattern/Gradient area of the Toolbox. A few dozen more or less
randomly chosen patterns are supplied with GIMP, and you can easily add
new patterns of your own.
3.3.1.
Activate Dialog
The Patterns dialog is a dockable dialog; see the section on
Dialogs and Docking
for help on manipulating it. It can be activated in several ways:
From the Toolbox menu:
File->Dialogs->Patterns.
From the Toolbox menu:
File->Dialogs->Create New Dock->Brushes, Patterns, and Gradients.
This gives you a dock containing three dialogs, with the
Patterns dialog one of them.
From the Toolbox, by clicking on the pattern symbol in the
Brush/Pattern/Gradient area.
From an image menu:
Dialogs->Patterns.
From the Tab menu in any dockable dialog:
Add Tab->Patterns.
From the Tool Options dialog for the Clone tool, by
clicking on the Pattern icon button. This option appears
because the Clone tool is capable of painting with patterns.
3.3.2.
Using the pattern dialog
Grid/List modes
In the Tab menu, you can choose between
View as Grid
and View as List.
In Grid mode, the patterns are laid out in a rectangular array,
making it easy to see many at once and find the one you are
looking for. In List mode, the patterns are lined up in a list,
with the names beside them.
Tip
Independent of the real size of a pattern all patterns are shown
the same size in the dialog. So for larger patterns this means
that you see only a small portion of the pattern in the dialog
at all - no matter whether you view the dialog in the list or
the grid view. To see the full pattern you simply click on the
pattern and hold the mouse button
for a second.
Note
In the Tab menu, the option Preview Size
allows you to adapt the size of pattern previews to your liking.
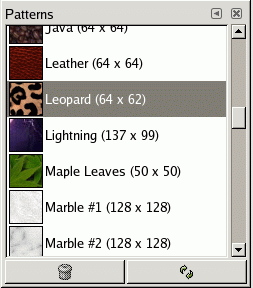
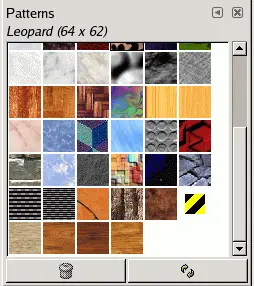
Figure 9.26.
The Patterns dialog
List view
Grid mode
Using the Patterns dialog (Grid mode)
At the top appears the name of the currently selected
patterns, and its dimensions in pixels.
In the center appears a grid view of all available patterns,
with the currently selected one outlined. Clicking on one of
them sets it as GIMP's current pattern, and causes it to
appear in the Brush/Pattern/Gradient area of the Toolbox.
Using the Patterns dialog (List view)
In this view, instead of a grid, you see a list of patterns,
each labeled with its name and size. Clicking on a row in
the list sets that pattern as GIMP's current pattern, just
as it does in the grid view.
If you double-click
on the name of a pattern, you will be able to edit the name.
Note that you are only allowed to rename patterns that you
have added yourself, not the ones that are supplied with
GIMP. If you edit a name that you don't have permission to
change, as soon as you hit return or move to a different
control, the name will revert back to its previous value.
Everything else in the List view works the same way as it
does in the Grid view.
Delete Pattern
Pressing this button removes the pattern from the list and causes
the file representing it to be deleted from disk. Note that you
cannot remove any of the patterns that are supplied with GIMP and
installed in the system patterns
directory; you can only remove patterns that you have added to
folders where you have write permission.
Refresh Patterns
Pressing this button causes GIMP to rescan the folders in your
pattern search path, adding any newly discovered patterns to the
list. This button is useful if you add new patterns to a folder,
and want to make them available without having to restart GIMP.
Published under the terms of the GNU General Public License


![[Tip]](../images/tip.png)
![[Note]](../images/note.png)