Subsections
Chapter
3 described in detail the use of the GIMP's
selection tools; however, that discussion is incomplete. A full
understanding of how to effectively work with selections requires a
discussion on how to integrate masks. This section shows how masks
are complementary to the selection tools and illustrates why the
combination of selections and masks is so powerful.
4.5.1 Using Masks to Refine Selections
Masks are terrific tools for refining selections. A careful
examination of a mask can often reveal several problems.
Figure
4.36
Figure 4.36:
Image Illustrating a Selection
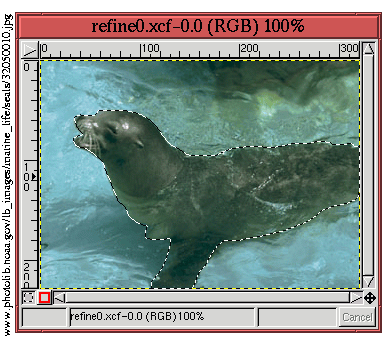 |
illustrates a selection made with the
Bezier Path tool. As will
be seen in a moment, this selection exhibits the three basic types of
selection problems. To better examine these problems, the selection
is converted to a channel mask, and the selection itself is canceled.
The resulting channel mask is shown in Figure
4.37(a),
Figure 4.37:
A Mask Converted from the Selection
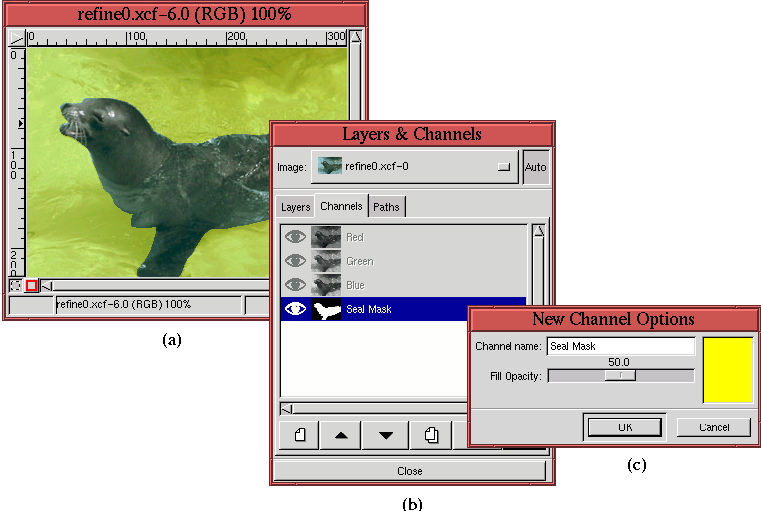 |
and Figure
4.37(b) shows the associated Channels
dialog. Because it is difficult to make out the light blue water
background through a 50% transparent, black channel mask, the color
of the mask has been changed to yellow, as shown in
Figure
4.37(c).
To see the problems associated with the selection, the Zoom tool is used to magnify the image window. This
produces the result shown in Figure
4.38(a).
Figure 4.38:
Illustrating the Three Basic Selection Problems
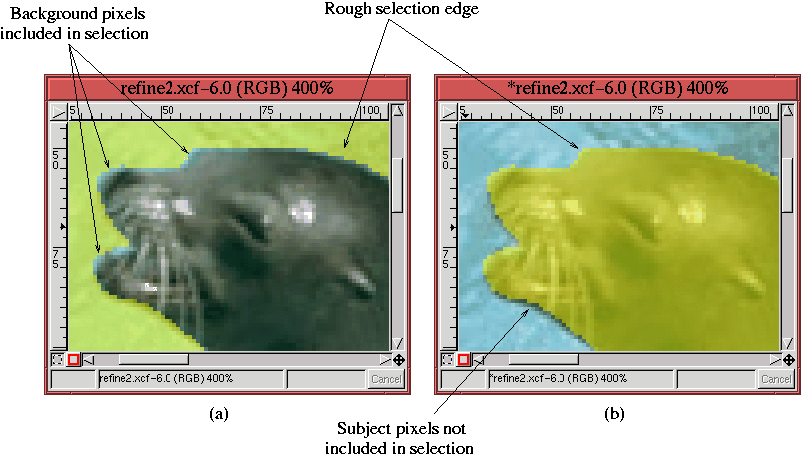 |
This figure shows that in several regions the light blue color of the
background is showing through from around the edges of the yellow
mask. This means that these pixels have been erroneously included as
part of the selection.
Figure
4.38(b) shows the same image as in
Figure
4.38(a), but with the colors of the mask
inverted. The color inversion is done by making the channel mask
active and then using the Invert function found in the Image:Image/Colors menu.
Inverting the colors inverts the regions of the mask that correspond
to selected and unselected pixels in the image. Now it can be seen
that in some places, the dark pixels from the subject are showing
through around the mask edges. This means that they are mistakenly
not included in the set of selected pixels.
Finally, in both Figures
4.38(a) and (b) a
rough-edge, aliasing effect can be seen.
Each of these three problems can be solved by refining the mask. This
can be accomplished using several different methods, but for this type
of fine work near a mask edge, the best choice is the Airbrush tool from the Toolbox. The Airbrush
can apply a very light coat of paint, so it is a great touch-up tool.
Working near the edge requires some blending of the background with
the subject to avoid aliasing. When used with a light pressure the
Airbrush is perfect for this.
Figure
4.39(a)
Figure 4.39:
Introducing the Airbrush Tool
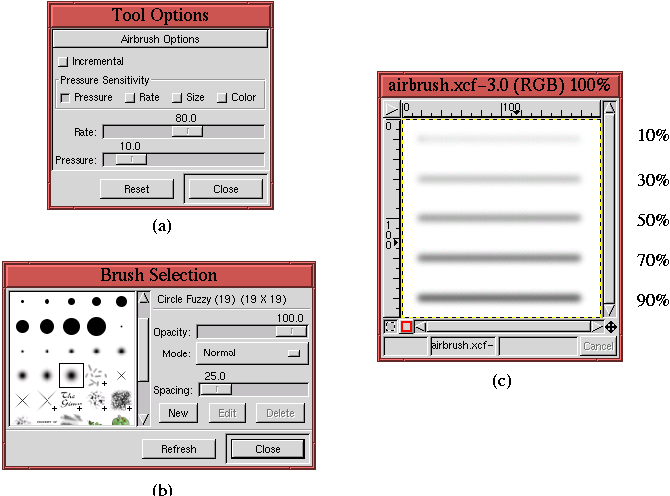 |
shows the
Tool Options dialog
for the
Airbrush. It is the Pressure option that interests us here.
The Pressure slider is in units of percent, and the default value of
10% is shown in Figure
4.39(a). The effect of
using 10% pressure in conjunction with the soft brush chosen in
Figure
4.39(b) produces the top line painted in
Figure
4.39(c). Each of the other lines is painted
with the Pressure value labeled to the right of the line. This figure
shows that, for low pressures, the
Airbrush tool produces a very
light layer of paint, great for touching up imperfect and aliased
edges like the ones seen in Figure
4.38.
Using the Airbrush tool on the problem pixels shown in
Figure
4.38 produces the results shown in
Figure
4.40.
Figure 4.40:
Solving the Three Basic Selection Problems with the Airbrush Tool
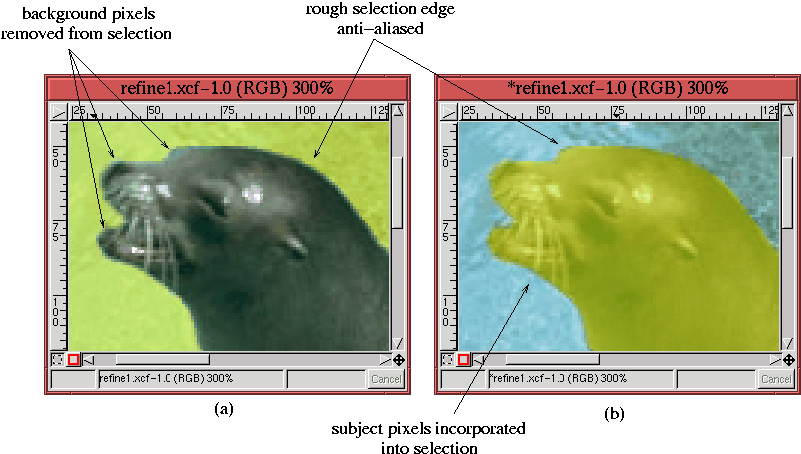 |
The technique used in applying the
Airbrush tool is as follows:
- 1.
- Make the channel mask active.
- 2.
- Use the Zoom tool to magnify the image to a sufficient
resolution so that the paint can be applied to the problem edge areas
with precision.
- 3.
- Set the Active Foreground Color to black by typing d in
the image window.
- 4.
- Lightly apply black paint to the problem areas with the Airbrush
tool. The black paint is useful for removing pixels which should not
be part of the selection.
- 5.
- Invert the mask colors using Invert from the Image:Image/Colors menu, and work the new problem areas. Because of
the inversion of color, now the black paint is useful for including
pixels that should be part of the selection.
- 6.
- Evaluate the precision of the applied paint, and correct for mistakes
by making liberal use of the Undo (C-z) and Redo
(C-r) functions.


